Singer Fashion Mate 5560 5560 Stitch Applications Guide - Page 39
Use a Satin Stitch Foot
 |
View all Singer Fashion Mate 5560 manuals
Add to My Manuals
Save this manual to your list of manuals |
Page 39 highlights
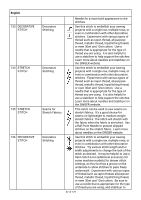
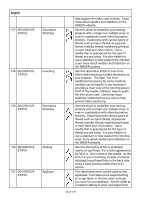
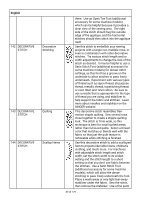
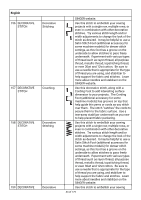
English 142 DECORATIVE STITCH 143 DECORATIVE STITCH 144 DECORATIVE STITCH Decorative Stitching Quilting Scallop Hems there. Use an Open Toe Foot (additional accessory for some machine models) which can be helpful because it provides a clear view of the sewing area. The right side of the stitch should hug the outside edge of the applique, and the horizontal stitches should then stitch into the applique itself. Use this stitch to embellish your sewing projects with a single row, multiple rows, or even in combination with other decorative stitches. Try various stitch length and/or width adjustments to change the look of the stitch as desired. It may be helpful to use a Satin Stitch Foot (additional accessory for some machine models) for denser stitch settings, as this foot has a groove on the underside to allow stitches to pass freely underneath. Experiment with various types of thread such as rayon thread, all-purpose thread, metallic thread, topstitching thread, or even 30wt and 12wt cotton. Be sure to use a needle that is appropriate for the type of thread you are using, and stabilizer to help support the fabric and stitches. Learn more about needles and stabilizer on the SINGER website. This decorative stitch resembles freemotion stipple quilting. Sew several rows close together to create a stipple quilting look. The stitch is 7mm wide, so this technique is best for small quilted areas, rather than full sized quilts. Select a thread color that matches or blends well with the fabric so that just the quilt texture is noticeable when stitching is finished. Use this decorative stitch to add a scalloped hem to projects like table linens, children's clothing, and much more. For machines with adjustable stitch length and stitch width, set the stitch width to its widest setting and the stitch length to a short setting so that you don't see fabric between the stitches. Use a Satin Stitch Foot (additional accessory for some machine models), which will allow the dense stitching to pass freely underneath the foot. Place a wash-away or very light tear-away stabilizer under the fabric. Sew the stitch, then remove the stabilizer. Use a fine point 39 of 179
-
 1
1 -
2
-
3
-
4
-
5
-
6
-
7
-
8
-
9
-
10
-
11
-
12
-
13
-
14
-
15
-
16
-
17
-
18
-
19
-
20
-
21
-
22
-
23
-
24
-
25
-
26
-
27
-
28
-
29
-
30
-
31
-
32
-
33
-
 34
34 -
 35
35 -
 36
36 -
 37
37 -
 38
38 -
 39
39 -
 40
40 -
 41
41 -
 42
42 -
 43
43 -
 44
44 -
45
-
46
-
47
-
48
-
49
-
50
-
51
-
52
-
53
-
54
-
55
-
56
-
57
-
58
-
59
-
60
-
61
-
62
-
63
-
64
-
65
-
66
-
67
-
68
-
69
-
70
-
71
-
72
-
73
-
74
-
75
-
76
-
77
-
78
-
79
-
80
-
81
-
82
-
83
-
84
-
85
-
86
-
87
-
88
-
89
-
90
-
91
-
92
-
93
-
94
-
95
-
96
-
97
-
98
-
99
-
100
-
101
-
102
-
103
-
104
-
105
-
106
-
107
-
108
-
109
-
110
-
111
-
112
-
113
-
114
-
115
-
116
-
117
-
118
-
119
-
120
-
121
-
122
-
123
-
124
-
125
-
126
-
127
-
128
-
129
-
130
-
131
-
132
-
133
-
134
-
135
-
136
-
137
-
138
-
139
-
140
-
141
-
142
-
143
-
144
-
145
-
146
-
147
-
148
-
149
-
150
-
151
-
152
-
153
-
154
-
155
-
156
-
157
-
158
-
159
-
160
-
161
-
162
-
163
-
164
-
165
-
166
-
167
-
168
-
169
-
170
-
171
-
172
-
173
-
174
-
175
-
176
-
177
-
178
-
179
 |
 |