Sony DSC-U30 Operating Instructions - Page 15
How to use the buttons, Setting the date and time, the POWER to turn on
 |
UPC - 027242629042
View all Sony DSC-U30 manuals
Add to My Manuals
Save this manual to your list of manuals |
Page 15 highlights
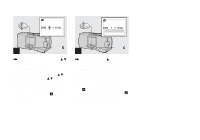
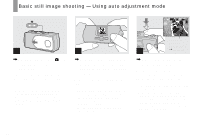
Getting started How to use the buttons Control button EXEC/ MENU To change the current settings of the camera, bring up the menu, and use the control button to make the changes. For each item, press MENU to display the menu and press v/V on the control button to select the desired value, then press EXEC to make the setting. Press MENU, then the menu disappears from the LCD screen. Setting the date and time POWER POWER DATE NOTATION 2003 1 1 12:00:00 AM Y/M/D M/D/Y D/M/Y DATE&TIME SET Y/M/D 2003 1 1 12:00 AM 1 , Slide the lens cover in the direction of the arrow or press the POWER to turn on the power. The POWER lamp (green) lights up and the DATE NOTATION screen appears on the LCD screen. • To change the date and time, press MENU and select [DATE&TIME SET] in [CLOCK SET] under [ ] (page 71), then perform step 3. When the setting is complete, press MENU so that the CLOCK SET screen disappears from the LCD screen. • This operation is available no matter what position the mode switch is in. EXEC/ 2 , Select the desired date display format with v/V on the control button, then press EXEC. Select from [Y/M/D] (year/month/day), [M/D/Y] (month/day/year) or [D/M/Y] (day/month/year). Then DATE&TIME SET screen appears on the LCD screen. • If the rechargeable button battery, which provides the power for saving the time data, is ever fully discharged (page 73), the DATE NOTATION screen will appear again. When this happens, reset the date and time, by starting from step 2. 15
-
 1
1 -
2
-
3
-
4
-
5
-
6
-
7
-
8
-
9
-
 10
10 -
 11
11 -
 12
12 -
 13
13 -
 14
14 -
 15
15 -
 16
16 -
 17
17 -
 18
18 -
 19
19 -
 20
20 -
21
-
22
-
23
-
24
-
25
-
26
-
27
-
28
-
29
-
30
-
31
-
32
-
33
-
34
-
35
-
36
-
37
-
38
-
39
-
40
-
41
-
42
-
43
-
44
-
45
-
46
-
47
-
48
-
49
-
50
-
51
-
52
-
53
-
54
-
55
-
56
-
57
-
58
-
59
-
60
-
61
-
62
-
63
-
64
-
65
-
66
-
67
-
68
-
69
-
70
-
71
-
72
-
73
-
74
-
75
-
76
-
77
-
78
-
79
-
80
-
81
-
82
-
83
-
84
 |
 |
