Sony HDW F900R Operation Manual - Page 66
Changing the Reference Value for Automatic Iris Adjustment
 |
View all Sony HDW F900R manuals
Add to My Manuals
Save this manual to your list of manuals |
Page 66 highlights
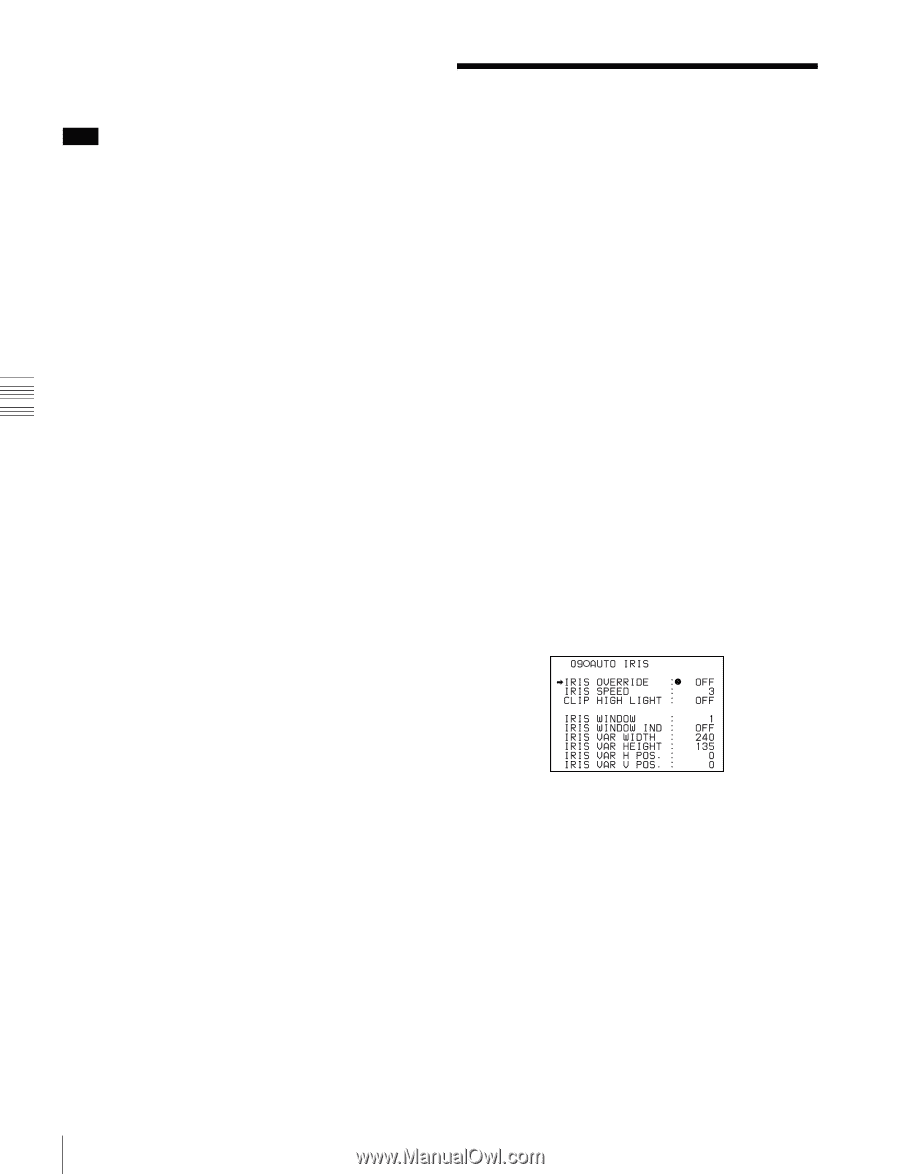
The menu display disappears from the viewfinder screen and the display indicating the current status of the camcorder appears on the viewfinder screen. Note When you set "SHT DISP MODE" (page 159) to "DEG" on the FUNCTION 3 page of the MAINTENANCE menu, the shutter speed indications in seconds (e.g. 1/100) can be changed to degrees (360 is equivalent to shutter OFF). 4-3 Changing the Reference Value for Automatic Iris Adjustment The reference value for automatic iris adjustment can be changed to aid the shooting of clear pictures of back-lit subjects, or to prevent blown-out highlights. The reference value for the lens iris can be set within the following range with respect to the standard value. • 0.25: about 0.25 stop further open • 0.5: about 0.5 stop further open • 0.75: about 0.75 stop further open • 1: about 1 stop further open • -0.25: about 0.25 stop further closed • -0.5: about 0.5 stop further closed • -0.75: about 0.75 stop further closed • -1: about 1 stop further closed Changing the reference value 1 Set the MENU ON/OFF switch to ON. The page accessed last appears. 2 Turn the MENU knob until the AUTO IRIS page appears, then push the MENU knob. Chapter 4 Adjustments and Settings for Recording 66 Changing the Reference Value for Automatic Iris Adjustment 3 Turn the MENU knob to move the b mark to IRIS OVERRIDE, then push the MENU knob. The b mark on the left of the selected item changes to a z mark and the z mark on the left of the setting changes to a ? mark. 4 Turn the MENU knob until ON appears, then push the MENU knob. The z mark on the left of the selected item returns to a b mark and the ? mark on the left of the setting returns to a z mark. The IRIS OVERRIDE item is set to ON (factory setting: OFF). 5 Set the MENU ON/OFF switch to OFF.
-
 1
1 -
2
-
3
-
4
-
5
-
6
-
7
-
8
-
9
-
10
-
11
-
12
-
13
-
14
-
15
-
16
-
17
-
18
-
19
-
20
-
21
-
22
-
23
-
24
-
25
-
26
-
27
-
28
-
29
-
30
-
31
-
32
-
33
-
34
-
35
-
36
-
37
-
38
-
39
-
40
-
41
-
42
-
43
-
44
-
45
-
46
-
47
-
48
-
49
-
50
-
51
-
52
-
53
-
54
-
55
-
56
-
57
-
58
-
59
-
60
-
 61
61 -
 62
62 -
 63
63 -
 64
64 -
 65
65 -
 66
66 -
 67
67 -
 68
68 -
 69
69 -
 70
70 -
 71
71 -
72
-
73
-
74
-
75
-
76
-
77
-
78
-
79
-
80
-
81
-
82
-
83
-
84
-
85
-
86
-
87
-
88
-
89
-
90
-
91
-
92
-
93
-
94
-
95
-
96
-
97
-
98
-
99
-
100
-
101
-
102
-
103
-
104
-
105
-
106
-
107
-
108
-
109
-
110
-
111
-
112
-
113
-
114
-
115
-
116
-
117
-
118
-
119
-
120
-
121
-
122
-
123
-
124
-
125
-
126
-
127
-
128
-
129
-
130
-
131
-
132
-
133
-
134
-
135
-
136
-
137
-
138
-
139
-
140
-
141
-
142
-
143
-
144
-
145
-
146
-
147
-
148
-
149
-
150
-
151
-
152
-
153
-
154
-
155
-
156
-
157
-
158
-
159
-
160
-
161
-
162
-
163
-
164
-
165
-
166
-
167
-
168
-
169
-
170
-
171
 |
 |