Sony HDW F900R Operation Manual - Page 72
Setting the Time Data, 4-5-2 Saving the Actual Time in the Time Code
 |
View all Sony HDW F900R manuals
Add to My Manuals
Save this manual to your list of manuals |
Page 72 highlights
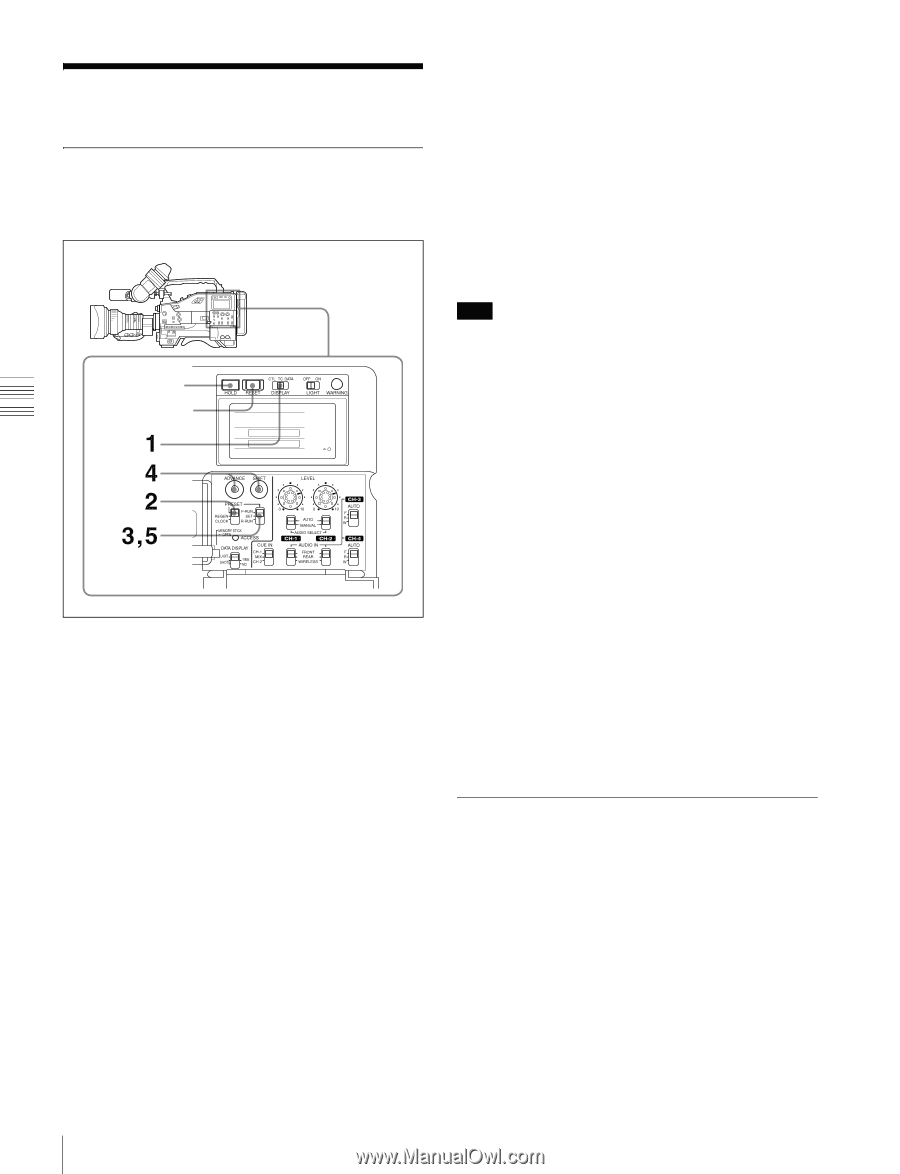
Chapter 4 Adjustments and Settings for Recording 4-5 Setting the Time Data 4-5-1 Setting the Time Code The time code setting range is from 00 : 00 : 00 : 00 to 23 : 59 : 59 : 29 (hours : minutes : seconds : frames). HOLD button RESET button 1 Set the DISPLAY switch to TC. 2 Set the PRESET/REGEN/CLOCK switch to PRESET. 3 Set the F-RUN/SET/R-RUN switch to SET. The first (leftmost) digit of time code flashes. 4 Using the SHIFT and ADVANCE buttons, set the time code. SHIFT: Selects a digit to set. Each time you press the button, the flashing digit moves one column to the right. Pressing this button while holding down the HOLD button moves the flashing digit one column to the left. ADVANCE: Increments the value of the flashing digit. Pressing this button while holding down the HOLD button decrements the flashing digit. To reset the time code value to 00:00:00:00 Press the RESET button. 5 Set the F-RUN/SET/R-RUN switch to F-RUN or R- RUN. F-RUN: Free run. The time code generator keeps running. R-RUN: Recording run. The time code generator runs only while recording. To set drop frame mode/non-drop frame mode You can select the drop frame (DF) mode or non-drop frame (NDF) mode on the FUNCTION 1 page (page 141) of the OPERATION menu or on the TIMECODE page (page 156) of the MAINTENANCE menu. Note This function is effective only when the 59.94i and 29.97PsF frame frequency is selected. To make the time code consecutive When the F-RUN/SET/R-RUN switch is set to R-RUN, recording a number of scenes on the tape normally produces consecutive time code. However, once you remove the tape and record on another tape, the time code will no longer be contiguous when you use the original tape again for recording. In this case, to make the time code consecutive, proceed as follows: 1 Set the PRESET/REGEN/CLOCK switch to REGEN. 2 Use the PLAY button to play back. 3 Watching the playback, find the point of the previous recording on the tape from which you wish to continue recording, then push the STOP button. 4 Press the RET button on the lens. This reads the previous recording and synchronizes the internal time code generator, as a result allowing the new time code recorded to continue consecutively. 4-5-2 Saving the Actual Time in the Time Code Setting the PRESET/REGEN/CLOCK switch to CLOCK saves the actual time in the time code. When it is necessary to set the actual time, use the TIME/ DATE page of the DIAGNOSIS menu. For details, see "5-3-6 Setting the Date/Time of the Internal Clock" on page 98. 72 Setting the Time Data
-
 1
1 -
2
-
3
-
4
-
5
-
6
-
7
-
8
-
9
-
10
-
11
-
12
-
13
-
14
-
15
-
16
-
17
-
18
-
19
-
20
-
21
-
22
-
23
-
24
-
25
-
26
-
27
-
28
-
29
-
30
-
31
-
32
-
33
-
34
-
35
-
36
-
37
-
38
-
39
-
40
-
41
-
42
-
43
-
44
-
45
-
46
-
47
-
48
-
49
-
50
-
51
-
52
-
53
-
54
-
55
-
56
-
57
-
58
-
59
-
60
-
61
-
62
-
63
-
64
-
65
-
66
-
 67
67 -
 68
68 -
 69
69 -
 70
70 -
 71
71 -
 72
72 -
 73
73 -
 74
74 -
 75
75 -
 76
76 -
 77
77 -
78
-
79
-
80
-
81
-
82
-
83
-
84
-
85
-
86
-
87
-
88
-
89
-
90
-
91
-
92
-
93
-
94
-
95
-
96
-
97
-
98
-
99
-
100
-
101
-
102
-
103
-
104
-
105
-
106
-
107
-
108
-
109
-
110
-
111
-
112
-
113
-
114
-
115
-
116
-
117
-
118
-
119
-
120
-
121
-
122
-
123
-
124
-
125
-
126
-
127
-
128
-
129
-
130
-
131
-
132
-
133
-
134
-
135
-
136
-
137
-
138
-
139
-
140
-
141
-
142
-
143
-
144
-
145
-
146
-
147
-
148
-
149
-
150
-
151
-
152
-
153
-
154
-
155
-
156
-
157
-
158
-
159
-
160
-
161
-
162
-
163
-
164
-
165
-
166
-
167
-
168
-
169
-
170
-
171
 |
 |