Sony HDW F900R Operation Manual - Page 98
Setting the Date/Time of the Internal Clock, Operation of the assignable switches
 |
View all Sony HDW F900R manuals
Add to My Manuals
Save this manual to your list of manuals |
Page 98 highlights
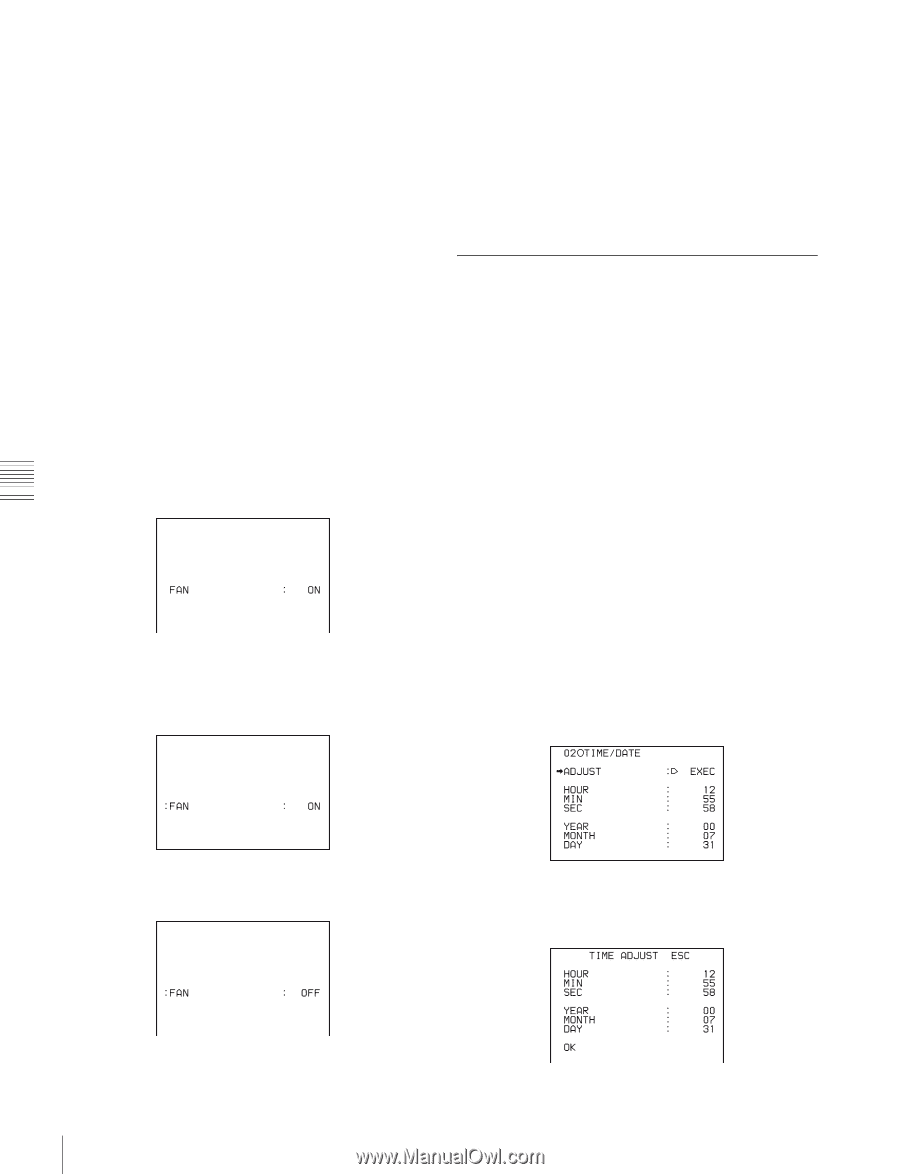
To continue to assign a function to another assignable switch Repeat steps 3 and 4. 5 To end the menu operation, set the MENU ON/OFF switch to OFF. To return to the FUNCTION 1 page Turn the MENU knob to move the b mark to ESC at the top right of the window, then push the MENU knob. Operation of the assignable switches when UA01 to UA10 are assigned The following shows an example of how to use the assignable switch to which the function registered in UA01 to UA10 on the ASSIGN EDIT page has been assigned. In the following example, the FAN ON/OFF function on the FUNCTION 3 page of the MAINTENANCE menu is assigned. 1 Push the corresponding assignable switch. The item and the current setting are displayed on the viewfinder screen. 2 Push the MENU knob while the item and the current setting are displayed. ":" appears at the left of the item. Viewfinder screen display When the function is assigned to the ASSIGN 1 switch (push-type), the display disappears from the viewfinder screen 3 seconds after you perform the last operation. When the function is assigned to the ASSIGN 2 switch (slide-type), the display remains while the ASSIGN 2 switch is set to the ON position (slide it in the direction of the arrow). To make the display disappear, set the switch to OFF. 5-3-6 Setting the Date/Time of the Internal Clock You can set or change the date and time of the internal clock. The date and time set are reflected in the time code. 1 Holding down the MENU knob, move the MENU ON/ OFF switch to ON. The TOP menu appears. 2 Turn the MENU knob to move the b mark to "DIAGNOSIS," then push the MENU knob. If this is the first time the DIAGNOSIS menu has been displayed, the CONTENTS page appears. If the menu has been used before, the page accessed last appears. 3 If the CONTENTS page is displayed, turn the MENU knob to move the b mark to TIME/DATE, then push the MENU knob to display the TIME/DATE page. If a different page is displayed, turn the MENU knob until the TIME/DATE page appears, then push the MENU knob to select that page. The b mark moves to "ADJUST." TIME/DATE page 3 Turn the MENU knob to change the setting while ":" is displayed. 4 Push the MENU knob. The TIME ADJUST setting window appears. Chapter 5 Menu Displays and Detailed Settings 98 Adjustments and Settings from Menus
-
 1
1 -
2
-
3
-
4
-
5
-
6
-
7
-
8
-
9
-
10
-
11
-
12
-
13
-
14
-
15
-
16
-
17
-
18
-
19
-
20
-
21
-
22
-
23
-
24
-
25
-
26
-
27
-
28
-
29
-
30
-
31
-
32
-
33
-
34
-
35
-
36
-
37
-
38
-
39
-
40
-
41
-
42
-
43
-
44
-
45
-
46
-
47
-
48
-
49
-
50
-
51
-
52
-
53
-
54
-
55
-
56
-
57
-
58
-
59
-
60
-
61
-
62
-
63
-
64
-
65
-
66
-
67
-
68
-
69
-
70
-
71
-
72
-
73
-
74
-
75
-
76
-
77
-
78
-
79
-
80
-
81
-
82
-
83
-
84
-
85
-
86
-
87
-
88
-
89
-
90
-
91
-
92
-
 93
93 -
 94
94 -
 95
95 -
 96
96 -
 97
97 -
 98
98 -
 99
99 -
 100
100 -
 101
101 -
 102
102 -
 103
103 -
104
-
105
-
106
-
107
-
108
-
109
-
110
-
111
-
112
-
113
-
114
-
115
-
116
-
117
-
118
-
119
-
120
-
121
-
122
-
123
-
124
-
125
-
126
-
127
-
128
-
129
-
130
-
131
-
132
-
133
-
134
-
135
-
136
-
137
-
138
-
139
-
140
-
141
-
142
-
143
-
144
-
145
-
146
-
147
-
148
-
149
-
150
-
151
-
152
-
153
-
154
-
155
-
156
-
157
-
158
-
159
-
160
-
161
-
162
-
163
-
164
-
165
-
166
-
167
-
168
-
169
-
170
-
171
 |
 |