Sony HDW F900R Operation Manual - Page 99
Selecting a Lens File, To cancel the setting
 |
View all Sony HDW F900R manuals
Add to My Manuals
Save this manual to your list of manuals |
Page 99 highlights
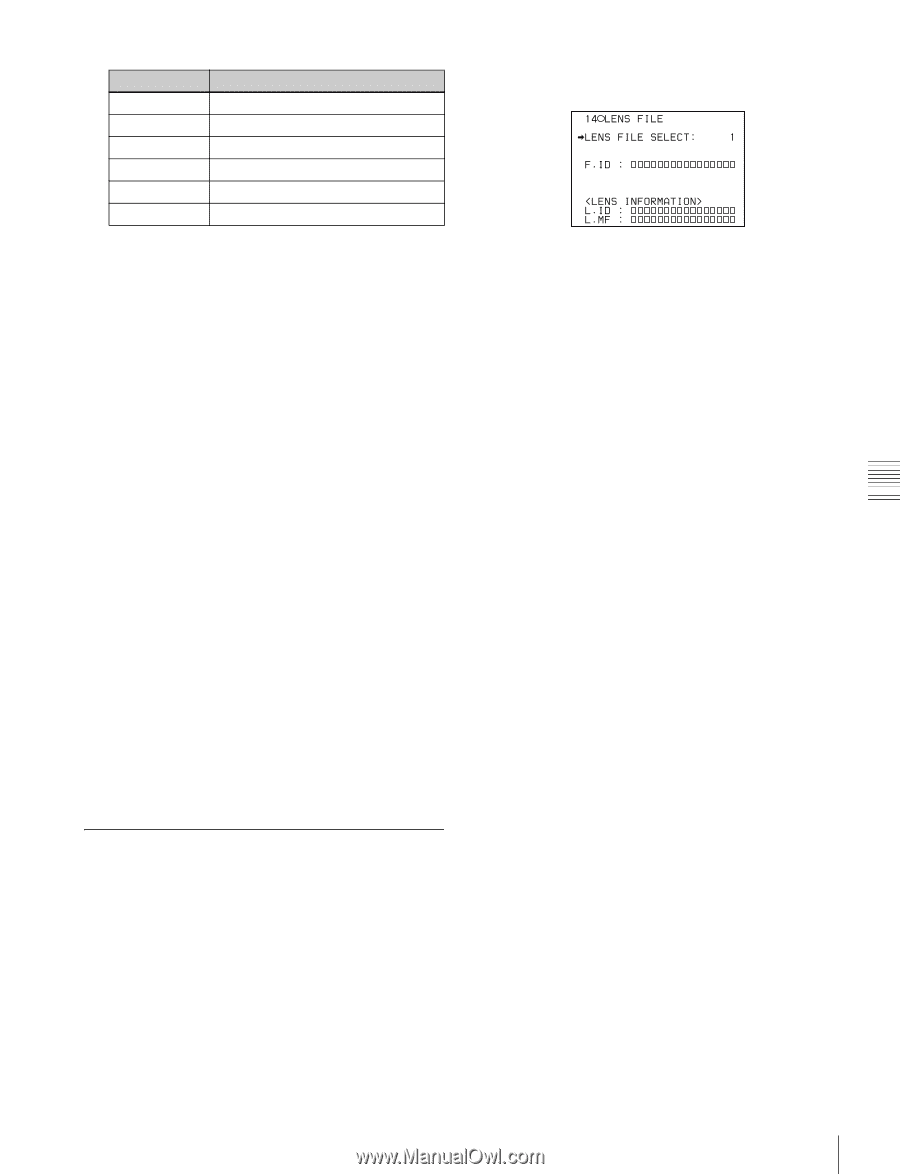
Chapter 5 Menu Displays and Detailed Settings Item HOUR MIN SEC YEAR MONTH DAY Description Sets the hour value. Sets the minutes value. Sets the seconds value. Sets the year. Sets the month. Sets the day. 5 Turn the MENU knob to move the b mark to the item you want to set, then push MENU knob. The b mark on the left of the selected item changes to a z mark, and the z mark on the left of the setting changes to a ? mark. 6 Turn the MENU knob to display the desired value, then push the MENU knob. The z mark returns to a b mark, and the ? mark returns to a z mark. 7 To continue the remaining settings, repeat steps 5 and 6. 8 When you finish making settings, turn the MENU knob to move the b mark to OK, then push the MENU knob. The internal clock is set with the date and time set in steps 5 to 7. The TIME/DATE page of the DIAGNOSIS menu appears again. The time set on the TIME ADJUST setting window is displayed. To cancel the setting Before executing step 8, move the b mark to ESC at the top right of the window then push the MENU knob. Alternatively, push the CANCEL/PRST / ESCAPE switch down to the ESCAPE side. All settings or changes are discarded and the TIME/DATE page of the DIAGNOSIS menu appears. The LENS FILE page shows the file name of the lens file currently selected. 3 Turn the MENU knob to move the b mark to LENS FILE SELECT, then push the MENU knob. The b mark changes to a z mark, and the z mark changes to a ? mark. 4 Turn the MENU knob until the lens file No. in use appears, then push the MENU knob. The z mark returns to a b mark, and the ? mark returns to a z mark. 5 To end the menu operation, set the MENU ON/OFF switch to OFF. 5-3-7 Selecting a Lens File The LENS FILE page of the USER menu allows you to change the lens file according to the lens in use. 1 Set the MENU ON/OFF switch to ON. The menu page accessed last appears on the viewfinder screen. 2 Turn the MENU knob until the LENS FILE page appears, then push the MENU knob to select the page. 99 Adjustments and Settings from Menus
-
 1
1 -
2
-
3
-
4
-
5
-
6
-
7
-
8
-
9
-
10
-
11
-
12
-
13
-
14
-
15
-
16
-
17
-
18
-
19
-
20
-
21
-
22
-
23
-
24
-
25
-
26
-
27
-
28
-
29
-
30
-
31
-
32
-
33
-
34
-
35
-
36
-
37
-
38
-
39
-
40
-
41
-
42
-
43
-
44
-
45
-
46
-
47
-
48
-
49
-
50
-
51
-
52
-
53
-
54
-
55
-
56
-
57
-
58
-
59
-
60
-
61
-
62
-
63
-
64
-
65
-
66
-
67
-
68
-
69
-
70
-
71
-
72
-
73
-
74
-
75
-
76
-
77
-
78
-
79
-
80
-
81
-
82
-
83
-
84
-
85
-
86
-
87
-
88
-
89
-
90
-
91
-
92
-
93
-
 94
94 -
 95
95 -
 96
96 -
 97
97 -
 98
98 -
 99
99 -
 100
100 -
 101
101 -
 102
102 -
 103
103 -
 104
104 -
105
-
106
-
107
-
108
-
109
-
110
-
111
-
112
-
113
-
114
-
115
-
116
-
117
-
118
-
119
-
120
-
121
-
122
-
123
-
124
-
125
-
126
-
127
-
128
-
129
-
130
-
131
-
132
-
133
-
134
-
135
-
136
-
137
-
138
-
139
-
140
-
141
-
142
-
143
-
144
-
145
-
146
-
147
-
148
-
149
-
150
-
151
-
152
-
153
-
154
-
155
-
156
-
157
-
158
-
159
-
160
-
161
-
162
-
163
-
164
-
165
-
166
-
167
-
168
-
169
-
170
-
171
 |
 |