Sony NWZ-X1061FBSMP Operation Guide - Page 125
Format, USB Connection Mode, From the Home menu, select, Settings, Common Settings, Reset/Format
 |
View all Sony NWZ-X1061FBSMP manuals
Add to My Manuals
Save this manual to your list of manuals |
Page 125 highlights
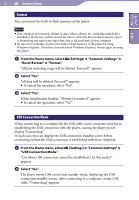
Table of Contents Index 125 Common Settings Format You can format the built-in flash memory of the player. Notes If the memory is formatted, all data (songs, videos, photos, etc., including sample data installed at the factory) will be erased. Be sure to verify the data stored in memory prior to formatting and export any important data to the hard disk of your computer. Be sure not to initialize (format) the built-in flash memory of the player by using Windows Explorer. If you have formatted with Windows Explorer, format again by using the player. From the Home menu, select (Settings) "Common Settings" "Reset/Format" "Format." "All data including songs will be deleted. Proceed?" appears. Select "Yes." "All data will be deleted. Proceed?" appears. To cancel the operation, select "No." Select "Yes." When initialization finishes, "Memory formatted." appears. To cancel the operation, select "No." USB Connection Mode When connecting to a computer by the USB cable, some computers may fail to establishing the USB connection with the player, causing the player to not display "Connecting." In such case, you can display the USB connection standby screen before connecting so that the USB connection is established with more reliability. From the Home menu, select (Settings) "Common Settings" "USB Connection Mode." "Use when USB connection cannot be established. Use this mode?" appears. Select "Yes." The player enters USB connection standby mode, displaying the USB connection standby screen. After connecting to a computer via the USB cable, "Connecting" appears.
-
 1
1 -
2
-
3
-
4
-
5
-
6
-
7
-
8
-
9
-
10
-
11
-
12
-
13
-
14
-
15
-
16
-
17
-
18
-
19
-
20
-
21
-
22
-
23
-
24
-
25
-
26
-
27
-
28
-
29
-
30
-
31
-
32
-
33
-
34
-
35
-
36
-
37
-
38
-
39
-
40
-
41
-
42
-
43
-
44
-
45
-
46
-
47
-
48
-
49
-
50
-
51
-
52
-
53
-
54
-
55
-
56
-
57
-
58
-
59
-
60
-
61
-
62
-
63
-
64
-
65
-
66
-
67
-
68
-
69
-
70
-
71
-
72
-
73
-
74
-
75
-
76
-
77
-
78
-
79
-
80
-
81
-
82
-
83
-
84
-
85
-
86
-
87
-
88
-
89
-
90
-
91
-
92
-
93
-
94
-
95
-
96
-
97
-
98
-
99
-
100
-
101
-
102
-
103
-
104
-
105
-
106
-
107
-
108
-
109
-
110
-
111
-
112
-
113
-
114
-
115
-
116
-
117
-
118
-
119
-
 120
120 -
 121
121 -
 122
122 -
 123
123 -
 124
124 -
 125
125 -
 126
126 -
 127
127 -
 128
128 -
 129
129 -
 130
130 -
131
-
132
-
133
-
134
-
135
-
136
-
137
-
138
-
139
-
140
-
141
-
142
-
143
-
144
-
145
-
146
-
147
-
148
-
149
-
150
-
151
-
152
-
153
-
154
-
155
-
156
-
157
-
158
-
159
-
160
-
161
-
162
-
163
-
164
-
165
-
166
-
167
-
168
-
169
-
170
-
171
-
172
-
173
-
174
-
175
-
176
-
177
-
178
-
179
-
180
-
181
-
182
 |
 |