Sony PCV-RZ56G VAIO User Guide - Page 118
Recording music (from a CD), Jump to Record Window
 |
UPC - 027242642249
View all Sony PCV-RZ56G manuals
Add to My Manuals
Save this manual to your list of manuals |
Page 118 highlights
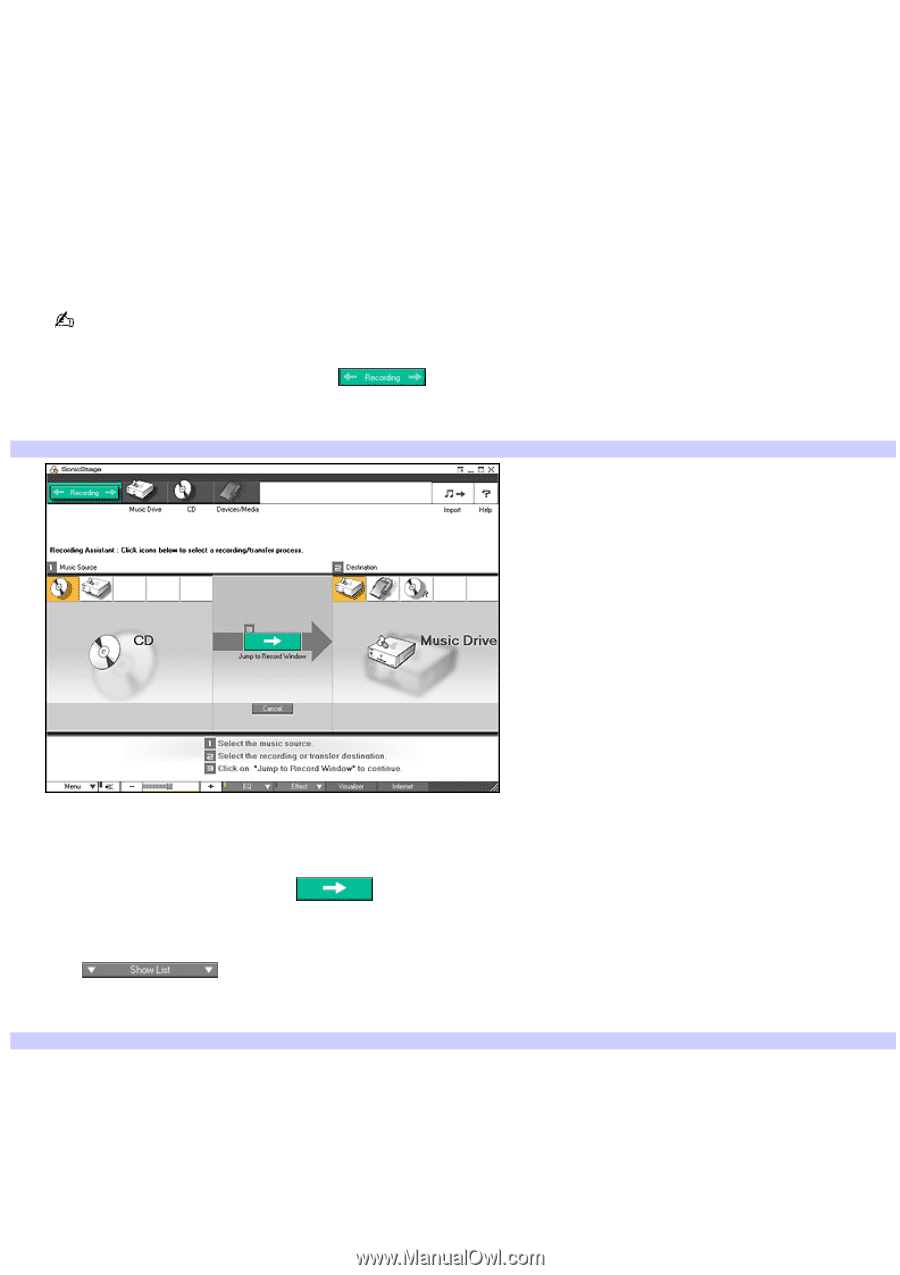
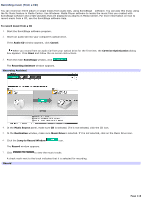
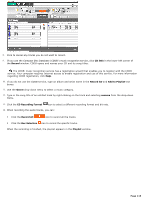
Recording music (from a CD) You can record an entire album or single tracks from audio CDs, using SonicStage software. You can play this music using the My Music feature in Media Center. Use Windows® Media Player software to locate the music files you created with SonicStage software and create playlists that are displayed as albums in Media Center. For more information on how to record music from a CD, see the SonicStage software Help. To record music from a CD 1. Start the SonicStage software program. 2. Insert an audio CD into your computer's optical drive. If the Audio CD window appears, click Cancel. When you record from an audio CD from your optical drive for the first time, the CD Drive Optimization dialog box appears. Click Start and follow the on-screen instructions. 3. From the main SonicStage window, click . The Recording Assistant window appears. Recording Assistant 4. In the Music Source panel, make sure CD is selected. If it is not selected, click the CD icon. 5. In the Destination window, make sure Music Drive is selected. If it is not selected, click on the Music Drive icon. 6. Click the Jump to Record Window icon. The Record window appears. 7. Click to view the music tracks. A check mark next to the track indicates that it is selected for recording. Record Page 118
-
 1
1 -
2
-
3
-
4
-
5
-
6
-
7
-
8
-
9
-
10
-
11
-
12
-
13
-
14
-
15
-
16
-
17
-
18
-
19
-
20
-
21
-
22
-
23
-
24
-
25
-
26
-
27
-
28
-
29
-
30
-
31
-
32
-
33
-
34
-
35
-
36
-
37
-
38
-
39
-
40
-
41
-
42
-
43
-
44
-
45
-
46
-
47
-
48
-
49
-
50
-
51
-
52
-
53
-
54
-
55
-
56
-
57
-
58
-
59
-
60
-
61
-
62
-
63
-
64
-
65
-
66
-
67
-
68
-
69
-
70
-
71
-
72
-
73
-
74
-
75
-
76
-
77
-
78
-
79
-
80
-
81
-
82
-
83
-
84
-
85
-
86
-
87
-
88
-
89
-
90
-
91
-
92
-
93
-
94
-
95
-
96
-
97
-
98
-
99
-
100
-
101
-
102
-
103
-
104
-
105
-
106
-
107
-
108
-
109
-
110
-
111
-
112
-
 113
113 -
 114
114 -
 115
115 -
 116
116 -
 117
117 -
 118
118 -
 119
119 -
 120
120 -
 121
121 -
 122
122 -
 123
123 -
124
-
125
-
126
-
127
-
128
-
129
-
130
-
131
-
132
-
133
-
134
-
135
-
136
-
137
-
138
-
139
-
140
-
141
-
142
-
143
-
144
-
145
-
146
-
147
-
148
-
149
-
150
-
151
-
152
-
153
-
154
-
155
-
156
-
157
-
158
-
159
-
160
-
161
-
162
-
163
-
164
-
165
-
166
-
167
-
168
-
169
-
170
-
171
-
172
-
173
-
174
-
175
-
176
-
177
-
178
-
179
-
180
-
181
-
182
-
183
-
184
-
185
-
186
-
187
-
188
-
189
-
190
-
191
-
192
-
193
-
194
-
195
-
196
-
197
-
198
-
199
-
200
-
201
-
202
-
203
-
204
-
205
-
206
-
207
-
208
-
209
-
210
-
211
-
212
-
213
-
214
-
215
-
216
-
217
-
218
-
219
-
220
-
221
-
222
-
223
-
224
-
225
-
226
-
227
-
228
-
229
-
230
-
231
-
232
-
233
-
234
-
235
-
236
-
237
-
238
-
239
-
240
-
241
-
242
-
243
-
244
-
245
 |
 |