Sony PCV-RZ56G VAIO User Guide - Page 127
Background Music, Video Menu
 |
UPC - 027242642249
View all Sony PCV-RZ56G manuals
Add to My Manuals
Save this manual to your list of manuals |
Page 127 highlights
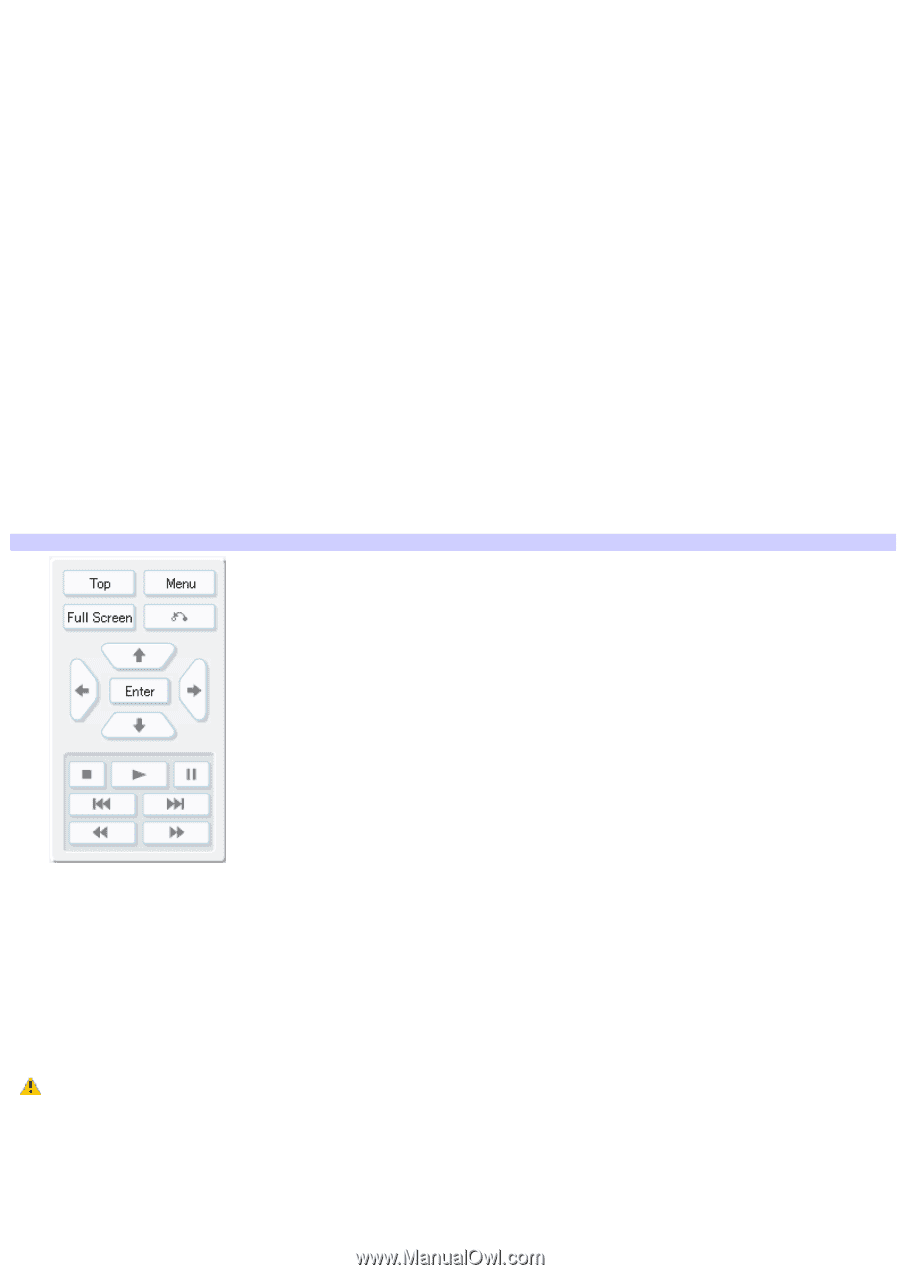
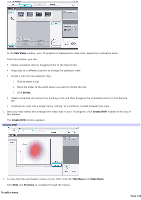
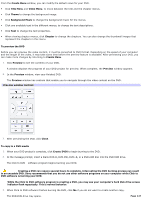
From the Create Menu window, you can modify the default views for your DVD. Click Title Menu and Video Menu, to move between the title and the chapter menus. Click Theme to change the background image. Click Background Music to change the background music for the menus. Click any available text in the different menus, to change the text descriptions. Click Text to change the text properties. When viewing chapter menus, click Chapter to change the chapters. You can also change the thumbnail images that represent the chapters in this menu. To preview the DVD Before you can preview the video content, it must be converted to DVD format. Depending on the speed of your computer and the length of the video, it may take some time before the preview feature is available. After previewing your DVD, you can make more changes by returning to Create Menu. 1. Click Preview to see the contents of your DVD. A window displays the progress of your DVD project for preview. When complete, the Preview window appears. 2. In the Preview window, view your finished DVD. The Preview window has controls that enable you to navigate through the video content on the DVD. Prev iew window controls 3. After previewing the DVD, click Close. To copy to a DVD media 1. When your DVD project is complete, click Create DVD! to begin burning to the DVD. 2. At the message prompt, insert a blank DVD-R, DVD-RW, DVD+R, or a DVD+RW disc into the DVD±RW drive. The Click to DVD software program begins burning your DVD. Creating a DVD can require several hours to complete. Interrupting the DVD burning process can result in an unusable DVD. Sony recommends that you do not use other software programs on your computer while Click to DVD software is burning your DVD. While the Click to DVD software program is creating a DVD, you may see your computer's hard disk drive access indicator flash repeatedly. This is normal behavior. 3. When Click to DVD software finishes burning the DVD, click No if you do not want to create another copy. The DVD±RW drive tray opens. Page 127
-
 1
1 -
2
-
3
-
4
-
5
-
6
-
7
-
8
-
9
-
10
-
11
-
12
-
13
-
14
-
15
-
16
-
17
-
18
-
19
-
20
-
21
-
22
-
23
-
24
-
25
-
26
-
27
-
28
-
29
-
30
-
31
-
32
-
33
-
34
-
35
-
36
-
37
-
38
-
39
-
40
-
41
-
42
-
43
-
44
-
45
-
46
-
47
-
48
-
49
-
50
-
51
-
52
-
53
-
54
-
55
-
56
-
57
-
58
-
59
-
60
-
61
-
62
-
63
-
64
-
65
-
66
-
67
-
68
-
69
-
70
-
71
-
72
-
73
-
74
-
75
-
76
-
77
-
78
-
79
-
80
-
81
-
82
-
83
-
84
-
85
-
86
-
87
-
88
-
89
-
90
-
91
-
92
-
93
-
94
-
95
-
96
-
97
-
98
-
99
-
100
-
101
-
102
-
103
-
104
-
105
-
106
-
107
-
108
-
109
-
110
-
111
-
112
-
113
-
114
-
115
-
116
-
117
-
118
-
119
-
120
-
121
-
 122
122 -
 123
123 -
 124
124 -
 125
125 -
 126
126 -
 127
127 -
 128
128 -
 129
129 -
 130
130 -
 131
131 -
 132
132 -
133
-
134
-
135
-
136
-
137
-
138
-
139
-
140
-
141
-
142
-
143
-
144
-
145
-
146
-
147
-
148
-
149
-
150
-
151
-
152
-
153
-
154
-
155
-
156
-
157
-
158
-
159
-
160
-
161
-
162
-
163
-
164
-
165
-
166
-
167
-
168
-
169
-
170
-
171
-
172
-
173
-
174
-
175
-
176
-
177
-
178
-
179
-
180
-
181
-
182
-
183
-
184
-
185
-
186
-
187
-
188
-
189
-
190
-
191
-
192
-
193
-
194
-
195
-
196
-
197
-
198
-
199
-
200
-
201
-
202
-
203
-
204
-
205
-
206
-
207
-
208
-
209
-
210
-
211
-
212
-
213
-
214
-
215
-
216
-
217
-
218
-
219
-
220
-
221
-
222
-
223
-
224
-
225
-
226
-
227
-
228
-
229
-
230
-
231
-
232
-
233
-
234
-
235
-
236
-
237
-
238
-
239
-
240
-
241
-
242
-
243
-
244
-
245
 |
 |