Sony PDWHR1 User Manual (PDW-HR1 Operation Manual Ed. 1 Rev. 2 for Version 2.0 - Page 19
Audio level adjustment AUDIO MONITOR SELECT audio monitor
 |
View all Sony PDWHR1 manuals
Add to My Manuals
Save this manual to your list of manuals |
Page 19 highlights
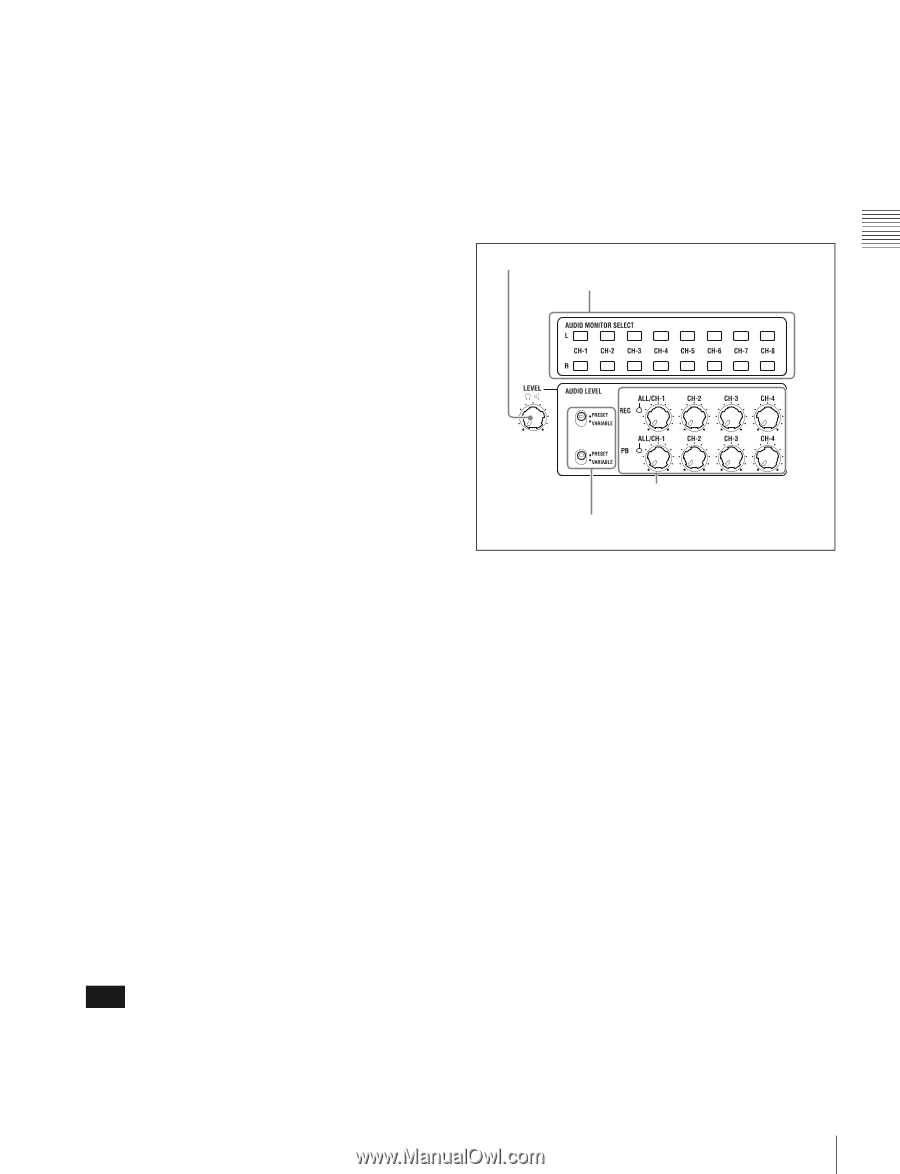
Chapter 2 Names and Functions of Parts Press it again to resume recording or playback. d PREV (previous) button Press this button, turning it on, to show the first frame of the current clip. While the first frame of a clip is shown, pressing this button jumps to the beginning of the previous clip. This button is also used together with other buttons for the following operations. Reverse direction high-speed search: Hold down the PLAY button, and press this button. A high-speed search in the reverse direction is carried out. Displaying the first frame of the first clip: Hold down the SHIFT button, and press this button. e PLAY button Press this button, turning it on, to start playback. When pressed during recording, this button stops recording and selects stop mode. If you do not want to stop recording when this button is pressed, set setup menu item 145 MODE KEY ENABLE DURING RECORDING to "stop & pause". f NEXT button Press this button, turning it on, to jump to the next clip, and show the first frame. This button is also used together with other buttons for the following operations. Forward direction high-speed search: Hold down the PLAY button, and press this button. A high-speed search in the forward direction is carried out. Displaying the last frame of the last clip: Hold down the SHIFT button, and press this button. g STANDBY indicator Lights when the unit is in standby mode (STOP button and, STANDBY indicator lit). After a certain time passes in a disc stop mode, the unit automatically enters standby off mode and the indicator goes off. You can specify the time until the unit enters standby off mode. For details, see the description of setup menu item 501 STILL TIMER (page 145). h STOP button Press this button, turning it on, to stop recording or playback. The frame at the stop point appears. The unit enters standby off mode when you press this button with the SHIFT button held down. It returns from standby off mode to the original state when you press this button again with the SHIFT button held down. (The lit or unlit status of the STOP button does not change.) Note This button flashes when setup menu item 105 REFERENCE SYSTEM ALARM is set to "on" and the correct reference video input signal (as specified by OUT REF on page P1 VIDEO of the function menu) is not being input. This unit can automatically enter standby off mode whenever a specified time elapses in disc stop mode. For details, see the description of setup menu item 501 STILL TIMER (page 145). 4 Audio level adjustment section 1 LEVEL adjustment knob 2 AUDIO MONITOR SELECT buttons 4 ALL/CH-1 and CH-2 to CH-4 adjustment knobs 3 VARIABLE/PRESET switches a LEVEL (volume) adjustment knob Adjusts the volume of headphones or speakers. You can also cause this to simultaneously adjust the output volume from the ANALOG AUDIO OUTPUT 3 and 4 (MONITOR R and L) connectors on the connector panel. To do this, set setup menu item 114 AUDIO MONITOR OUTPUT LEVEL to "var". b AUDIO MONITOR SELECT (audio monitor channel selection) buttons The upper (L) and lower (R) rows each contain buttons for channels 1 to 8 (CH1 to CH8). Press the buttons to select the audio channels to output. The audio is output from the PHONES jack on the control panel, from the speakers, and from the ANALOG AUDIO OUTPUT 3 and 4 (MONITOR R and L) connectors on the connector panel. By pressing multiple buttons in the L and R rows, you can monitor the mixed audio of the selected channels. (To cancel a channel selection, press the button for that channel again.) c VARIABLE/PRESET switches These switches select the settings that determine audio levels for recording (upper switch) and playback (lower switch). VARIABLE: Settings made with the ALL/CH-1 and CH- 2 to CH-4 adjustment knobs. PRESET: Fixed as preset values. 19 Control Panel
-
 1
1 -
2
-
3
-
4
-
5
-
6
-
7
-
8
-
9
-
10
-
11
-
12
-
13
-
 14
14 -
 15
15 -
 16
16 -
 17
17 -
 18
18 -
 19
19 -
 20
20 -
 21
21 -
 22
22 -
 23
23 -
 24
24 -
25
-
26
-
27
-
28
-
29
-
30
-
31
-
32
-
33
-
34
-
35
-
36
-
37
-
38
-
39
-
40
-
41
-
42
-
43
-
44
-
45
-
46
-
47
-
48
-
49
-
50
-
51
-
52
-
53
-
54
-
55
-
56
-
57
-
58
-
59
-
60
-
61
-
62
-
63
-
64
-
65
-
66
-
67
-
68
-
69
-
70
-
71
-
72
-
73
-
74
-
75
-
76
-
77
-
78
-
79
-
80
-
81
-
82
-
83
-
84
-
85
-
86
-
87
-
88
-
89
-
90
-
91
-
92
-
93
-
94
-
95
-
96
-
97
-
98
-
99
-
100
-
101
-
102
-
103
-
104
-
105
-
106
-
107
-
108
-
109
-
110
-
111
-
112
-
113
-
114
-
115
-
116
-
117
-
118
-
119
-
120
-
121
-
122
-
123
-
124
-
125
-
126
-
127
-
128
-
129
-
130
-
131
-
132
-
133
-
134
-
135
-
136
-
137
-
138
-
139
-
140
-
141
-
142
-
143
-
144
-
145
-
146
-
147
-
148
-
149
-
150
-
151
-
152
-
153
-
154
-
155
-
156
-
157
-
158
-
159
-
160
-
161
-
162
-
163
-
164
-
165
-
166
-
167
-
168
-
169
-
170
-
171
-
172
-
173
-
174
-
175
-
176
-
177
-
178
-
179
-
180
-
181
-
182
-
183
-
184
-
185
-
186
-
187
-
188
-
189
-
190
-
191
-
192
-
193
-
194
-
195
-
196
-
197
-
198
-
199
 |
 |