Sony PDWHR1 User Manual (PDW-HR1 Operation Manual Ed. 1 Rev. 2 for Version 2.0 - Page 93
Displaying disc and clip properties in a web browser, To disable the Format Disc command
 |
View all Sony PDWHR1 manuals
Add to My Manuals
Save this manual to your list of manuals |
Page 93 highlights
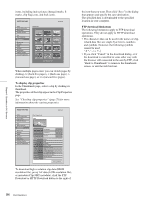
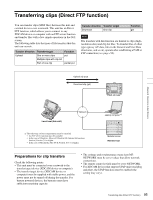
Chapter 5 Operations in GUI Screens To continue by formatting another disc Exchange the disc, select OK, and then press the PUSH SET knob. To exit the formatting screen Press the PUSH SET knob with Exit selected. To disable the Format Disc command To prevent inadvertent disc formatting, resulting in the loss of recorded data, you can disable the Format Disc command. See page 71 for more information about GUI information. 1 Display the Disc Menu. 2 Select Settings, and then press the PUSH SET knob. 3 Select Setting Format Disc, and then press the PUSH SET knob. 4 Select Disable, and then press the PUSH SET knob. Displaying disc and clip properties in a web browser By connecting this unit and a computer over a network, you can display disc properties and clip properties in a web browser installed on the computer (Web Thumbnail function). The Clip Properties page also allows you to download high-resolution clip data, proxy AV data, and metadata from this unit and to save that data on your computer. If the connection succeeds, you will be prompted to enter a user name and a password. 3 Enter your user name and password, and then press the Enter key. The user name and password are set to the following when the unit is shipped from the factory. • User name: admin • Password: Model name ("pdw-hr1") After the user name and password are verified, an XDCAM web page appears. To display disc and clip properties 1 Insert a disc into this unit, and put this unit into the following state. • Recording, playback, search and other disc operations: Stopped • THUMBNAIL button: Off • Disc access by Lock or Delete All Clips, Format Disc, and so on in the Disc Menu: Stopped • FAM or FTP connection for file operations: Disconnected, or logged out 2 Display the XDCAM web pages in the browser of your computer (see the previous section). To display disc properties Click "Disc Properties" in the Disc menu. The disc properties of this unit appear in the Disc Properties page. See "Checking disc properties" (page 90) for more information about the various properties. Recommended browsers The following browsers are recommended. • Internet Explorer 7 1) • Internet Explorer 8 1) 1) This function may not work properly in 32-bit versions of Internet Explorer if you are using a 64-bit version of Microsoft Windows. You should use a 64-bit version of Internet Explorer with 64-bit versions of Windows. To display the unit's XDCAM web pages 1 Connect this unit and a computer to a network (see page 162). 2 Start the browser on the computer, and enter "http://" + IP_address_of_this_unit + "/" in the address bar of the browser, and then press the Enter key. For example, if the IP address of this unit is "192.168.001.010", enter "http://192.168.1.10/". To display clip thumbnails Click "Thumbnails" in the Disc menu. A page of thumbnails of clips on the disc appears. Each thumbnail page displays up to 12 thumbnails. Like the thumbnails in the unit's GUI screens (see page 66), the thumbnails display several information 93 Disc Operations
-
 1
1 -
2
-
3
-
4
-
5
-
6
-
7
-
8
-
9
-
10
-
11
-
12
-
13
-
14
-
15
-
16
-
17
-
18
-
19
-
20
-
21
-
22
-
23
-
24
-
25
-
26
-
27
-
28
-
29
-
30
-
31
-
32
-
33
-
34
-
35
-
36
-
37
-
38
-
39
-
40
-
41
-
42
-
43
-
44
-
45
-
46
-
47
-
48
-
49
-
50
-
51
-
52
-
53
-
54
-
55
-
56
-
57
-
58
-
59
-
60
-
61
-
62
-
63
-
64
-
65
-
66
-
67
-
68
-
69
-
70
-
71
-
72
-
73
-
74
-
75
-
76
-
77
-
78
-
79
-
80
-
81
-
82
-
83
-
84
-
85
-
86
-
87
-
 88
88 -
 89
89 -
 90
90 -
 91
91 -
 92
92 -
 93
93 -
 94
94 -
 95
95 -
 96
96 -
 97
97 -
 98
98 -
99
-
100
-
101
-
102
-
103
-
104
-
105
-
106
-
107
-
108
-
109
-
110
-
111
-
112
-
113
-
114
-
115
-
116
-
117
-
118
-
119
-
120
-
121
-
122
-
123
-
124
-
125
-
126
-
127
-
128
-
129
-
130
-
131
-
132
-
133
-
134
-
135
-
136
-
137
-
138
-
139
-
140
-
141
-
142
-
143
-
144
-
145
-
146
-
147
-
148
-
149
-
150
-
151
-
152
-
153
-
154
-
155
-
156
-
157
-
158
-
159
-
160
-
161
-
162
-
163
-
164
-
165
-
166
-
167
-
168
-
169
-
170
-
171
-
172
-
173
-
174
-
175
-
176
-
177
-
178
-
179
-
180
-
181
-
182
-
183
-
184
-
185
-
186
-
187
-
188
-
189
-
190
-
191
-
192
-
193
-
194
-
195
-
196
-
197
-
198
-
199
 |
 |
