Sony PDWHR1 User Manual (PDW-HR1 Operation Manual Ed. 1 Rev. 2 for Version 2.0 - Page 20
Editing operation AUTO EDIT button - mk1
 |
View all Sony PDWHR1 manuals
Add to My Manuals
Save this manual to your list of manuals |
Page 20 highlights
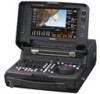
Chapter 2 Names and Functions of Parts d ALL/CH-1 and CH-2 to CH-4 adjustment knobs These knobs adjust the audio levels of channels 1 to 4 (CH1 to CH-4). The knobs in the upper row adjust recording levels, and the knobs in the lower row adjust playback levels. These settings are enabled when the corresponding VARIABLE/PRESET switch is set to VARIABLE. You can use the function menu to adjust channels 5 to 8. For details, see page 52. Setup menu item 131 AUDIO VOLUME allows you to enable simultaneous adjustment of all eight channels with the ALL/CH-1 knob. The ALL indicator lights when simultaneous adjustment is enabled. 5 Editing operation section 1 EDIT button 2 RECALL button 3 DELETE button 4 GOTO button 5 - and + TRIM buttons q; ENTRY button 9 IN and OUT buttons 8 UNDO button 7 AUTO EDIT button 6 PREVIEW button a EDIT button Switches to the edit list editing screen (see page 102). Note The scene selection function is disabled in the edit list editing screens. b RECALL button When pressed together with the IN button or the OUT button after deleting the In or Out point of a clip or sub clip, recalls the In or Out point. When pressed in the EDIT LIST screen, switches to the Clip List (Trim) screen, so that you can trim the positions of In and Out points (see page 111). c DELETE button Deletes an In or Out point in a clip or sub clip. Delete the point (if it exists) by holding down the IN or OUT button and pressing this button. d GOTO button Jumps to an In or Out point in a clip or sub clip. Jump to the point (if it exists) by holding down the IN or OUT button and pressing this button. e - and + TRIM buttons Trim an In or Out point in a clip or sub clip. Trim the point (if it exists) by holding down the IN or OUT button and pressing the [-] or [+] button. The In or Out point moves one frame forward or back. When an edit list editing screen is displayed, the + TRIM and - TRIM buttons enlarge or reduce the time scale of the timeline. When a sub clip is selected in an edit list editing screen, these buttons function as trim buttons for audio split editing (see page 114) if you press them while holding down the GOTO button. Note Audio split editing function is enabled when the PDBZUPG03 Software Upgrade Key or PDBK-MK1 option board is installed. f PREVIEW button Flashes when preview is possible. The editing screen switches to full-screen mode and one of the following sections are played back, depending on the screen that was displayed when you pressed the button. RECORDER mode screen: The editing section, including preroll and postroll sections. PLAYER mode screen: The editing section only. Note When PLAYER SEL in the Edit Menu is set to "external" and EDIT MODE is set to "insert", the postroll section is not played, even if you press the button in RECORDER mode. g AUTO EDIT button Flashes when auto editing is possible. Updates an edit list by adding material in the specified editing mode at the location specified by an edit point. When two edit points or less have been set, the editing screen changes into full-screen playback of a section until the edit section is confirmed, including the preroll and postroll sections. Note The preroll and postroll sections are not played when PLAYER SEL in the Edit Menu is set to "external". 20 Control Panel
-
 1
1 -
2
-
3
-
4
-
5
-
6
-
7
-
8
-
9
-
10
-
11
-
12
-
13
-
14
-
 15
15 -
 16
16 -
 17
17 -
 18
18 -
 19
19 -
 20
20 -
 21
21 -
 22
22 -
 23
23 -
 24
24 -
 25
25 -
26
-
27
-
28
-
29
-
30
-
31
-
32
-
33
-
34
-
35
-
36
-
37
-
38
-
39
-
40
-
41
-
42
-
43
-
44
-
45
-
46
-
47
-
48
-
49
-
50
-
51
-
52
-
53
-
54
-
55
-
56
-
57
-
58
-
59
-
60
-
61
-
62
-
63
-
64
-
65
-
66
-
67
-
68
-
69
-
70
-
71
-
72
-
73
-
74
-
75
-
76
-
77
-
78
-
79
-
80
-
81
-
82
-
83
-
84
-
85
-
86
-
87
-
88
-
89
-
90
-
91
-
92
-
93
-
94
-
95
-
96
-
97
-
98
-
99
-
100
-
101
-
102
-
103
-
104
-
105
-
106
-
107
-
108
-
109
-
110
-
111
-
112
-
113
-
114
-
115
-
116
-
117
-
118
-
119
-
120
-
121
-
122
-
123
-
124
-
125
-
126
-
127
-
128
-
129
-
130
-
131
-
132
-
133
-
134
-
135
-
136
-
137
-
138
-
139
-
140
-
141
-
142
-
143
-
144
-
145
-
146
-
147
-
148
-
149
-
150
-
151
-
152
-
153
-
154
-
155
-
156
-
157
-
158
-
159
-
160
-
161
-
162
-
163
-
164
-
165
-
166
-
167
-
168
-
169
-
170
-
171
-
172
-
173
-
174
-
175
-
176
-
177
-
178
-
179
-
180
-
181
-
182
-
183
-
184
-
185
-
186
-
187
-
188
-
189
-
190
-
191
-
192
-
193
-
194
-
195
-
196
-
197
-
198
-
199
 |
 |
