Sony PEG-T615C Operating Instructions (primary manual) - Page 59
Using the Address Book menus, Record menus
 |
UPC - 027242598119
View all Sony PEG-T615C manuals
Add to My Manuals
Save this manual to your list of manuals |
Page 59 highlights
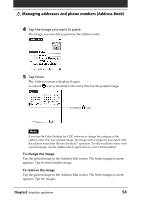
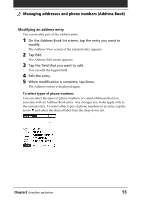
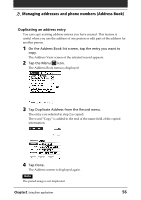
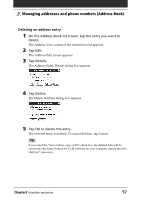
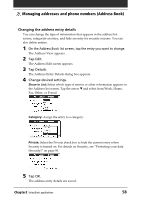
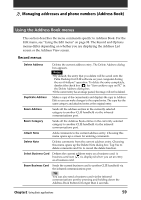
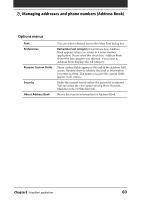
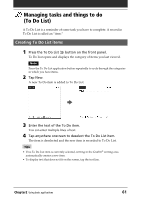
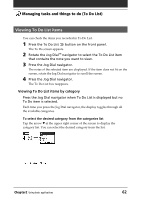
Managing addresses and phone numbers (Address Book) Using the Address Book menus This section describes the menu commands specific to Address Book. For the Edit menu, see "Using the Edit menu" on page 98. The Record and Options menus differ depending on whether you are displaying the Address List screen or the Address View screen. Record menus Delete Address Deletes the current address entry. The Delete Address dialog box appears. Notes •By default, the entry that you delete will be saved onto the Palm Desktop for CLIÉ software on your computer during the next HotSync® operation. To delete the entry completely, deselect the check box ( ) for "Save archive copy on PC" in the Delete Address dialog box. •If the current entry has an image pasted, the image will not be deleted. Duplicate Address Makes a copy of the current entry and displays the copy in Address Edit so you can make changes to the copied entry. The copy has the same category and attached notes as the original entry. Beam Address Sends all the address entries in the currently selected category to another CLIÉ handheld via the infrared communications port. Beam Category Sends all the Address Book entries in the currently selected category to another CLIÉ handheld via the infrared communications port. Attach Note Adds comments to the current address entry. Choosing this menu opens up a screen for entering comments. Delete Note Deletes comments from the current address entry. Choosing this menu opens up the Delete Note dialog box. Tap Yes to delete comments and No to cancel the delete function. Select Business Card Defines the current address entry on a business card. A business card icon ( ) is displayed when you set an entry as a business card. Beam Business Card Sends the current business card to another CLIÉ handheld via the infrared communications port. Tip You can also send a business card via the infrared communications port by pressing and holding down the Address Book button for longer than 2 seconds. Chapter2 Using Basic applications 59
-
 1
1 -
2
-
3
-
4
-
5
-
6
-
7
-
8
-
9
-
10
-
11
-
12
-
13
-
14
-
15
-
16
-
17
-
18
-
19
-
20
-
21
-
22
-
23
-
24
-
25
-
26
-
27
-
28
-
29
-
30
-
31
-
32
-
33
-
34
-
35
-
36
-
37
-
38
-
39
-
40
-
41
-
42
-
43
-
44
-
45
-
46
-
47
-
48
-
49
-
50
-
51
-
52
-
53
-
 54
54 -
 55
55 -
 56
56 -
 57
57 -
 58
58 -
 59
59 -
 60
60 -
 61
61 -
 62
62 -
 63
63 -
 64
64 -
65
-
66
-
67
-
68
-
69
-
70
-
71
-
72
-
73
-
74
-
75
-
76
-
77
-
78
-
79
-
80
-
81
-
82
-
83
-
84
-
85
-
86
-
87
-
88
-
89
-
90
-
91
-
92
-
93
-
94
-
95
-
96
-
97
-
98
-
99
-
100
-
101
-
102
-
103
-
104
-
105
-
106
-
107
-
108
-
109
-
110
-
111
-
112
-
113
-
114
-
115
-
116
-
117
-
118
-
119
-
120
-
121
-
122
-
123
-
124
-
125
-
126
-
127
-
128
-
129
-
130
-
131
-
132
-
133
-
134
-
135
-
136
-
137
-
138
-
139
-
140
-
141
-
142
-
143
-
144
-
145
-
146
-
147
-
148
-
149
-
150
-
151
-
152
-
153
-
154
-
155
-
156
-
157
-
158
-
159
-
160
-
161
-
162
-
163
-
164
-
165
-
166
-
167
-
168
-
169
-
170
-
171
-
172
-
173
-
174
-
175
-
176
-
177
-
178
-
179
-
180
-
181
-
182
-
183
-
184
-
185
-
186
-
187
-
188
-
189
-
190
-
191
-
192
-
193
-
194
-
195
-
196
-
197
-
198
-
199
-
200
-
201
-
202
-
203
-
204
-
205
-
206
-
207
-
208
-
209
-
210
-
211
-
212
-
213
-
214
-
215
-
216
-
217
-
218
-
219
-
220
 |
 |