Sony RDR-GX7 Operating Instructions - Page 19
Step 4: Connecting the Audio Cords - problem
 |
View all Sony RDR-GX7 manuals
Add to My Manuals
Save this manual to your list of manuals |
Page 19 highlights
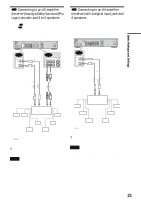
Basic Hookups and Settings Note Consumers should note that not all high definition television sets are fully compatible with this product and may cause artifacts to be displayed in the picture. In the case of 480 progressive scan picture problems, it is recommended that the user switch the connection to the 'standard definition' output. If there are questions regarding our TV set compatibility with this model 480p DVD recorder, please contact our customer service center. Step 4: Connecting the Audio Cords Select the connection that best suits your system. Be sure to read the instructions for the components you wish to connect. Connection A TV • Surround effects: Dynamic, Wide B Stereo amplifier (receiver) and two speakers • Surround effects: Standard MD deck/DAT deck • Surround effects: None Your setup C AV amplifier (receiver) having a Dolby Surround (Pro Logic) decoder*1 and 3 to 6 speakers • Surround effects: Dolby Surround (Pro Logic) D AV amplifier (receiver) with a digital input jack having a Dolby Digital or DTS*2 decoder and 6 speakers • Surround effects: Dolby Digital (5.1ch), DTS (5.1ch) *1 Manufactured under license from Dolby laboratories. "Dolby," "Pro Logic," and the double-D symbol are trademarks of Dolby Laboratories. *2 "DTS" and "DTS Digital Out" are trademarks of Digital Theater Systems, Inc. ,continued 19 Step 4: Connecting the Audio Cords
-
 1
1 -
2
-
3
-
4
-
5
-
6
-
7
-
8
-
9
-
10
-
11
-
12
-
13
-
 14
14 -
 15
15 -
 16
16 -
 17
17 -
 18
18 -
 19
19 -
 20
20 -
 21
21 -
 22
22 -
 23
23 -
 24
24 -
25
-
26
-
27
-
28
-
29
-
30
-
31
-
32
-
33
-
34
-
35
-
36
-
37
-
38
-
39
-
40
-
41
-
42
-
43
-
44
-
45
-
46
-
47
-
48
-
49
-
50
-
51
-
52
-
53
-
54
-
55
-
56
-
57
-
58
-
59
-
60
-
61
-
62
-
63
-
64
-
65
-
66
-
67
-
68
-
69
-
70
-
71
-
72
-
73
-
74
-
75
-
76
-
77
-
78
-
79
-
80
-
81
-
82
-
83
-
84
-
85
-
86
-
87
-
88
-
89
-
90
-
91
-
92
-
93
-
94
-
95
-
96
-
97
-
98
-
99
-
100
-
101
-
102
-
103
-
104
-
105
-
106
-
107
-
108
-
109
-
110
-
111
-
112
 |
 |
