Sony RDR-GX7 Operating Instructions - Page 24
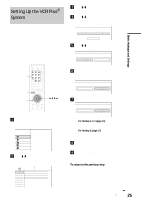
To return to the previous step, Press ENTER when Finish appears.
 |
View all Sony RDR-GX7 manuals
Add to My Manuals
Save this manual to your list of manuals |
Page 24 highlights
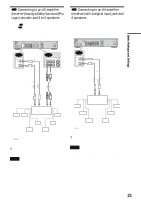
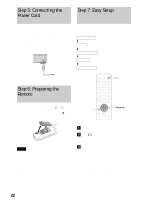
j Press ENTER. The Setup Display for selecting the type of jack used to connect to your amplifier (receiver) appears. EASY SETUP Audio Connection 5/5 Is this recorder connected to an amplifier (receiver)? Select the type of jack you are using. Yes : LINE OUT(R-AUDIO-L) Yes : DIGITAL OUT No k Press M/m to select the type of jack (if any) you are using to connect to an amplifier (receiver), then press ENTER. Choose the item that matches the audio connection you selected on pages 20 to 21 ( A through D ). A • If you connect just a TV and nothing else, select "No," then go to step 15. B-1 C-1 • Select "Yes: LINE OUT (R-AUDIO-L)," then go to step 15. B-2 C-2 D • Select "Yes: DIGITAL OUT." The Setup Display for "Dolby Digital" appears. l Press M/m to select the type of Dolby Digital signal you wish to send to your amplifier (receiver). Choose the signal that matches the audio connection you selected on pages 20 to 21 ( B through D ). EASY SETUP Audio Connection 5/5 Dolby Digital D-PCM Dolby Digital n Press M/m to select whether or not you wish to send a DTS signal to your amplifier (receiver) and press ENTER. Choose the item that matches the audio connection you selected on pages 20 to 21 ( B through D ). B-2 C-2 • Off D • On (only if the amplifier (receiver) has a DTS decoder) o Press ENTER when "Finish" appears. Easy Setup is finished. All connections and setup operations are complete. EASY SETUP Easy Setup is finished Finish To return to the previous step Press RETURN. z Hint If you want to run Easy Setup again, select "Easy Setup" in the Setup Display (page 100). Notes • If there are only a few channels in your area that carry time signals, setting the clock automatically may take up to about 20 minutes after the recorder turns off. If nothing happens even after you wait about 20 minutes, set the clock manually in "Clock" of "Settings" (page 93). • If you use the antenna connection Hookup 2 (page 17), make sure you leave the cable box on. • To record TV programs using the timer, you must set the clock accurately. B-2 C-2 • D-PCM D • Dolby Digital (only if the amplifier (receiver) has a Dolby Digital decoder) m Press ENTER. The Setup Display for selecting the type of DTS signal appears. EASY SETUP Audio Connection 5/5 DTS On Off 24 Step 7: Easy Setup
-
 1
1 -
2
-
3
-
4
-
5
-
6
-
7
-
8
-
9
-
10
-
11
-
12
-
13
-
14
-
15
-
16
-
17
-
18
-
 19
19 -
 20
20 -
 21
21 -
 22
22 -
 23
23 -
 24
24 -
 25
25 -
 26
26 -
 27
27 -
 28
28 -
 29
29 -
30
-
31
-
32
-
33
-
34
-
35
-
36
-
37
-
38
-
39
-
40
-
41
-
42
-
43
-
44
-
45
-
46
-
47
-
48
-
49
-
50
-
51
-
52
-
53
-
54
-
55
-
56
-
57
-
58
-
59
-
60
-
61
-
62
-
63
-
64
-
65
-
66
-
67
-
68
-
69
-
70
-
71
-
72
-
73
-
74
-
75
-
76
-
77
-
78
-
79
-
80
-
81
-
82
-
83
-
84
-
85
-
86
-
87
-
88
-
89
-
90
-
91
-
92
-
93
-
94
-
95
-
96
-
97
-
98
-
99
-
100
-
101
-
102
-
103
-
104
-
105
-
106
-
107
-
108
-
109
-
110
-
111
-
112
 |
 |
