Sony RDR-GX7 Operating Instructions - Page 23
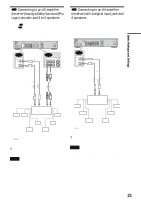
Hookup 1 and 3, Hookup 2, If you have a 4:3 standard TV
 |
View all Sony RDR-GX7 manuals
Add to My Manuals
Save this manual to your list of manuals |
Page 23 highlights
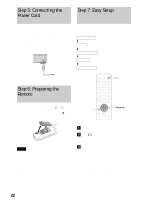
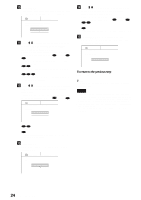
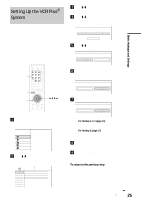
Basic Hookups and Settings d Press ENTER. The Setup Display for selecting the language used in the on-screen display appears. EASY SETUP Language 1/5 Select the screen Language. English Français g Press M/m to select the item that matches the antenna connection you selected on page 16 (Hookup 1, 2, or 3). EASY SETUP Tuner Preset 3/5 Select the way in which you will receive channels. Antenna Cable e Press M/m to select a language, then press ENTER. The Setup Display for clock setting appears. EASY SETUP Clock 2/5 Select a method for setting the clock. If you select "Auto", this recorder will look for a time signal when you turn it off. Auto Manual f Press M/m to select the item that matches the antenna connection you selected on page 16 (Hookup 1, 2, or 3). ◆ Hookup 1 and 3 Select "Auto," then press ENTER. The recorder automatically sets the clock by searching for a channel that carries a time signal and sets your time zone and Daylight Saving Time (if applicable). To activate the Auto Clock function, turn off the recorder after finishing Easy Setup. If your clock is set to the wrong time zone or Daylight Saving Time, you can adjust these settings (page 93). If your clock cannot be set automatically, set the clock manually (page 93). ◆ Hookup 2 Select "Manual," then press ENTER. Set the clock manually using
-
 1
1 -
2
-
3
-
4
-
5
-
6
-
7
-
8
-
9
-
10
-
11
-
12
-
13
-
14
-
15
-
16
-
17
-
 18
18 -
 19
19 -
 20
20 -
 21
21 -
 22
22 -
 23
23 -
 24
24 -
 25
25 -
 26
26 -
 27
27 -
 28
28 -
29
-
30
-
31
-
32
-
33
-
34
-
35
-
36
-
37
-
38
-
39
-
40
-
41
-
42
-
43
-
44
-
45
-
46
-
47
-
48
-
49
-
50
-
51
-
52
-
53
-
54
-
55
-
56
-
57
-
58
-
59
-
60
-
61
-
62
-
63
-
64
-
65
-
66
-
67
-
68
-
69
-
70
-
71
-
72
-
73
-
74
-
75
-
76
-
77
-
78
-
79
-
80
-
81
-
82
-
83
-
84
-
85
-
86
-
87
-
88
-
89
-
90
-
91
-
92
-
93
-
94
-
95
-
96
-
97
-
98
-
99
-
100
-
101
-
102
-
103
-
104
-
105
-
106
-
107
-
108
-
109
-
110
-
111
-
112
 |
 |
