Sony RDR-GX7 Operating Instructions - Page 21
Connecting to an AV amplifier (receiver) having a Dolby Surround (Pro Logic) decoder and 3 to 6 s - dvd recorder will not play
 |
View all Sony RDR-GX7 manuals
Add to My Manuals
Save this manual to your list of manuals |
Page 21 highlights
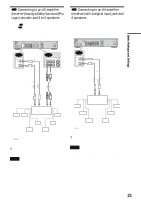
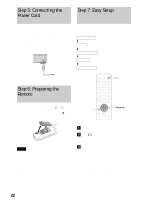
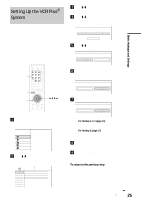
Basic Hookups and Settings C Connecting to an AV amplifier (receiver) having a Dolby Surround (Pro Logic) decoder and 3 to 6 speakers If your AV amplifier (receiver) only has L and R audio input jacks, use C-1 . If your amplifier (receiver) has a digital input jack, use C-2 . You can enjoy Dolby Surround effects only when playing Dolby Surround audio or multi-channel audio (Dolby Digital) discs. VHF/UHF IN OUT CONTROL S IN DIGITAL OUT PCM/DTS/DOLBY DIGITAL LINE IN COAXIAL R-AUDIO-L 1 VIDEO S VIDEO LINE OUT R-AUDIO-L VIDEO 1 S VIDEO OPTICAL 3 2 Y PB PR COMPONENT VIDEO OUT DVD recorder ~ AC IN C-2 DIGITAL OUT PCM/DTS/DOLBY DIGITAL COAXIAL Coaxial digital cord (not supplied) C-1 LINE OUT R-AUDIO-L VIDEO 1 S VIDEO 2 OPTICAL to DIGITAL OUT or (COAXIAL or OPTICAL) Optical digital cord (not supplied) (red) to LINE OUT (R-AUDIO-L) 1 or 2 (white) Stereo audio cord (not supplied) (red) (white) to coaxial or optical digital input to audio input [Speakers] Amplifier (receiver) with Dolby Surround decoder [Speakers] Rear (L) Rear (R) Front (R) Center Front (L) Subwoofer Rear (mono) : Signal flow z Hint For correct speaker location, see the operating instructions of the connected components. Note When connecting 6 speakers, replace the monaural rear speaker with a center speaker, 2 rear speakers, and a subwoofer. D Connecting to an AV amplifier (receiver) with a digital input jack and 6 speakers If your AV amplifier (receiver) has a Dolby Digital or DTS decoder and a digital input jack, use this connection. Note that the surround sound effects of this recorder cannot be used with this connection. VHF/UHF IN OUT CONTROL S IN DIGITAL OUT PCM/DTS/DOLBY DIGITAL LINE IN COAXIAL R-AUDIO-L 1 VIDEO S VIDEO LINE OUT R-AUDIO-L VIDEO 1 S VIDEO OPTICAL 3 2 Y PB PR COMPONENT VIDEO OUT D DIGITAL OUT PCM/DTS/DOLBY DIGITAL COAXIAL to DIGITAL OUT (COAXIAL or OPTICAL) DVD recorder ~ AC IN OPTICAL or Optical digital cord (not supplied) Coaxial digital cord (not supplied) to optical digital input to coaxial digital input [Speakers] AV amplifier (receiver) having a decoder [Speakers] Rear (L) Center Rear (R) Front (R) Subwoofer : Signal flow Front (L) z Hint For correct speaker location, see the operating instructions of the connected components. Note After you have completed the connection, be sure to set "Dolby Digital" to "Dolby Digital" and "DTS" to "On" under "Audio" in Easy Setup (page 24). Otherwise, no sound or a loud noise will come from your speakers. 21 Step 4: Connecting the Audio Cords
-
 1
1 -
2
-
3
-
4
-
5
-
6
-
7
-
8
-
9
-
10
-
11
-
12
-
13
-
14
-
15
-
 16
16 -
 17
17 -
 18
18 -
 19
19 -
 20
20 -
 21
21 -
 22
22 -
 23
23 -
 24
24 -
 25
25 -
 26
26 -
27
-
28
-
29
-
30
-
31
-
32
-
33
-
34
-
35
-
36
-
37
-
38
-
39
-
40
-
41
-
42
-
43
-
44
-
45
-
46
-
47
-
48
-
49
-
50
-
51
-
52
-
53
-
54
-
55
-
56
-
57
-
58
-
59
-
60
-
61
-
62
-
63
-
64
-
65
-
66
-
67
-
68
-
69
-
70
-
71
-
72
-
73
-
74
-
75
-
76
-
77
-
78
-
79
-
80
-
81
-
82
-
83
-
84
-
85
-
86
-
87
-
88
-
89
-
90
-
91
-
92
-
93
-
94
-
95
-
96
-
97
-
98
-
99
-
100
-
101
-
102
-
103
-
104
-
105
-
106
-
107
-
108
-
109
-
110
-
111
-
112
 |
 |
