Sony RDR-GX7 Operating Instructions - Page 22

Step 5: Connecting the Power Cord, Step 6: Preparing the Remote, Step 7: Easy Setup - dvd recorder player

Page 22 highlights

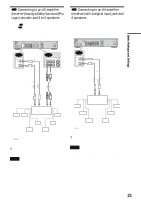
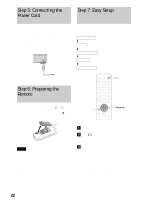
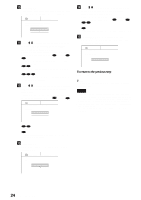
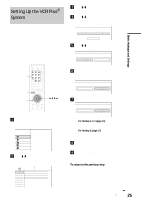
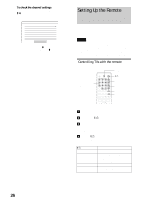
Step 5: Connecting the Power Cord Step 7: Easy Setup Connect the supplied power cord to the AC IN terminal of the recorder. Then plug the recorder and TV power cords into an AC outlet. After you connect the power cord, you must wait for a short while before operating the recorder. You can operate the recorder once the front panel display lights up and the recorder enters standby mode. If you connect additional equipment to this recorder (pages 29 to 30), be sure to connect the power cord after all connections are complete. ~ AC IN to AC IN Follow the steps below to make the minimum number of basic adjustments for using the recorder. If you do not complete Easy Setup, it will appear each time you turn on your recorder. Make the settings below in the following order. OSD Language Setup m Clock Setup m Tuner and Channel Setup m TV Type Setup m Audio Connection Setup to AC outlet "/1 Step 6: Preparing the Remote You can control the recorder using the supplied remote. Insert two Size AA (R6) batteries by matching the 3 and # ends on the batteries to the markings inside the battery compartment. When using the remote, point it at the remote sensor on the recorder. RETURN

  • 1
  • 2
  • 3
  • 4
  • 5
  • 6
  • 7
  • 8
  • 9
  • 10
  • 11
  • 12
  • 13
  • 14
  • 15
  • 16
  • 17
  • 18
  • 19
  • 20
  • 21
  • 22
  • 23
  • 24
  • 25
  • 26
  • 27
  • 28
  • 29
  • 30
  • 31
  • 32
  • 33
  • 34
  • 35
  • 36
  • 37
  • 38
  • 39
  • 40
  • 41
  • 42
  • 43
  • 44
  • 45
  • 46
  • 47
  • 48
  • 49
  • 50
  • 51
  • 52
  • 53
  • 54
  • 55
  • 56
  • 57
  • 58
  • 59
  • 60
  • 61
  • 62
  • 63
  • 64
  • 65
  • 66
  • 67
  • 68
  • 69
  • 70
  • 71
  • 72
  • 73
  • 74
  • 75
  • 76
  • 77
  • 78
  • 79
  • 80
  • 81
  • 82
  • 83
  • 84
  • 85
  • 86
  • 87
  • 88
  • 89
  • 90
  • 91
  • 92
  • 93
  • 94
  • 95
  • 96
  • 97
  • 98
  • 99
  • 100
  • 101
  • 102
  • 103
  • 104
  • 105
  • 106
  • 107
  • 108
  • 109
  • 110
  • 111
  • 112

22
Step 5: Connecting the Power Cord
Step 5: Connecting the
Power Cord
Connect the supplied power cord to the AC IN terminal of the
recorder. Then plug the recorder and TV power cords into an
AC outlet. After you connect the power cord,
you must wait for
a short while before operating the recorder.
You can operate
the recorder once the front panel display lights up and the
recorder enters standby mode.
If you connect additional equipment to this recorder
(pages 29
to
30)
, be sure to connect the power cord after all connections are
complete.
Step 6: Preparing the
Remote
You can control the recorder using the supplied remote. Insert
two Size AA (R6) batteries by matching the
3
and
#
ends on
the batteries to the markings inside the battery compartment.
When using the remote, point it at the remote sensor
on the
recorder.
Notes
If the supplied remote interferes your other Sony DVD recorder or
player, change the command mode number for this recorder. For
details,
see page 28
.
Do not leave the remote in an extremely hot or humid place.
Do not drop any foreign object into the remote casing, particularly
when replacing the batteries.
Do not expose the remote sensor to direct sunlight or a lighting
apparatus. Doing so may cause a malfunction.
If you do not use the remote for an extended period of time, remove the
batteries to avoid possible damage from battery leakage and corrosion.
Step 7: Easy Setup
Follow the steps below to make the minimum number of basic
adjustments for using the recorder. If you do not complete Easy
Setup, it will appear each time you turn on your recorder.
Make the settings below in the following order.
m
m
m
m
a
Turn on the TV.
b
Press
[
/
1
.
The recorder turns on and the power indicator on the
front panel lights up in green.
c
Switch the input selector on your TV so that
the signal from the recorder appears on your
TV screen.
“Initial settings necessary to operate the DVD
recorder will be made. You can change them later
using Setup.” appears. If this message does not
appear, select “Easy Setup” from “SETUP” in the
System Menu to run Easy Setup. For details,
see
“Settings and Adjustments” on page 90.
~
AC IN
to AC outlet
to AC IN
OSD Language Setup
Clock Setup
Tuner and Channel Setup
TV Type Setup
Audio Connection Setup
"
/
1
<
/
M
/
m
/
,
,
ENTER
RETURN