Sony SNC-DF70N User Guide - Page 13
Accessing the Camera Using the Web Browser - network camera
 |
View all Sony SNC-DF70N manuals
Add to My Manuals
Save this manual to your list of manuals |
Page 13 highlights
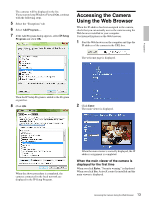
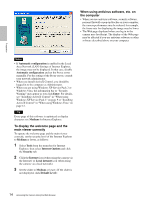
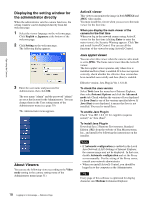
Preparation The cameras will be displayed in the list. If you want to keep Windows Firewall On, continue with the following steps. 5 Select the "Exceptions" tab. 6 Select Add Program.... 7 If the Add Program dialog appears, select IP Setup Program and click OK. Accessing the Camera Using the Web Browser When the IP address has been assigned to the camera, check that you can actually access the camera using the Web browser installed in your computer. Use Internet Explorer as the Web browser. 1 Start the Web browser on the computer and type the IP address of the camera in the URL box. The welcome page is displayed. Then the IP Setup Program is added to the Program or port list. 8 Click OK. 2 Click Enter. The main viewer is displayed. When the above procedure is completed, the cameras connected in the local network are displayed in the IP Setup Program. When the main viewer is correctly displayed, the IP address assignment is completed. When the main viewer of the camera is displayed for the first time When you click Enter, "Security warning" is displayed. When you click Yes, ActiveX control is installed and the main viewer is displayed. 13 Accessing the Camera Using the Web Browser
-
 1
1 -
2
-
3
-
4
-
5
-
6
-
7
-
 8
8 -
 9
9 -
 10
10 -
 11
11 -
 12
12 -
 13
13 -
 14
14 -
 15
15 -
 16
16 -
 17
17 -
 18
18 -
19
-
20
-
21
-
22
-
23
-
24
-
25
-
26
-
27
-
28
-
29
-
30
-
31
-
32
-
33
-
34
-
35
-
36
-
37
-
38
-
39
-
40
-
41
-
42
-
43
-
44
-
45
-
46
-
47
-
48
-
49
-
50
-
51
-
52
-
53
-
54
-
55
-
56
-
57
-
58
-
59
-
60
-
61
-
62
-
63
-
64
-
65
-
66
-
67
-
68
-
69
-
70
-
71
-
72
 |
 |
