Sony SNC-DF70N User Guide - Page 54
Setting the Schedule - Schedule setting Menu, Setting the Alarm Buffer - Alarm buffer setting Menu
 |
View all Sony SNC-DF70N manuals
Add to My Manuals
Save this manual to your list of manuals |
Page 54 highlights
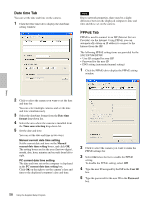
Setting the Schedule - Schedule setting Menu When you click Schedule on the Administrator menu, the Schedule setting menu appears. This is the same menu as the setting menu which is displayed when you click Schedule to set Effective period and Schedule in FTP client setting menu, e-Mail (SMTP) setting menu, Image memory setting menu, Alarm output 1, 2 setting menu and so on. Example: When setting e-Mail (SMTP) (the alarm sending) in the Schedule setting menu Setting the Alarm Buffer - Alarm buffer setting Menu When you click Alarm buffer on the Administrator menu, the Alarm buffer Setting menu appears. You can set the Pre-alarm image and audio (the image and audio before the alarm detection) and the Post alarm image and audio. These can be set when Alarm sending or Alarm recording of FTP client setting menu or Image memory setting menu is set to On, and besides when Use alarm buffer is selected. Administrating the Camera Schedule selection Select the list box to specify the schedule you want to set. e-Mail (SMTP) - Alarm, e-Mail (SMTP) - Periodical, FTP - Alarm, FTP - Periodical, Image memory - Alarm, Image memory - Periodical, Alarm output 1 - Alarm, Alarm output 1 - Timer, Alarm output 2 - Alarm or Alarm output 2 - Timer, Day/Night mode - Timer can be selected. The time period on the right of the checked day is the effective period of the schedule. Mon (Monday) to Sun (Sunday) The time period on the right of the checked day is the effective period of the schedule. Start time, End time Specify the Start time and the End time. Use the same time schedule every day When this is checked, the Start time and End time set to Mon (Monday) are applied to all days. In this case, the Start time and End time of the other days than Mon (Monday) cannot be input. OK/Cancel See "Buttons common to every setting menu" on page 27. Video mode The Video mode setting in the Common tab of the Camera setting menu is displayed. MPEG4: Shows the present output format of the camera is MPEG4. JPEG: Shows the present output format of the camera is JPEG. Recording capacity Displays the maximum recording capacity of alarm buffer in the present camera setting of the video mode, image size, bit rate and frame rate. Pre-alarm period: Displays the maximum recording capacity of image/audio before the alarm detection. Post-alarm period: Displays the maximum recording capacity of image/audio after the alarm detection. Recording time Set the recording time for the Pre-alarm image/audio and Post alarm image/audio. Pre alarm period: Type the recording time of the image/audio before the alarm detection. Post alarm period: Type the recording time of the image/audio after the alarm detection. 54 Setting the Schedule - Schedule setting Menu / Setting the Alarm Buffer - Alarm buffer setting Menu
-
 1
1 -
2
-
3
-
4
-
5
-
6
-
7
-
8
-
9
-
10
-
11
-
12
-
13
-
14
-
15
-
16
-
17
-
18
-
19
-
20
-
21
-
22
-
23
-
24
-
25
-
26
-
27
-
28
-
29
-
30
-
31
-
32
-
33
-
34
-
35
-
36
-
37
-
38
-
39
-
40
-
41
-
42
-
43
-
44
-
45
-
46
-
47
-
48
-
 49
49 -
 50
50 -
 51
51 -
 52
52 -
 53
53 -
 54
54 -
 55
55 -
 56
56 -
 57
57 -
 58
58 -
 59
59 -
60
-
61
-
62
-
63
-
64
-
65
-
66
-
67
-
68
-
69
-
70
-
71
-
72
 |
 |
