Sony SNC-DF70N User Guide - Page 26
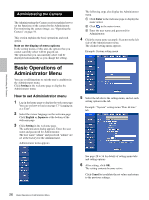
Administrating the Camera, Basic Operations of Administrator Menu, How to set Administrator menu
 |
View all Sony SNC-DF70N manuals
Add to My Manuals
Save this manual to your list of manuals |
Page 26 highlights
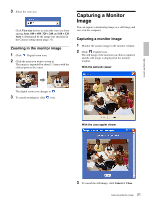
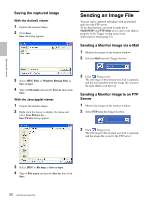
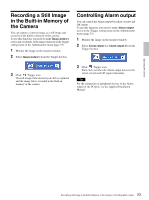
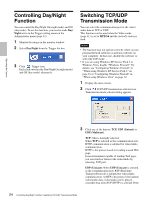
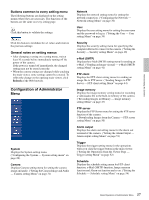
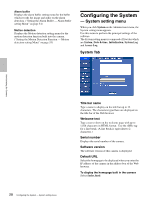
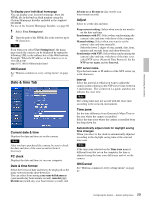
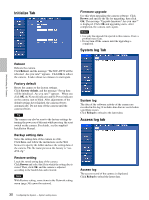
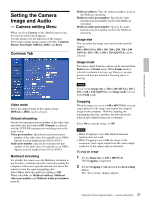
Administrating the Camera Administrating the Camera The Administrating the Camera section explains how to set the functions of the camera by the Administrator. For monitoring the camera image, see "Operating the Camera" on page 16. This section explains the basic operations and each option. Note on the display of menu options In the setting menus of this unit, the options that you cannot currently select will be grayed out. The options that you can currently select will be displayed automatically as you change the setting. The following steps also display the Administrator menu. 1 Click Enter in the welcome page to display the main viewer. 2 Click in the main viewer. 3 Enter the user name and password for Administrator. 4 Click the menu name (example: System) on the left side of the Administrator menu. The clicked setting menu appears. Example: System setting menu Basic Operations of Administrator Menu You can set all functions to suit the user's condition in the Administrator menu. Click Setting in the welcome page to display the Administrator menu. How to set Administrator menu 1 Log in the home page to display the welcome page. You can see how to log in on page 17 "Logging in as a User". 2 Select the viewer language on the welcome page. Click English or Japanese at the bottom of the welcome page. 3 Click Setting in the welcome page. The authentication dialog appears. Enter the user name and password for Administrator. The user name "admin" and password "admin" are set at the factory for the Administrator. Administrator menu appears. 5 Select the tab above the setting menu, and set each setting option in the tab. Example: "System" setting menu "Date & time" tab See page 28 to 56 for details of setting menu tabs and setting options. 6 After setting, click OK. The setting contents become active. Click Cancel to invalidate the set values and return to the previous settings. 26 Basic Operations of Administrator Menu
-
 1
1 -
2
-
3
-
4
-
5
-
6
-
7
-
8
-
9
-
10
-
11
-
12
-
13
-
14
-
15
-
16
-
17
-
18
-
19
-
20
-
 21
21 -
 22
22 -
 23
23 -
 24
24 -
 25
25 -
 26
26 -
 27
27 -
 28
28 -
 29
29 -
 30
30 -
 31
31 -
32
-
33
-
34
-
35
-
36
-
37
-
38
-
39
-
40
-
41
-
42
-
43
-
44
-
45
-
46
-
47
-
48
-
49
-
50
-
51
-
52
-
53
-
54
-
55
-
56
-
57
-
58
-
59
-
60
-
61
-
62
-
63
-
64
-
65
-
66
-
67
-
68
-
69
-
70
-
71
-
72
 |
 |
