Sony SNC-DF70N User Guide - Page 32
Picture Tab, Color, Microphone, Mic volume, Audio codec, Speaker output, OK/Cancel, Exposure mode
 |
View all Sony SNC-DF70N manuals
Add to My Manuals
Save this manual to your list of manuals |
Page 32 highlights
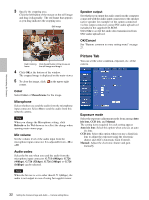
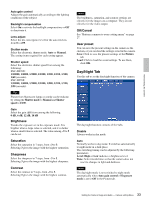
Administrating the Camera 3 Specify the cropping area. Click the left button of the mouse on the still image and drag it diagonally. The red frame that appears as you drag indicates the cropping area. Still image Red trimming Click the left button of the mouse on frame the still image and drag it. 4 Click OK at the bottom of the window. The cropped image is displayed on the main viewer. 5 To close the image, click in the upper-right corner. Color Select Color or Monochrome for the image. Microphone Select whether you send the audio from the microphone input connector. Select On to send the audio from this network camera. Note When you change the Microphone setting, click Refresh on the Web browser to reflect the change when opening main viewer page. Mic volume Set the volume level of the audio input from the microphone input connector. It is adjustable from -10 to +10. Audio codec Select the bit rate when you send the audio from the microphone input connector. G.711 (64kbps), G.726 (40kbps), G.726 (32kbps), G.726 (24kbps) or G.726 (16kbps) can be selected. Note When the bit rate is set to other than G.711(64bps), the audio is not output in case of using Java applet viewer. Speaker output Set whether you output the audio sent from the computer connected with the audio input connectors to the speaker (active speaker for example) of the camera connected via line output connectors using SNC audio upload tool included in the supplied CD-ROM. Select On to accept the audio data transmission from SNC audio upload tool. OK/Cancel See "Buttons common to every setting menu" on page 27. Picture Tab You can set the color condition, exposure, etc. of the camera. Exposure mode Select the exposure adjustment mode from among Auto iris lens, CCD iris, and Manual. The setting items required for each setting appear. Auto iris lens: Select this option when you use an auto iris lens. CCD iris: Select this option when you use a fixed-iris lens to adjust the exposure using the electronic shutter and AGC (Automatic Gain Control). Manual: Adjust the electronic shutter and gain manually. 32 Setting the Camera Image and Audio - Camera setting Menu
-
 1
1 -
2
-
3
-
4
-
5
-
6
-
7
-
8
-
9
-
10
-
11
-
12
-
13
-
14
-
15
-
16
-
17
-
18
-
19
-
20
-
21
-
22
-
23
-
24
-
25
-
26
-
 27
27 -
 28
28 -
 29
29 -
 30
30 -
 31
31 -
 32
32 -
 33
33 -
 34
34 -
 35
35 -
 36
36 -
 37
37 -
38
-
39
-
40
-
41
-
42
-
43
-
44
-
45
-
46
-
47
-
48
-
49
-
50
-
51
-
52
-
53
-
54
-
55
-
56
-
57
-
58
-
59
-
60
-
61
-
62
-
63
-
64
-
65
-
66
-
67
-
68
-
69
-
70
-
71
-
72
 |
 |
