Sony SRG300SE Installation Guide (SRG-300SE Application Guide)
Sony SRG300SE Manual
 |
View all Sony SRG300SE manuals
Add to My Manuals
Save this manual to your list of manuals |
Sony SRG300SE manual content summary:
- Sony SRG300SE | Installation Guide (SRG-300SE Application Guide) - Page 1
A-EAK-100-16 (1) Network Camera Application Guide 1.6 Before operating the unit, please read this manual thoroughly and retain it for future reference. © 2012 Sony Corporation - Sony SRG300SE | Installation Guide (SRG-300SE Application Guide) - Page 2
the customized homepage 15 Creating and Uploading the Voice alert file ..... 15 Using the Firmware Upgrade 18 Using CGI Sending 19 Using the Schedule Task 20 Configuring the device setting 21 Device restart and initialization 22 Installing SNC toolbox 22 Using the SNC audio upload tool 23 - Sony SRG300SE | Installation Guide (SRG-300SE Application Guide) - Page 3
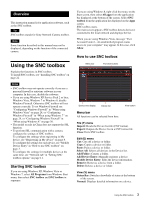
Sony Network Camera toolbox. Note Some function described in this manual may not be displayed, depending on the function of the connected camera. Using the SNC toolbox Explains the functions in SNC toolbox. To install SNC toolbox, see "Installing sale in China does not support the SSL function. • To - Sony SRG300SE | Installation Guide (SRG-300SE Application Guide) - Page 4
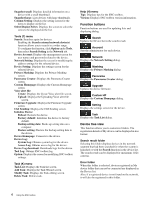
Displays the Network Setting dialog. Masking Displays the Privacy Masking dialog. Panorama Displays the Panorama Creator dialog. Upgrade Updates the device firmware. Custom HP Displays the Custom Homepage dialog. Setting Displays the settings screen for the device. Task Displays the Task List dialog - Sony SRG300SE | Installation Guide (SRG-300SE Application Guide) - Page 5
Search result folder or registered manually are displayed in the Device serial number. Version No. Displays the version of firmware. Admin name Displays the administrator user name. IP address. • The model on sale in China does not support the SSL function. View button You can change the display - Sony SRG300SE | Installation Guide (SRG-300SE Application Guide) - Page 6
Assigning an IP address To connect the device via network, you need to assign a new IP address to the device when you install it for the first time. Clicking Network after selecting a device to configure network settings with from the device list, the Network setting dialog will be - Sony SRG300SE | Installation Guide (SRG-300SE Application Guide) - Page 7
Device list: Displays devices for IPv6. After selecting and setting a device to configure, the device list will be updated automatically. IPv6: Enables you to switch IPv6 modes. Obtain IP address automatically: Sets DHCP mode to on. Use the following IP address: Sets DHCP mode to off. When this is - Sony SRG300SE | Installation Guide (SRG-300SE Application Guide) - Page 8
DNS server address. To obtain the DNS server addresses automatically: Select Obtain DNS server address automatically. To specify the DNS server addresses manually: Select Use the following DNS server address, and type the Primary DNS server address and Secondary DNS server address in the relevant - Sony SRG300SE | Installation Guide (SRG-300SE Application Guide) - Page 9
The Add Device Entry dialog appears. 3 Enter the following items: Device name: Enter a device name of your choice. Device address: Enter the address of the device to register. Normally, select Single device. If there is more than one camera in the specified IP address range then select Multi device. - Sony SRG300SE | Installation Guide (SRG-300SE Application Guide) - Page 10
Details display with thumbnails Select Snapshot(S) from the View menu or click to set to the details display with thumbnails. Modifying the series to show on list Select Select Display Series from the View menu to display the "Select Display Series" dialog. Display with large thumbnails Select - Sony SRG300SE | Installation Guide (SRG-300SE Application Guide) - Page 11
device account Set the initial values of user name and password for the administrator accessing the device for each device. Firmware Upgrade Make settings related to firmware upgrades. Timeout: Configure the Timeout of the device when an upgrade is performed. Device setting backup folder: Set the - Sony SRG300SE | Installation Guide (SRG-300SE Application Guide) - Page 12
, restart the SNC toolbox. • The model on sale in China does not support the SSL function. • Only the SSL setting registered in My device activates. Log Click Masking to display the Privacy Masking screen. Privacy Masking screen PTZ function off: Viewer Overwrite the oldest log file To set the size - Sony SRG300SE | Installation Guide (SRG-300SE Application Guide) - Page 13
PTZ function on: Viewer Viewer A live image of the camera is displayed. You focus on the place clicked. Note If a panorama image has not been created, the default image is displayed. PTZ controller Allows you to pan, tilt and zoom the camera. Pan/tilt operation Click the arrows in the direction you - Sony SRG300SE | Installation Guide (SRG-300SE Application Guide) - Page 14
Privacy mask setting range See User's Guide for the privacy mask setting range. Using Panorama Creator the image in the file should be 320 × 90 pixels (horizontal/vertical). Other image sizes are not supported. Save You can save the panorama image in a file. Note Only Map view panorama images can be - Sony SRG300SE | Installation Guide (SRG-300SE Application Guide) - Page 15
the image to conform to the following requirements: • File format: JPEG or Bitmap • Image size: 320 × 90 pixels (horizontal/vertical) The camera does not support use of images that do not conform to the above conditions. 1 Click File open on the Main tab. The File dialog opens. 2 Select the image - Sony SRG300SE | Installation Guide (SRG-300SE Application Guide) - Page 16
Using Create Voice alert file From the Tools menu, select Create Voice alert file and Create in this order. The SNC toolbox contains a sample of a Voice alert file. To create new a Voice alert file, use this function. Note Use this function by inputting the sound to be recorded from the microphone - Sony SRG300SE | Installation Guide (SRG-300SE Application Guide) - Page 17
displayed by file number. Display sample: File1, File2, File3 Voice alert file names currently uploaded in the device are displayed. If the device does not support File2 and File3, is displayed. Up/Down: Selects the order of devices to be uploaded. Test play Displays the Test play screen - Sony SRG300SE | Installation Guide (SRG-300SE Application Guide) - Page 18
file uploaded in the device, click Delete. Using the Firmware Upgrade The Firmware Upgrade function of the SNC toolbox allows you to upgrade the firmware of the device. Starting the Firmware Upgrade 1 Select the device to upgrade its firmware from the Device list. You can select multiple devices - Sony SRG300SE | Installation Guide (SRG-300SE Application Guide) - Page 19
Upgrade screen is displayed. Device list Module list Tip The Firmware Upgrade screen can also be displayed using the following method: • Select Firmware Upgrade from the Tools menu. Device list Select the device to upgrade. A progress bar is displayed when upgrading is in process. The status - Sony SRG300SE | Installation Guide (SRG-300SE Application Guide) - Page 20
sent, will be saved in CSV format. Using the Schedule Task You can specify the time or interval to change the Device setting or perform Firmware upgrade. Click Task to display the Task List, which shows a list of scheduled executable tasks. Displays Task Wizard. Task List Displays the list of - Sony SRG300SE | Installation Guide (SRG-300SE Application Guide) - Page 21
needed, click Back to return to the previous screen to redo the setting. For Firmware Upgrade: Set the firmware for the device you want to upgrade. See "Using the Firmware Upgrade" on page 18 for setting firmware. 7 Click Next. 8 Set the schedule. Daily: Specify the operation frequency in units of - Sony SRG300SE | Installation Guide (SRG-300SE Application Guide) - Page 22
is displayed. Apply Apply the setting. Other settings See User's Guide for configuring the settings. Device restart and initialization You can restart website. http://www.sony.net/ipela/snc 2 Extract the downloaded installer ZIP file. 3 Run the "SncToolbox_Setup.exe" file. 4 Install the SNC toolbox - Sony SRG300SE | Installation Guide (SRG-300SE Application Guide) - Page 23
SNC audio upload tool. The SNC audio upload tool supports the following audio data to be transmitted. Audio CODEC . • If you are using Windows XP Service Pack 2 or later, Windows Vista, Windows Windows 8" on page 30. Installing SNC audio upload tool Install the SNC audio upload tool following - Sony SRG300SE | Installation Guide (SRG-300SE Application Guide) - Page 24
for each camera. Click this button repeatedly to hide/show the camera list. Target camera(s) (Camera list) When the application is launched, it displays Sony network cameras on the same network segment in the camera list automatically. Up to 256 cameras can be displayed in the list. Select the - Sony SRG300SE | Installation Guide (SRG-300SE Application Guide) - Page 25
user ID and password are set for all those selected cameras. Add Use this item when you add a new network camera to the camera list manually. Click this button to open the following dialog. Type the IP address and port number of the camera to be added and click OK. Notes - Sony SRG300SE | Installation Guide (SRG-300SE Application Guide) - Page 26
IP address of the camera. • The model on sale in China does not support the SSL function. Model: Displays the model name of the network camera. Serial: . When you click it during recording, recording stops, and you can review the recorded sound or upload the recording to the camera. When you click - Sony SRG300SE | Installation Guide (SRG-300SE Application Guide) - Page 27
. Tips • During SSL communication, appears on the left side of the IP address of the camera. • The model on sale in China does not support the SSL function. Model: Displays the model name of the network camera. Serial: Displays the serial number of the network camera. Progress: Displays the progress - Sony SRG300SE | Installation Guide (SRG-300SE Application Guide) - Page 28
Configuring Windows Firewall 7 If the Add Program dialog appears, select SNC toolbox or SNC audio upload tool and click OK. When using Windows Vista Configuring Windows Firewall SNC toolbox or SNC audio upload tool may not operate correctly depending on the configuration of Windows Firewall. (No - Sony SRG300SE | Installation Guide (SRG-300SE Application Guide) - Page 29
When using Windows 7 Configuring Windows Firewall SNC toolbox or SNC audio upload tool may not operate correctly depending on the configuration of Windows Firewall. (No cameras are shown in the list even if they are detected.) In this case, confirm the Windows Firewall configuration as follows: To - Sony SRG300SE | Installation Guide (SRG-300SE Application Guide) - Page 30
5 Add program. When using Windows 8 Configuring Windows Firewall SNC toolbox or SNC audio upload tool may not operate correctly depending on the configuration of Windows Firewall. (No cameras are shown in the list even if they are detected.) In this case, confirm the Windows Firewall configuration - Sony SRG300SE | Installation Guide (SRG-300SE Application Guide) - Page 31
To turn Windows Firewall on 1 Press the Windows key + X, then select Control Panel from the displayed list. 2 Click Windows Firewall. 3 Select Allow an app or feature through Windows Firewall. 5 Add an app. 4 Select Allow another app.... When the above procedure is completed, the cameras - Sony SRG300SE | Installation Guide (SRG-300SE Application Guide) - Page 32
Sony Corporation
-
 1
1 -
 2
2 -
 3
3 -
 4
4 -
 5
5 -
 6
6 -
 7
7 -
8
-
9
-
10
-
11
-
12
-
13
-
14
-
15
-
16
-
17
-
18
-
19
-
20
-
21
-
22
-
23
-
24
-
25
-
26
-
27
-
28
-
29
-
30
-
31
-
32
 |
 |

Network Camera
Application Guide
1.6
Before operating the unit, please read this manual thoroughly
and retain it for future reference.
A-EAK-100-
16
(1)
© 2012 Sony Corporation