Sony SRG300SE Installation Guide (SRG-300SE Application Guide) - Page 15
Using the Custom Home Setting the customized home
 |
View all Sony SRG300SE manuals
Add to My Manuals
Save this manual to your list of manuals |
Page 15 highlights
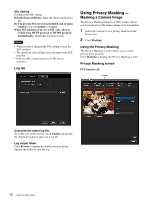
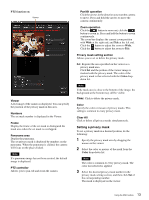
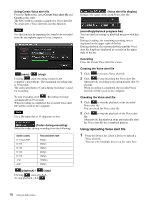
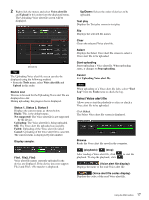
The specified camera movement area will be effective when the panorama image is saved in the camera. 3 Click Send to transmit the panorama image to the camera. The panorama image is saved in the camera. You can use the saved panorama image when you control panning and tilting from the main viewer. Saving a custom image to the camera You can save a custom image to the camera in spite of the panorama image shot by the camera. Prepare the image to conform to the following requirements: • File format: JPEG or Bitmap • Image size: 320 × 90 pixels (horizontal/vertical) The camera does not support use of images that do not conform to the above conditions. 1 Click File open on the Main tab. The File dialog opens. 2 Select the image you have prepared. 3 Specify the camera movement area by dragging the mouse to draw a rectangle on the panorama image. The specified camera movement area will be effective when the panorama image is saved in the camera. 4 Click Send to transmit the prepared image to the camera. The image is saved in the camera. You can use the saved image when you control panning and tilting from the main viewer. Tip The panorama image is the still image converted from the image taken when you were going to create a panorama image with Panorama Creator. When the camera is moved or when the layout around the camera is changed, create the panorama image again. Using the Custom Homepage - Setting the customized homepage The Custom Homepage function of the SNC toolbox allows you to store the homepage that you have created in the camera and watch it. Notes on creating the homepage When you are creating the homepage, note the following points. • The file name should be typed using up to 24 characters including the extension. • The file size of the homepage should be 2.0 MB or less. • To see the created homepage, set the Homepage in the Layout tab from viewer menu. Uploading the homepage to the camera using the Custom Homepage 1 Select the device to upload from the Device list. You can select multiple devices at the same time. 2 Click the Custom Homepage. The "Custom Homepage" dialog opens. Read the notes carefully. Note Depending on the proxy server, communication with the camera may not be performed correctly. In that case, connect the camera to the same network segment, etc. and execute the Custom Homepage without using a proxy server. 3 Type the path in which your homepage is stored. 4 Click Start uploading. Uploading of the homepage file to the camera starts. 5 Click Cancel to exit the program. Creating and Uploading the Voice alert file The Voice alert file function allows you to create a Voice alert file and upload the Voice alert file to a device. 15 Using the SNC toolbox
-
 1
1 -
2
-
3
-
4
-
5
-
6
-
7
-
8
-
9
-
 10
10 -
 11
11 -
 12
12 -
 13
13 -
 14
14 -
 15
15 -
 16
16 -
 17
17 -
 18
18 -
 19
19 -
 20
20 -
21
-
22
-
23
-
24
-
25
-
26
-
27
-
28
-
29
-
30
-
31
-
32
 |
 |
