Sony STR-DA5200ES Operating Instructions (Large File - 23.24 MB) - Page 43
Using the receiver as a pre, amplifier, Performing auto calibration
 |
View all Sony STR-DA5200ES manuals
Add to My Manuals
Save this manual to your list of manuals |
Page 43 highlights
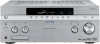
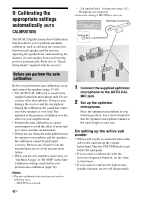
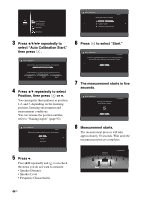
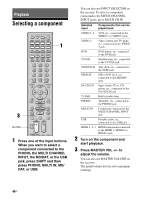
Getting Started Note Depending on the characteristics of the sub woofer you are using, the setup distance value may be further away from the actual position. Using the receiver as a preamplifier You can use the auto calibration function when you use the receiver as a pre-amplifier. In this case, the distance value shown on the display may differ from the actual distance value. However, there will be no problems even if you continue to use the receiver with that value. 2-6 Performing auto calibration The auto calibration function allows you to measure the following: • Whether or not speakers are connecteda) • Polarity of speakers • Distance of each speaker to your listening positionb) • Speaker angleb) • Speaker sizeb) • Speaker level • Frequency characteristicsc) a) This receiver corrects signals by analog downmix processing only for the center speaker and sub woofer when MULTI IN is selected. The correction is invalid for other speakers. b) The measurement result is not utilized when MULTI IN is selected. c) • DTS 96/24 signals are always played back as 48 kHz when you correct signals. • The measurement result is not utilized in the following cases. -MULTI IN is selected. -"2ch Analog Direct" is being used (page 111). -Input signals of which the sampling frequency is more than 96 kHz are being received. 1 Choose Settings menu (page 38). The Settings menu list appears on the TV screen. 2 Press V/v repeatedly to select "Auto Calibration," then press . continued 43GB
-
 1
1 -
2
-
3
-
4
-
5
-
6
-
7
-
8
-
9
-
10
-
11
-
12
-
13
-
14
-
15
-
16
-
17
-
18
-
19
-
20
-
21
-
22
-
23
-
24
-
25
-
26
-
27
-
28
-
29
-
30
-
31
-
32
-
33
-
34
-
35
-
36
-
37
-
 38
38 -
 39
39 -
 40
40 -
 41
41 -
 42
42 -
 43
43 -
 44
44 -
 45
45 -
 46
46 -
 47
47 -
 48
48 -
49
-
50
-
51
-
52
-
53
-
54
-
55
-
56
-
57
-
58
-
59
-
60
-
61
-
62
-
63
-
64
-
65
-
66
-
67
-
68
-
69
-
70
-
71
-
72
-
73
-
74
-
75
-
76
-
77
-
78
-
79
-
80
-
81
-
82
-
83
-
84
-
85
-
86
-
87
-
88
-
89
-
90
-
91
-
92
-
93
-
94
-
95
-
96
-
97
-
98
-
99
-
100
-
101
-
102
-
103
-
104
-
105
-
106
-
107
-
108
-
109
-
110
-
111
-
112
-
113
-
114
-
115
-
116
-
117
-
118
-
119
-
120
-
121
-
122
-
123
-
124
-
125
-
126
-
127
-
128
-
129
-
130
-
131
-
132
-
133
-
134
-
135
-
136
-
137
-
138
-
139
-
140
-
141
-
142
-
143
-
144
-
145
-
146
-
147
-
148
-
149
-
150
-
151
-
152
-
153
-
154
-
155
-
156
-
157
-
158
-
159
-
160
-
161
-
162
-
163
-
164
-
165
-
166
-
167
-
168
-
169
-
170
-
171
-
172
-
173
-
174
-
175
-
176
-
177
-
178
-
179
-
180
-
181
-
182
-
183
-
184
-
185
-
186
-
187
-
188
-
189
-
190
-
191
-
192
-
193
-
194
-
195
-
196
-
197
-
198
-
199
-
200
-
201
-
202
-
203
-
204
-
205
-
206
-
207
-
208
-
209
-
210
-
211
-
212
-
213
-
214
-
215
-
216
-
217
-
218
-
219
-
220
-
221
-
222
-
223
-
224
-
225
-
226
-
227
-
228
-
229
-
230
-
231
-
232
-
233
-
234
-
235
-
236
-
237
-
238
-
239
-
240
-
241
-
242
-
243
-
244
-
245
-
246
-
247
-
248
-
249
-
250
-
251
-
252
-
253
-
254
-
255
-
256
-
257
-
258
-
259
-
260
-
261
-
262
-
263
-
264
-
265
-
266
-
267
-
268
-
269
-
270
-
271
-
272
-
273
-
274
-
275
-
276
-
277
-
278
 |
 |
