Sony TA-E2000ESD Primary User Manual - Page 22
Effect
 |
View all Sony TA-E2000ESD manuals
Add to My Manuals
Save this manual to your list of manuals |
Page 22 highlights
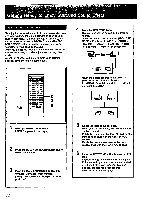
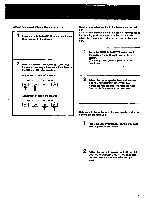
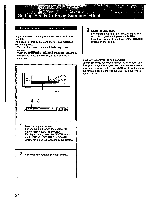
s.7-4r+-1- • t lei . c:4': • Getting Ready to Enjoy Surround Sound Effect Adjusting the Speaker Volume Level To enjoy the surround sound to the maximum when you play any program source, adjustment of each speaker level is necessary. To make this adjustment easy, use the test tone in DOLBY SURROUND mode. (The PRO LOGIC MODE button should be adjusted in advance according to your speaker system.) Once you adjust the level in DOLBY SURROUND mode, it is not necessary to make adjustments in any other mode. Adjust the speaker volume level from your listening position using the remote commander. 4 Press the TEST TONE button. The test tone will be output in the order as follows. When the center speaker is used (PRO LOGIC MODE button is set to WIDE or NORMAL): Front left Center -0 Front right -0 Rear left and right -+ Front left in succession. J _0:1-. .lo •p= 000 . 0=00 0 CID ED CO CO CD i r co CO CO CO CM MI ; OICIOCOGO00 ; COCO 00 1=1 t 0000 CO 0=00 CM 000000 =1000 2 1 00000A r" . ... aT g, CO CO CI CO lirc 1 4,6 . ..E:4.70 . I i i Press the PRESETIUSER button. PRESET appears in the display. 2 Press the DOLBY SURROUND button (10) to select DOLBY SUR. 3 Press the MAIN PARAMETER button until C=xxdB L,R=xxdB xxdB appears. (Designated figures are displayed in the xx positions.) When the center speaker is not used (The PRO LOGIC MODE button is set to PHANTOM): Front left and right -* Rear left and right alternately. L.) 5 Adjust the level of the speakers. When you start adjusting, the test tone stops on that channel. Match the center speaker level (if used) to the front speaker level with the CENTER VOL buttons. Match the rear speaker level to the front speaker level with the REAR VOL buttons. 6 Press the TEST TONE button to stop the test tone. Speaker volume adjustment is now complete. If the left and right rear speakers are located at different distances from your listening position, proceed with rear speaker adjustment on the next page. 22
-
 1
1 -
2
-
3
-
4
-
5
-
6
-
7
-
8
-
9
-
10
-
11
-
12
-
13
-
14
-
15
-
16
-
 17
17 -
 18
18 -
 19
19 -
 20
20 -
 21
21 -
 22
22 -
 23
23 -
 24
24 -
 25
25 -
 26
26 -
 27
27 -
28
-
29
-
30
-
31
-
32
-
33
-
34
-
35
-
36
-
37
-
38
-
39
-
40
-
41
-
42
-
43
-
44
-
45
-
46
-
47
-
48
-
49
-
50
-
51
-
52
-
53
-
54
-
55
 |
 |
