Sony TA-E2000ESD Primary User Manual - Page 6
cling
 |
View all Sony TA-E2000ESD manuals
Add to My Manuals
Save this manual to your list of manuals |
Page 6 highlights
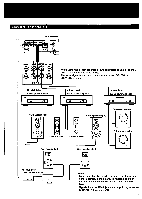
MIIRIMEMI yam.• Chapter 1 Getting Started , "f••• Unp-a-cling '71'-44 414., , • " First, check the supplied accessories and install the batteries in the programmable remote commander. Checking the Supplied Accessories After unpacking, check that the following accessories are present. Remote commander RM-P2000 (1) Sony battery SUM-3 (NS) (2) Audio connecting cord (3) Screw (4) Ferrite core (1) Do not throw away the carton and packing material! It will be an ideal container when transporting the system for repair work, etc. Removing the Side Panels You can remove the side panels. When you remove the panels, fix the cabinet with the short screws supplied instead of the screws that were removed. Do not use screws other than those supplied, since doing so might damage the internal circuit boards. For your safety, disconnect the AC power cord from the wall outlet before proceeding. Choosing a Good Location To prevent internal heat buildup in the unit, place the unit in a location with adequate air circulation. Do not install the unit: • Near heat sources such as radiators or air ducts. • In a place subject to direct sunlight, excessive dust, mechanical vibration or shock. Do not place anything on top of the cabinet. The top ventilation holes must be unobstructed for the proper operation of the unit and to prolong the life of its components. O Inserting the Batteries into the Remote Commander Install the batteries as shown. Battery life Normal operation can be expected about a half year using Sony SUM-3 (NS). When the batteries are run down, the remote commander will not operate the unit. In this case, replace the batteries with new ones.
-
 1
1 -
 2
2 -
 3
3 -
 4
4 -
 5
5 -
 6
6 -
 7
7 -
 8
8 -
 9
9 -
 10
10 -
 11
11 -
 12
12 -
13
-
14
-
15
-
16
-
17
-
18
-
19
-
20
-
21
-
22
-
23
-
24
-
25
-
26
-
27
-
28
-
29
-
30
-
31
-
32
-
33
-
34
-
35
-
36
-
37
-
38
-
39
-
40
-
41
-
42
-
43
-
44
-
45
-
46
-
47
-
48
-
49
-
50
-
51
-
52
-
53
-
54
-
55
 |
 |
