Sony XAV-601BT User Guide - Page 15
Setting the clock, Preparing the remote commander, Detaching the front panel - parts
 |
View all Sony XAV-601BT manuals
Add to My Manuals
Save this manual to your list of manuals |
Page 15 highlights
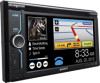
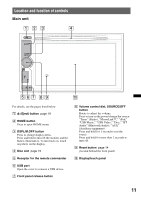
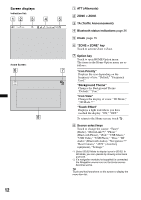
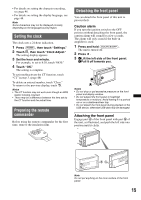
• For details on setting the character encoding, see page 48. • For details on setting the display language, see page 48. Note Some characters may not be displayed correctly, depending on the language/country/region. Setting the clock The clock uses a 24-hour indication. 1 Press (HOME), then touch "Settings." 2 Touch , then touch "Clock Adjust." The setting display appears. 3 Set the hour and minute. For example, to set to 8:30, touch "0830." 4 Touch "OK." The setting is complete. To activate/deactivate the CT function, touch "CT" in step 3. (page 48) To delete an entered number, touch "Clear." To return to the previous display, touch . Notes • The CT function may not work even though an RDS station is being received. • There may be a difference between the time set by the CT function and the actual time. Preparing the remote commander Before using the remote commander for the first time, remove the insulation film. Detaching the front panel You can detach the front panel of this unit to prevent theft. Caution alarm If you turn the ignition switch to the OFF position without detaching the front panel, the caution alarm will sound for a few seconds. The alarm will only sound if the built-in amplifier is used. 1 Press and hold (SOURCE/OFF). The unit is turned off. 2 Press . 3 1Lift the left side of the front panel. 2Pull it off towards you. Notes • Do not drop or put excessive pressure on the front panel and display window. • Do not subject the front panel to heat/high temperature or moisture. Avoid leaving it in a parked car or on a dashboard/rear tray. • Do not detach the front panel during playback of the USB device, otherwise USB data may be damaged. Attaching the front panel Engage part A of the front panel with part B of the unit, as illustrated, and push the left side into position until it clicks. Note Do not put anything on the inner surface of the front panel. 15
-
 1
1 -
2
-
3
-
4
-
5
-
6
-
7
-
8
-
9
-
 10
10 -
 11
11 -
 12
12 -
 13
13 -
 14
14 -
 15
15 -
 16
16 -
 17
17 -
 18
18 -
 19
19 -
 20
20 -
21
-
22
-
23
-
24
-
25
-
26
-
27
-
28
-
29
-
30
-
31
-
32
-
33
-
34
-
35
-
36
-
37
-
38
-
39
-
40
-
41
-
42
-
43
-
44
-
45
-
46
-
47
-
48
-
49
-
50
-
51
-
52
-
53
-
54
-
55
-
56
-
57
-
58
-
59
-
60
-
61
-
62
-
63
-
64
-
65
-
66
-
67
-
68
-
69
-
70
-
71
-
72
-
73
-
74
-
75
-
76
-
77
-
78
-
79
-
80
-
81
-
82
-
83
-
84
-
85
-
86
-
87
-
88
-
89
-
90
-
91
-
92
-
93
-
94
-
95
-
96
-
97
-
98
-
99
-
100
-
101
-
102
-
103
-
104
-
105
-
106
-
107
-
108
-
109
-
110
-
111
-
112
-
113
-
114
-
115
-
116
-
117
-
118
-
119
-
120
-
121
-
122
-
123
-
124
-
125
-
126
-
127
-
128
-
129
-
130
-
131
-
132
-
133
-
134
-
135
-
136
-
137
-
138
-
139
-
140
-
141
-
142
-
143
-
144
-
145
-
146
-
147
-
148
-
149
-
150
-
151
-
152
-
153
-
154
-
155
-
156
-
157
-
158
-
159
-
160
-
161
-
162
-
163
-
164
-
165
-
166
-
167
-
168
-
169
-
170
-
171
-
172
-
173
-
174
-
175
-
176
-
177
-
178
-
179
-
180
-
181
-
182
-
183
-
184
-
185
-
186
-
187
-
188
-
189
-
190
-
191
-
192
-
193
-
194
-
195
-
196
-
197
-
198
-
199
-
200
-
201
-
202
-
203
-
204
-
205
-
206
-
207
-
208
-
209
-
210
-
211
-
212
-
213
-
214
-
215
-
216
-
217
-
218
-
219
-
220
 |
 |