Sony XAV-601BT User Guide - Page 46
Monitor Adjustment, Touch panel calibration, Adjusting the picture - Picture EQ - camera
 |
View all Sony XAV-601BT manuals
Add to My Manuals
Save this manual to your list of manuals |
Page 46 highlights
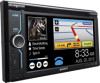
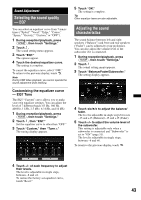
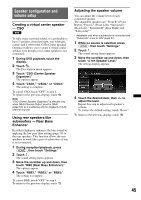
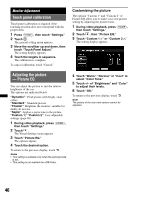
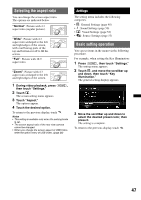
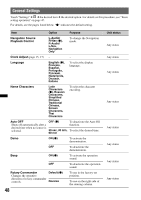
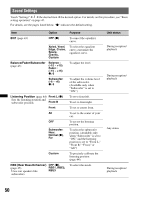
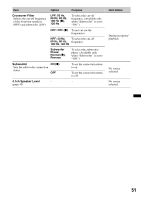
Monitor Adjustment Touch panel calibration Touch panel calibration is required if the touching position does not correspond with the proper item. 1 Press (HOME), then touch "Settings." 2 Touch . The general setting menu appears. 3 Move the scrollbar up and down, then touch "Touch Panel Adjust." The setting display appears. 4 Touch the targets in sequence. The calibration is complete. To cancel calibration, touch "Cancel." Customizing the picture The options "Custom 1" and "Custom 2" of Picture EQ allow you to make your own picture setting by adjusting the picture tones. 1 During video playback, press (HOME), then touch "Settings." 2 Touch , then "Picture EQ." 3 Touch "Custom 1 >" or "Custom 2 >." The setting display appears. Adjusting the picture - Picture EQ You can adjust the picture to suit the interior brightness of the car. The options are indicated below. "Dynamic": Vivid picture with bright, clear colors. "Standard": Standard picture. "Theater": Brightens the monitor; suitable for darkly-lit movies. "Sepia": Applies a sepia tone to the picture. "Custom 1," "Custom 2": User-adjustable settings (page 46). 1 During video playback, press (HOME), then touch "Settings." 2 Touch . The Visual Settings menu appears. 3 Touch "Picture EQ." The options appear. 4 Touch the desired option. To return to the previous display, touch . Notes • This setting is available only when the parking brake is set. • This setting is not available for USB Video. 4 Touch "Warm," "Normal," or "Cool" to select "Color Tone." 5 Touch +/- of "Brightness" and "Color" to adjust their levels. 6 Touch "OK." To return to the previous display, touch . Note The picture of the rear view camera cannot be adjusted. 46
-
 1
1 -
2
-
3
-
4
-
5
-
6
-
7
-
8
-
9
-
10
-
11
-
12
-
13
-
14
-
15
-
16
-
17
-
18
-
19
-
20
-
21
-
22
-
23
-
24
-
25
-
26
-
27
-
28
-
29
-
30
-
31
-
32
-
33
-
34
-
35
-
36
-
37
-
38
-
39
-
40
-
 41
41 -
 42
42 -
 43
43 -
 44
44 -
 45
45 -
 46
46 -
 47
47 -
 48
48 -
 49
49 -
 50
50 -
 51
51 -
52
-
53
-
54
-
55
-
56
-
57
-
58
-
59
-
60
-
61
-
62
-
63
-
64
-
65
-
66
-
67
-
68
-
69
-
70
-
71
-
72
-
73
-
74
-
75
-
76
-
77
-
78
-
79
-
80
-
81
-
82
-
83
-
84
-
85
-
86
-
87
-
88
-
89
-
90
-
91
-
92
-
93
-
94
-
95
-
96
-
97
-
98
-
99
-
100
-
101
-
102
-
103
-
104
-
105
-
106
-
107
-
108
-
109
-
110
-
111
-
112
-
113
-
114
-
115
-
116
-
117
-
118
-
119
-
120
-
121
-
122
-
123
-
124
-
125
-
126
-
127
-
128
-
129
-
130
-
131
-
132
-
133
-
134
-
135
-
136
-
137
-
138
-
139
-
140
-
141
-
142
-
143
-
144
-
145
-
146
-
147
-
148
-
149
-
150
-
151
-
152
-
153
-
154
-
155
-
156
-
157
-
158
-
159
-
160
-
161
-
162
-
163
-
164
-
165
-
166
-
167
-
168
-
169
-
170
-
171
-
172
-
173
-
174
-
175
-
176
-
177
-
178
-
179
-
180
-
181
-
182
-
183
-
184
-
185
-
186
-
187
-
188
-
189
-
190
-
191
-
192
-
193
-
194
-
195
-
196
-
197
-
198
-
199
-
200
-
201
-
202
-
203
-
204
-
205
-
206
-
207
-
208
-
209
-
210
-
211
-
212
-
213
-
214
-
215
-
216
-
217
-
218
-
219
-
220
 |
 |