TEAC NP-H750 NP-H750 Owner's Manual - Page 15
STANDBY/ON button, PHONES jack, AUX 2 IN jack, USB port, SOURCE button, MENU button, Skip buttons
 |
View all TEAC NP-H750 manuals
Add to My Manuals
Save this manual to your list of manuals |
Page 15 highlights
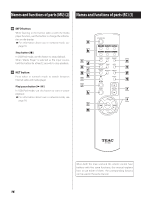
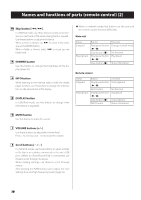
ENGLISH E STANDBY/ON button Press this button to turn the unit on or put it in standby mode. The color of the indicator above the STANDBY/ON button shows the status of the unit. Indicator Orange Blue Status Standby ON I SOURCE button Use this button to select the source. J MENU button In USB/iPod mode, use this button to go back to the previous menu when an iPod/iPhone/iPad is connected. When in network mode (Internet radio/media player), the setup menu appears. F PHONES jack To listen with headphones, first minimize the volume. Then, insert the headphones' plug into the PHONES jack and gradually increase the volume. No sound will be output from the speakers while the headphones' plug is inserted in the PHONES jack. VCAUTION Do not connect or disconnect headphones or turn the unit on or put it in standby while wearing them. Sudden loud noises could occur, which might cause hearing damage. G AUX 2 IN jack Connect this jack to the headphones' jack (or an audio output jack) of a portable audio player or other device using a commercially available 3.5 mm stereo mini plug cable. K Skip buttons [.//] In USB/iPod mode, use these buttons to skip to the previous or next track or file when playing back or paused. Use these buttons to adjust the balance. When a menu is shown, use / to select in the same way as the ENTER button. When a folder is shown, press . to move up one folder level. L ENTER button In USB/iPod mode, use this button to confirm selections in menus when an iPod/iPhone/iPad is connected. When making settings, use this button to confirm selection of a menu item. In network mode (Internet radio/media player), use to select a station or track. H USB port Connect an iPod/iPhone/iPad or USB flash drive. 15
-
 1
1 -
2
-
3
-
4
-
5
-
6
-
7
-
8
-
9
-
 10
10 -
 11
11 -
 12
12 -
 13
13 -
 14
14 -
 15
15 -
 16
16 -
 17
17 -
 18
18 -
 19
19 -
 20
20 -
21
-
22
-
23
-
24
-
25
-
26
-
27
-
28
-
29
-
30
-
31
-
32
-
33
-
34
-
35
-
36
-
37
-
38
-
39
-
40
-
41
-
42
-
43
-
44
-
45
-
46
-
47
-
48
-
49
-
50
-
51
-
52
-
53
-
54
-
55
-
56
-
57
-
58
-
59
-
60
-
61
-
62
-
63
-
64
-
65
-
66
-
67
-
68
-
69
-
70
-
71
-
72
-
73
-
74
-
75
-
76
-
77
-
78
-
79
-
80
-
81
-
82
-
83
-
84
-
85
-
86
-
87
-
88
-
89
-
90
-
91
-
92
-
93
-
94
-
95
-
96
-
97
-
98
-
99
-
100
-
101
-
102
-
103
-
104
-
105
-
106
-
107
-
108
-
109
-
110
-
111
-
112
-
113
-
114
-
115
-
116
-
117
-
118
-
119
-
120
-
121
-
122
-
123
-
124
-
125
-
126
-
127
-
128
-
129
-
130
-
131
-
132
-
133
-
134
-
135
-
136
-
137
-
138
-
139
-
140
-
141
-
142
-
143
-
144
-
145
-
146
-
147
-
148
-
149
-
150
-
151
-
152
-
153
-
154
-
155
-
156
-
157
-
158
-
159
-
160
-
161
-
162
-
163
-
164
-
165
-
166
-
167
-
168
-
169
-
170
-
171
-
172
-
173
-
174
-
175
-
176
 |
 |
