TEAC NP-H750 NP-H750 Owner's Manual - Page 49
Using DLNA, From your Computer
 |
View all TEAC NP-H750 manuals
Add to My Manuals
Save this manual to your list of manuals |
Page 49 highlights
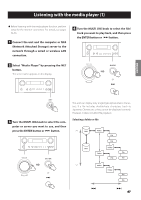
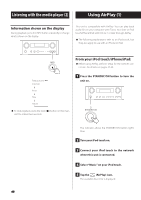
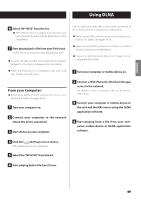
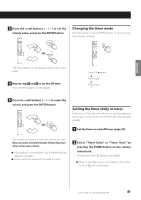
ENGLISH Using DLNA 6 Select "NP-H750" from the list. pp"NP-H750" can be set to appear in the list when you have changed the Device Name Edit setting on the Setup Menu. 7 Start playing back a file from your iPod touch. It takes five or six seconds to start playing back a file. ppIf you do not select another source after AirPlay has been stopped, "Air Play" will not disappear from the display. ppWhen the iPod touch is connected to this unit's USB port, AirPlay cannot be used. From your Computer: ppBefore using AirPlay, perform setup for the Internet connection. For details, see pages 34-36. 1 Turn your computer on. 2 Connect your computer to the network where this unit is connected. 3 Start iTunes on your computer. You can play back audio files on the server connected to the network, from your computer or mobile device. ppBefore using DLNA, perform setup for the Internet connection. For details, see pages 34-36. ppMake sure that DLNA application software is installed on your computer or mobile device. ppPrepare an NAS (Network Attached Storage) server compatible with DLNA. 1 Turn your computer or mobile device on. 2 Connect a NAS (Network Attached Storage) server to the network. For details on how to connect, refer to the server's instructions. 3 Connect your computer or mobile device to the unit and the NAS server using the DLNA application software. 4 Start playing back a file from your com- puter, mobile device or DLNA application software. 4 Click the (AirPlay) icon on iTunes. The available device list is displayed. 5 Select the "NP-H750" from the list. 6 Start playing back a file from iTunes. 49
-
 1
1 -
2
-
3
-
4
-
5
-
6
-
7
-
8
-
9
-
10
-
11
-
12
-
13
-
14
-
15
-
16
-
17
-
18
-
19
-
20
-
21
-
22
-
23
-
24
-
25
-
26
-
27
-
28
-
29
-
30
-
31
-
32
-
33
-
34
-
35
-
36
-
37
-
38
-
39
-
40
-
41
-
42
-
43
-
 44
44 -
 45
45 -
 46
46 -
 47
47 -
 48
48 -
 49
49 -
 50
50 -
 51
51 -
 52
52 -
 53
53 -
 54
54 -
55
-
56
-
57
-
58
-
59
-
60
-
61
-
62
-
63
-
64
-
65
-
66
-
67
-
68
-
69
-
70
-
71
-
72
-
73
-
74
-
75
-
76
-
77
-
78
-
79
-
80
-
81
-
82
-
83
-
84
-
85
-
86
-
87
-
88
-
89
-
90
-
91
-
92
-
93
-
94
-
95
-
96
-
97
-
98
-
99
-
100
-
101
-
102
-
103
-
104
-
105
-
106
-
107
-
108
-
109
-
110
-
111
-
112
-
113
-
114
-
115
-
116
-
117
-
118
-
119
-
120
-
121
-
122
-
123
-
124
-
125
-
126
-
127
-
128
-
129
-
130
-
131
-
132
-
133
-
134
-
135
-
136
-
137
-
138
-
139
-
140
-
141
-
142
-
143
-
144
-
145
-
146
-
147
-
148
-
149
-
150
-
151
-
152
-
153
-
154
-
155
-
156
-
157
-
158
-
159
-
160
-
161
-
162
-
163
-
164
-
165
-
166
-
167
-
168
-
169
-
170
-
171
-
172
-
173
-
174
-
175
-
176
 |
 |