TEAC NP-H750 NP-H750 Owner's Manual - Page 18
Names and functions of parts remote control 2
 |
View all TEAC NP-H750 manuals
Add to My Manuals
Save this manual to your list of manuals |
Page 18 highlights
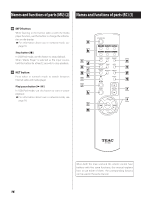
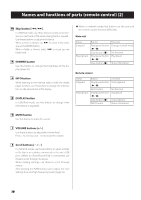
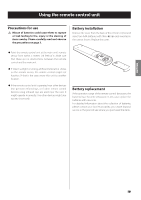
Names and functions of parts (remote control) (2) m Skip button [.//] In USB/iPod mode, use these buttons to skip to the previous or next track or file when playing back or paused. Use these buttons to adjust the balance. When a menu is shown, use / to select in the same way as the ENTER button. When a folder is shown, press . to move up one folder level. n DIMMER button Use this button to change the brightness of the display (page 26). o INFO button While listening to the Internet radio or with the media player function, use this button to change the information on the second line of the display. p DISPLAY button In USB/iPod mode, use this button to change what information is displayed. ppWhen in network mode, the buttons on the unit and the remote control function differently. Main unit Status Stopped Playing back Button Play/pause button (7/9) Stop button (8) Play/pause button (7/9) Stop button (8) Function Change network mode No function Play/pause Show information Remote control Status Stopped Playing back Button Play/pause button (7/9) INFO button Play/pause button (7/9) Stop button (8) INFO button Function Start playback No function Play/pause Stop playback Show information q MUTE button Use this button to mute the sound. r VOLUME buttons [+/−] Use these buttons to adjust the volume level. Press + to increase and − to decrease the volume. s Scroll buttons [k/j] In USB/iPod mode, use these buttons to select a folder or file that is on a device connected to the unit's USB port. (When an iPod/iPhone/iPad is connected, use these to scroll through its menu.) When making settings, use these to scroll through menus. After pressing the TONE button, use to adjust the tone settings (low and high frequency levels) (page 26). 18
-
 1
1 -
2
-
3
-
4
-
5
-
6
-
7
-
8
-
9
-
10
-
11
-
12
-
 13
13 -
 14
14 -
 15
15 -
 16
16 -
 17
17 -
 18
18 -
 19
19 -
 20
20 -
 21
21 -
 22
22 -
 23
23 -
24
-
25
-
26
-
27
-
28
-
29
-
30
-
31
-
32
-
33
-
34
-
35
-
36
-
37
-
38
-
39
-
40
-
41
-
42
-
43
-
44
-
45
-
46
-
47
-
48
-
49
-
50
-
51
-
52
-
53
-
54
-
55
-
56
-
57
-
58
-
59
-
60
-
61
-
62
-
63
-
64
-
65
-
66
-
67
-
68
-
69
-
70
-
71
-
72
-
73
-
74
-
75
-
76
-
77
-
78
-
79
-
80
-
81
-
82
-
83
-
84
-
85
-
86
-
87
-
88
-
89
-
90
-
91
-
92
-
93
-
94
-
95
-
96
-
97
-
98
-
99
-
100
-
101
-
102
-
103
-
104
-
105
-
106
-
107
-
108
-
109
-
110
-
111
-
112
-
113
-
114
-
115
-
116
-
117
-
118
-
119
-
120
-
121
-
122
-
123
-
124
-
125
-
126
-
127
-
128
-
129
-
130
-
131
-
132
-
133
-
134
-
135
-
136
-
137
-
138
-
139
-
140
-
141
-
142
-
143
-
144
-
145
-
146
-
147
-
148
-
149
-
150
-
151
-
152
-
153
-
154
-
155
-
156
-
157
-
158
-
159
-
160
-
161
-
162
-
163
-
164
-
165
-
166
-
167
-
168
-
169
-
170
-
171
-
172
-
173
-
174
-
175
-
176
 |
 |
