Thermador CIT367YGS Instructions for Use - Page 13
HeatShift® function
 |
View all Thermador CIT367YGS manuals
Add to My Manuals
Save this manual to your list of manuals |
Page 13 highlights
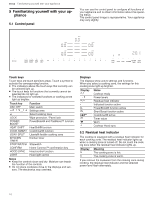
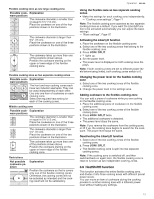
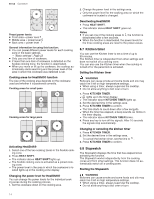
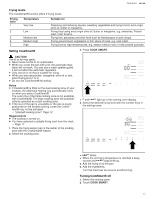
Flexible cooking zone as one large cooking zone Possible cook- Explanation ware positions The cookware diameter is smaller than or equal to 5⅛" (13 cm). Place the cookware on one of the four positions shown in the illustration. The cookware diameter is larger than 5⅛" (13 cm). Place the cookware on one of the three positions shown in the illustration. The cookware takes up more than one of the positions shown above. Position the cookware starting on the upper or lower edge of the flexible cooking zone. Flexible cooking zone as two separate cooking zones Possible cook- Explanation ware positions The front and rear cooking zones each have two induction elements. They can be used independently of each other. Use only one item of cookware on each cooking zone. Select the required heat setting for each of the cooking zones. Middle cooking zone Possible cook- Explanation ware positions The cookware diameter is smaller than or equal to 5⅛" (13 cm). Place the cookware on one of the three positions shown in the illustration. The cookware diameter is larger than 5⅛" (13 cm). Place the cookware on one of the two positions shown in the illustration. The cookware takes up more than one of the positions shown above. Position the cookware starting on the upper or lower edge of the flexible cooking zone. Restrictions Not possible cookware position Explanation Position the cookware so that is covers only one of the flexible cooking zones. Otherwise, the cooking zones will not be activated as intended and the cooking result will not be satisfactory. Operation en-us Using the flexible zone as two separate cooking zones ▶ Make the settings for each cooking zone independently. → "Cooking zone settings", Page 11 Note: The flexible cooking zone operates as two separate cooking zones as a default. If you want the Liberty® function to be activated automatically you can adjust the basic settings. → "Basic settings", Page 22 Activating the Liberty® function 1. Place the cookware on the flexible cooking zone. 2. Select one of the two cooking zones that belong to the flexible cooking zone. 3. Press JOIN I SPLIT. a lights up. 4. Set the power level. a The power level is displayed on both cooking zone dis- plays. Note: If both cooking zones are set to different power levels before being linked, both cooking zones switch to 0. Changing the power level for the flexible cooking zone 1. Select one of the two cooking zones of the flexible cooking zone. 2. Change the power level in the settings area. Adding cookware to the flexible cooking zone You can add a piece of cookware while you are cooking on the flexible cooking zone. 1. Place the additional piece of cookware on the flexible cooking zone. 2. Select one of the two cooking zones of the flexible cooking zone. 3. Press JOIN I SPLIT twice. a The additional cookware is detected. a The power level stays the same. Note: If you remove the cookware from the cooking zone, or lift it up, the cooking zone begins to search for the cookware. The power level stays the same. Deactivating the Liberty® function 1. Select one of the two cooking zones of the flexible cooking zone. 2. Press JOIN I SPLIT. a The flexible cooking zone is split into two separate cooking zones. Note: If the cooking zone is switched off, and then switched back on again later, the flexible cooking zone is reset to function as two independent cooking zones. 6.6 HeatShift® function This function activates the entire flexible cooking zone, and divides it into three cooking areas with different preset power levels. You can move an item of cookware during the cooking process to another cooking area with a different power level without making any settings. 13
-
 1
1 -
2
-
3
-
4
-
5
-
6
-
7
-
 8
8 -
 9
9 -
 10
10 -
 11
11 -
 12
12 -
 13
13 -
 14
14 -
 15
15 -
 16
16 -
 17
17 -
 18
18 -
19
-
20
-
21
-
22
-
23
-
24
-
25
-
26
-
27
-
28
-
29
-
30
-
31
-
32
-
33
-
34
-
35
-
36
-
37
-
38
-
39
-
40
-
41
-
42
-
43
-
44
-
45
-
46
-
47
-
48
-
49
-
50
-
51
-
52
-
53
-
54
-
55
-
56
-
57
-
58
-
59
-
60
-
61
-
62
-
63
-
64
-
65
-
66
-
67
-
68
-
69
-
70
-
71
-
72
-
73
-
74
-
75
-
76
 |
 |
