Thermador CIT367YGS Instructions for Use - Page 22
Wipe protection, Basic settings
 |
View all Thermador CIT367YGS manuals
Add to My Manuals
Save this manual to your list of manuals |
Page 22 highlights
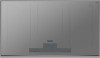
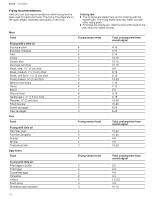
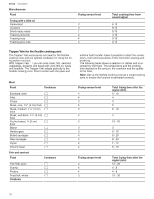
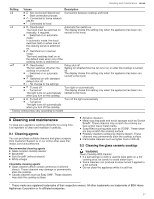
en-us Operation Automatic panel lock This function automatically activates the panel lock when you switch off the cooktop. The automatic panel lock can be activated in the basic settings → Page 22. 6.14 Wipe protection With this function you can avoid changing the settings while cleaning the control panel during cooking. This function does not lock the main switch. You can turn the cooktop off at any time. Activating wipe protection ▶ Touch LOCK. a The indicator above LOCK lights up. a The control panel is locked for 35 seconds. a After 30 seconds a beep indicates that the wipe protec- tion is about to turn off. Deactivating wipe protection ▶ Touch LOCK. a The indicator above LOCK goes out. 6.15 Basic settings You can configure your appliance to meet your needs. Basic settings overview Here you can find an overview of the basic settings and the preset factory settings. Display Function Panel lock - Manual1 - Automatic - Function deactivated Signal tones - Confirmation signal and error signal are off. The main switch signal remains on. - Only error signal is on. - Only confirmation signal is on. - Confirmation signal and error signal are on.1 Display energy consumption - Deactivated.1 - Activated. Duration of timer end signal - 10 seconds1 - 30 seconds - 1 minute 1 Factory setting (may vary according to model) 2 The cooktop's maximum power output is shown on the rating plate Display Function Power management function. Limiting the to- tal power of the cooktop. The available set- tings depend on the maximum power of the cooktop. - Deactivated1, 2 - 1.000 W minimum power - 1.500 W ... - 3.000 W recommended for 13 A . - 3.500 W recommended for 16 A - 4.000 W . - 4.500 W recommended for 20 A ... or . - Maximum power of the cooktop2 Changing the preset power levels for HeatShift® - Preset power level for the front cooking zone. - Preset power level for the middle cooking zone. - Preset power level for the rear cooking zone. Results for suitability test for cookware - Not suitable. - Not ideal. -Suitable. Configuring status of Liberty® cooking zone when the cooktop is turned on - As two independent cooking zones1 - As a joined cooking zone. Restore factory settings - Off1 - Restore appliance to factory settings 1 Factory setting (may vary according to model) 2 The cooktop's maximum power output is shown on the rating plate Changing the basic settings Requirement: The cooktop is turned off. 1. Turn on the cooktop. 2. Within the next 10 seconds, press KITCHEN TIMER for about 4 seconds. The first four displays provide the product information. To call up the individual displays, touch the control panel. Product information Customer Support index (CI) Production number Production number 1 Production number 2 Display . 22
-
 1
1 -
2
-
3
-
4
-
5
-
6
-
7
-
8
-
9
-
10
-
11
-
12
-
13
-
14
-
15
-
16
-
 17
17 -
 18
18 -
 19
19 -
 20
20 -
 21
21 -
 22
22 -
 23
23 -
 24
24 -
 25
25 -
 26
26 -
 27
27 -
28
-
29
-
30
-
31
-
32
-
33
-
34
-
35
-
36
-
37
-
38
-
39
-
40
-
41
-
42
-
43
-
44
-
45
-
46
-
47
-
48
-
49
-
50
-
51
-
52
-
53
-
54
-
55
-
56
-
57
-
58
-
59
-
60
-
61
-
62
-
63
-
64
-
65
-
66
-
67
-
68
-
69
-
70
-
71
-
72
-
73
-
74
-
75
-
76
 |
 |