Thermador CIT367YGS Instructions for Use - Page 23
Home Connect™
 |
View all Thermador CIT367YGS manuals
Add to My Manuals
Save this manual to your list of manuals |
Page 23 highlights
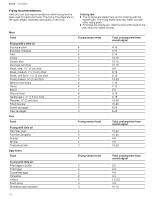
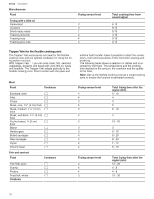
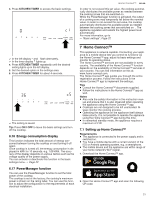
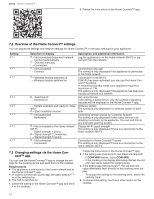
3. Press KITCHEN TIMER to access the basic settings. Home Connect™ en-us In order to not exceed this set value, the cooktop automatically distributes the available power as needed between the cooking zones that are switched on. While the PowerManager function is activated, the output of a cooking zone may temporarily fall below the nominal value. In order to not exceed this set value, the cooktop automatically distributes the available power as needed between the cooking zones that are switched on . The appliance regulates and selects the highest power level automatically. For more information, go to → "Basic settings", Page 22 a In the left display and flash alternately. a In the timer display lights up. 4. Press KITCHEN TIMER repeatedly until the desired setting lights up in the left display. 5. Set the desired option in the settings area. 6. Press KITCHEN TIMER for about 4 seconds. a The setting is saved. Tip: Press ON I OFF to leave the basic settings and turn off the cooktop. 6.16 Energy consumption display This function indicates the total amount of energy consumed between turning the cooktop on and turning it off again. Once cooktop is turned off, the energy consumption is displayed in kWh for 10 seconds, e.g. 1.08 kWh. The accuracy of the display depends on various factors such as the voltage quality of the power supply. You can activate or deactivate this function in the basic settings menu. → Page 22 6.17 PowerManager function You can use the PowerManager function to set the total power of the cooktop. The cooktop is set at the factory; the cooktop's maximum power is shown on the rating label. You can use this function to adjust the configuration to the requirements of each electrical installation. Home Connect™ 7 Home Connect™ Home Connect™ This appliance is network-capable. Connecting your appliance to a mobile device lets you control its functions via the Home Connect™ app, adjust its basic settings and monitor its operating status. The Home Connect™ services are not available in every country. The availability of the Home Connect™ function depends on the availability of Home Connect™ services in your country. You can find information on this at: www.home-connect.com. The Home Connect™ app guides you through the entire registration process. Follow the instructions in the Home Connect™ app to implement the settings. Tips ¡ Consult the Home Connect™ documents supplied. ¡ Follow the instructions in the Home Connect™ app as well. Notes ¡ Also note the safety information in this instruction man- ual and ensure that it is also observed when operating the appliance using the Home Connect™ app. ¡ Cooktops are not designed to be left unattended. Always monitor the cooking process. ¡ Operating the appliance on the appliance itself always takes priority. It is not possible to operate the appliance using the Home Connect™ app during this time. ¡ In networked standby mode, the appliance requires a maximum of 2 W. 7.1 Setting up Home Connect™ Requirements ¡ The appliance is connected to the power supply and is switched on. ¡ You have a mobile device with a current version of the iOS or Android operating system, e.g. a smartphone. ¡ The mobile device and the appliance are within range of your home network's Wi-Fi signal. 1. Download the Home Connect™ app. 2. Open the Home Connect™ app and scan the following QR code. 23
-
 1
1 -
2
-
3
-
4
-
5
-
6
-
7
-
8
-
9
-
10
-
11
-
12
-
13
-
14
-
15
-
16
-
17
-
 18
18 -
 19
19 -
 20
20 -
 21
21 -
 22
22 -
 23
23 -
 24
24 -
 25
25 -
 26
26 -
 27
27 -
 28
28 -
29
-
30
-
31
-
32
-
33
-
34
-
35
-
36
-
37
-
38
-
39
-
40
-
41
-
42
-
43
-
44
-
45
-
46
-
47
-
48
-
49
-
50
-
51
-
52
-
53
-
54
-
55
-
56
-
57
-
58
-
59
-
60
-
61
-
62
-
63
-
64
-
65
-
66
-
67
-
68
-
69
-
70
-
71
-
72
-
73
-
74
-
75
-
76
 |
 |
