Toshiba Satellite A65-S1762 Satellite A60/A65 Users Guide - Page 63
turned on., Do not install or remove a memory module while
 |
View all Toshiba Satellite A65-S1762 manuals
Add to My Manuals
Save this manual to your list of manuals |
Page 63 highlights
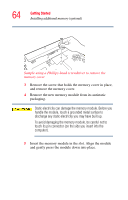
Getting Started Installing additional memory (optional) 63 Do not try to install a memory module under the following conditions. You can damage the computer and the module. 1. The computer is turned on. 2. The computer was shut down using Standby or Hibernation mode. 3. Power to the DVD-ROM or multi-function drive has been turned on. Do not install or remove a memory module while the DVD-ROM or multi-function drive power is on. You need a standard Phillips no. 0 (zero) screwdriver to install a memory module. To avoid damaging the computer's screws, use a standard Phillips no. 0 (zero) screwdriver that is in good condition. If you are adding memory after you have started to use the computer, begin at step 1, otherwise skip to step 2. 1 Turn off the computer via the Start menu. See "Turn Off or Shut down command" on page 102. The operating system turns off the computer. 2 Close the display panel and turn the computer upside down with the front side of the computer facing you.
-
 1
1 -
2
-
3
-
4
-
5
-
6
-
7
-
8
-
9
-
10
-
11
-
12
-
13
-
14
-
15
-
16
-
17
-
18
-
19
-
20
-
21
-
22
-
23
-
24
-
25
-
26
-
27
-
28
-
29
-
30
-
31
-
32
-
33
-
34
-
35
-
36
-
37
-
38
-
39
-
40
-
41
-
42
-
43
-
44
-
45
-
46
-
47
-
48
-
49
-
50
-
51
-
52
-
53
-
54
-
55
-
56
-
57
-
 58
58 -
 59
59 -
 60
60 -
 61
61 -
 62
62 -
 63
63 -
 64
64 -
 65
65 -
 66
66 -
 67
67 -
 68
68 -
69
-
70
-
71
-
72
-
73
-
74
-
75
-
76
-
77
-
78
-
79
-
80
-
81
-
82
-
83
-
84
-
85
-
86
-
87
-
88
-
89
-
90
-
91
-
92
-
93
-
94
-
95
-
96
-
97
-
98
-
99
-
100
-
101
-
102
-
103
-
104
-
105
-
106
-
107
-
108
-
109
-
110
-
111
-
112
-
113
-
114
-
115
-
116
-
117
-
118
-
119
-
120
-
121
-
122
-
123
-
124
-
125
-
126
-
127
-
128
-
129
-
130
-
131
-
132
-
133
-
134
-
135
-
136
-
137
-
138
-
139
-
140
-
141
-
142
-
143
-
144
-
145
-
146
-
147
-
148
-
149
-
150
-
151
-
152
-
153
-
154
-
155
-
156
-
157
-
158
-
159
-
160
-
161
-
162
-
163
-
164
-
165
-
166
-
167
-
168
-
169
-
170
-
171
-
172
-
173
-
174
-
175
-
176
-
177
-
178
-
179
-
180
-
181
-
182
-
183
-
184
-
185
-
186
-
187
-
188
-
189
-
190
-
191
-
192
-
193
-
194
-
195
-
196
-
197
-
198
-
199
-
200
-
201
-
202
-
203
-
204
-
205
-
206
-
207
-
208
-
209
-
210
-
211
-
212
-
213
-
214
-
215
-
216
-
217
-
218
-
219
-
220
-
221
-
222
-
223
-
224
-
225
-
226
-
227
-
228
-
229
-
230
-
231
-
232
-
233
-
234
-
235
-
236
-
237
-
238
-
239
-
240
-
241
-
242
 |
 |
