Toshiba Satellite A65-S1762 Satellite A60/A65 Users Guide - Page 72
Connecting an optional external diskette drive
 |
View all Toshiba Satellite A65-S1762 manuals
Add to My Manuals
Save this manual to your list of manuals |
Page 72 highlights
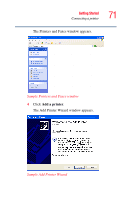
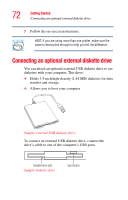
72 Getting Started Connecting an optional external diskette drive 5 Follow the on-screen instructions. HINT: If you are using more than one printer, make sure the name is descriptive enough to help you tell the difference. Connecting an optional external diskette drive You can attach an optional external USB diskette drive to use diskettes with your computer. This drive: ❖ Holds 3.5-inch high-density (1.44 MB) diskettes for data transfer and storage. ❖ Allows you to boot your computer Sample external USB diskette drive To connect an external USB diskette drive, connect the drive's cable to one of the computer's USB ports. Diskette drive LED Sample diskette drive Eject button
-
 1
1 -
2
-
3
-
4
-
5
-
6
-
7
-
8
-
9
-
10
-
11
-
12
-
13
-
14
-
15
-
16
-
17
-
18
-
19
-
20
-
21
-
22
-
23
-
24
-
25
-
26
-
27
-
28
-
29
-
30
-
31
-
32
-
33
-
34
-
35
-
36
-
37
-
38
-
39
-
40
-
41
-
42
-
43
-
44
-
45
-
46
-
47
-
48
-
49
-
50
-
51
-
52
-
53
-
54
-
55
-
56
-
57
-
58
-
59
-
60
-
61
-
62
-
63
-
64
-
65
-
66
-
 67
67 -
 68
68 -
 69
69 -
 70
70 -
 71
71 -
 72
72 -
 73
73 -
 74
74 -
 75
75 -
 76
76 -
 77
77 -
78
-
79
-
80
-
81
-
82
-
83
-
84
-
85
-
86
-
87
-
88
-
89
-
90
-
91
-
92
-
93
-
94
-
95
-
96
-
97
-
98
-
99
-
100
-
101
-
102
-
103
-
104
-
105
-
106
-
107
-
108
-
109
-
110
-
111
-
112
-
113
-
114
-
115
-
116
-
117
-
118
-
119
-
120
-
121
-
122
-
123
-
124
-
125
-
126
-
127
-
128
-
129
-
130
-
131
-
132
-
133
-
134
-
135
-
136
-
137
-
138
-
139
-
140
-
141
-
142
-
143
-
144
-
145
-
146
-
147
-
148
-
149
-
150
-
151
-
152
-
153
-
154
-
155
-
156
-
157
-
158
-
159
-
160
-
161
-
162
-
163
-
164
-
165
-
166
-
167
-
168
-
169
-
170
-
171
-
172
-
173
-
174
-
175
-
176
-
177
-
178
-
179
-
180
-
181
-
182
-
183
-
184
-
185
-
186
-
187
-
188
-
189
-
190
-
191
-
192
-
193
-
194
-
195
-
196
-
197
-
198
-
199
-
200
-
201
-
202
-
203
-
204
-
205
-
206
-
207
-
208
-
209
-
210
-
211
-
212
-
213
-
214
-
215
-
216
-
217
-
218
-
219
-
220
-
221
-
222
-
223
-
224
-
225
-
226
-
227
-
228
-
229
-
230
-
231
-
232
-
233
-
234
-
235
-
236
-
237
-
238
-
239
-
240
-
241
-
242
 |
 |

72
Getting Started
Connecting an optional external diskette drive
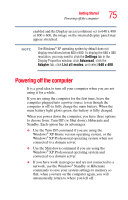
5
Follow the on-screen instructions.
HINT: If you are using more than one printer, make sure the
name is descriptive enough to help you tell the difference.
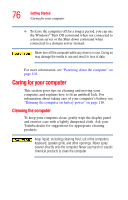
Connecting an optional external diskette drive
You can attach an optional external USB diskette drive to use
diskettes with your computer. This drive:
❖
Holds 3.5-inch high-density (1.44 MB) diskettes for data
transfer and storage.
❖
Allows you to boot your computer
Sample external USB diskette drive
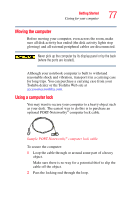
To connect an external USB diskette drive, connect the
drive’s cable to one of the computer’s USB ports.
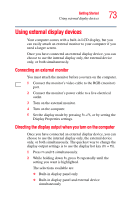
Sample diskette drive
Eject button
Diskette drive LED