Toshiba Satellite A65-S1762 Satellite A60/A65 Users Guide - Page 65
Sample inserting the memory module, Avoid touching the connectors on the memory module or
 |
View all Toshiba Satellite A65-S1762 manuals
Add to My Manuals
Save this manual to your list of manuals |
Page 65 highlights
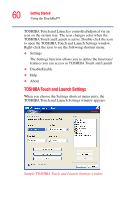
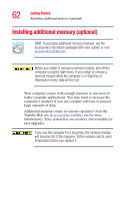
Getting Started Installing additional memory (optional) 65 Sample inserting the memory module Avoid touching the connectors on the memory module or on the computer. Grease or dust on the connectors may cause memory access problems. The clips on either side of the module will click to secure the module. 6 Replace the memory cover and screw. 7 Turn the computer over. 8 Turn on the computer. To verify that the computer correctly recognizes the memory, see "Checking total memory" on page 68. 9 If the computer does not recognize the memory, shut down the computer, remove the memory cover, and make sure the memory module is seated properly.
-
 1
1 -
2
-
3
-
4
-
5
-
6
-
7
-
8
-
9
-
10
-
11
-
12
-
13
-
14
-
15
-
16
-
17
-
18
-
19
-
20
-
21
-
22
-
23
-
24
-
25
-
26
-
27
-
28
-
29
-
30
-
31
-
32
-
33
-
34
-
35
-
36
-
37
-
38
-
39
-
40
-
41
-
42
-
43
-
44
-
45
-
46
-
47
-
48
-
49
-
50
-
51
-
52
-
53
-
54
-
55
-
56
-
57
-
58
-
59
-
 60
60 -
 61
61 -
 62
62 -
 63
63 -
 64
64 -
 65
65 -
 66
66 -
 67
67 -
 68
68 -
 69
69 -
 70
70 -
71
-
72
-
73
-
74
-
75
-
76
-
77
-
78
-
79
-
80
-
81
-
82
-
83
-
84
-
85
-
86
-
87
-
88
-
89
-
90
-
91
-
92
-
93
-
94
-
95
-
96
-
97
-
98
-
99
-
100
-
101
-
102
-
103
-
104
-
105
-
106
-
107
-
108
-
109
-
110
-
111
-
112
-
113
-
114
-
115
-
116
-
117
-
118
-
119
-
120
-
121
-
122
-
123
-
124
-
125
-
126
-
127
-
128
-
129
-
130
-
131
-
132
-
133
-
134
-
135
-
136
-
137
-
138
-
139
-
140
-
141
-
142
-
143
-
144
-
145
-
146
-
147
-
148
-
149
-
150
-
151
-
152
-
153
-
154
-
155
-
156
-
157
-
158
-
159
-
160
-
161
-
162
-
163
-
164
-
165
-
166
-
167
-
168
-
169
-
170
-
171
-
172
-
173
-
174
-
175
-
176
-
177
-
178
-
179
-
180
-
181
-
182
-
183
-
184
-
185
-
186
-
187
-
188
-
189
-
190
-
191
-
192
-
193
-
194
-
195
-
196
-
197
-
198
-
199
-
200
-
201
-
202
-
203
-
204
-
205
-
206
-
207
-
208
-
209
-
210
-
211
-
212
-
213
-
214
-
215
-
216
-
217
-
218
-
219
-
220
-
221
-
222
-
223
-
224
-
225
-
226
-
227
-
228
-
229
-
230
-
231
-
232
-
233
-
234
-
235
-
236
-
237
-
238
-
239
-
240
-
241
-
242
 |
 |

65
Getting Started
Installing additional memory (optional)
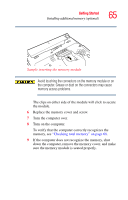
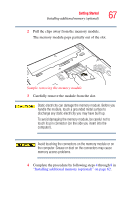
Sample inserting the memory module
Avoid touching the connectors on the memory module or on
the computer. Grease or dust on the connectors may cause
memory access problems.
The clips on either side of the module will click to secure
the module.
6
Replace the memory cover and screw.
7
Turn the computer over.
8
Turn on the computer.
To verify that the computer correctly recognizes the
memory, see
“Checking total memory” on page 68
.
9
If the computer does not recognize the memory, shut
down the computer, remove the memory cover, and make
sure the memory module is seated properly.