Toshiba Tecra A7 PTA71C-LL701EF Users Manual Canada; English - Page 98
Using the USB diskette drive
 |
View all Toshiba Tecra A7 PTA71C-LL701EF manuals
Add to My Manuals
Save this manual to your list of manuals |
Page 98 highlights
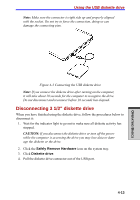
User's Manual How to Swipe the Finger Using the following steps when swiping fingers for fingerprint registration or authentication will help to minimize authentication failures: 1. Align the first joint of the finger to the center of the sensor. Lightly touch the sensor and swipe finger levelly towards you. While lightly touching the sensor, swipe the finger towards you until the sensor surface becomes visible. Ensure the center of the fingerprint is on the sensor when swiping the finger. Note Avoid swiping with the finger stiff or pressed-on too hard Fingerprint reading may fail if the center of the fingerprint is not touching on the sensor, or when finger is swiped while pressing hard. Make sure that the center of the fingerprint is touching the sensor before swiping. Confirm the center of the fingerprint whirl before swiping The thumb's fingerprint has a bigger whirl, which is prone to misalignment and distortions. This will cause difficulty in registration and a drop in the authentication success rate. Always confirm the center of the fingerprint whirl so that it is swiped along the centerline of the sensor. When fingerprint reading is not successful There is a possibility of authentication failures if the finger is swiped too quickly or too slowly. Follow the onscreen instructions to adjust the speed of the swipe. Using the USB diskette drive A 3 1/2" diskette drive connects to the computer's USB port. It accommodates 1.44-megabyte or 720-kilobyte diskettes. Refer to Chapter 2, The Grand Tour, for more information. Connecting 3 1/2" diskette drive To connect the drive, plug the diskette drive connector into a USB port. Refer to Figure 4-3. OPERATING BASICS 4-12
-
 1
1 -
2
-
3
-
4
-
5
-
6
-
7
-
8
-
9
-
10
-
11
-
12
-
13
-
14
-
15
-
16
-
17
-
18
-
19
-
20
-
21
-
22
-
23
-
24
-
25
-
26
-
27
-
28
-
29
-
30
-
31
-
32
-
33
-
34
-
35
-
36
-
37
-
38
-
39
-
40
-
41
-
42
-
43
-
44
-
45
-
46
-
47
-
48
-
49
-
50
-
51
-
52
-
53
-
54
-
55
-
56
-
57
-
58
-
59
-
60
-
61
-
62
-
63
-
64
-
65
-
66
-
67
-
68
-
69
-
70
-
71
-
72
-
73
-
74
-
75
-
76
-
77
-
78
-
79
-
80
-
81
-
82
-
83
-
84
-
85
-
86
-
87
-
88
-
89
-
90
-
91
-
92
-
 93
93 -
 94
94 -
 95
95 -
 96
96 -
 97
97 -
 98
98 -
 99
99 -
 100
100 -
 101
101 -
 102
102 -
 103
103 -
104
-
105
-
106
-
107
-
108
-
109
-
110
-
111
-
112
-
113
-
114
-
115
-
116
-
117
-
118
-
119
-
120
-
121
-
122
-
123
-
124
-
125
-
126
-
127
-
128
-
129
-
130
-
131
-
132
-
133
-
134
-
135
-
136
-
137
-
138
-
139
-
140
-
141
-
142
-
143
-
144
-
145
-
146
-
147
-
148
-
149
-
150
-
151
-
152
-
153
-
154
-
155
-
156
-
157
-
158
-
159
-
160
-
161
-
162
-
163
-
164
-
165
-
166
-
167
-
168
-
169
-
170
-
171
-
172
-
173
-
174
-
175
-
176
-
177
-
178
-
179
-
180
-
181
-
182
-
183
-
184
-
185
-
186
-
187
-
188
-
189
-
190
-
191
-
192
-
193
-
194
-
195
-
196
-
197
-
198
-
199
-
200
-
201
-
202
-
203
-
204
-
205
-
206
-
207
-
208
-
209
-
210
-
211
-
212
-
213
-
214
-
215
-
216
-
217
-
218
-
219
-
220
-
221
-
222
-
223
-
224
-
225
-
226
-
227
-
228
-
229
-
230
-
231
-
232
-
233
-
234
-
235
-
236
-
237
-
238
-
239
-
240
-
241
-
242
-
243
-
244
-
245
-
246
-
247
-
248
-
249
-
250
-
251
-
252
-
253
-
254
-
255
-
256
-
257
-
258
-
259
-
260
-
261
-
262
-
263
-
264
-
265
-
266
-
267
-
268
-
269
-
270
-
271
-
272
-
273
-
274
-
275
-
276
 |
 |