Yamaha 640 Owner's Manual - Page 53
DSP (PSR-640), PSR-640
 |
View all Yamaha 640 manuals
Add to My Manuals
Save this manual to your list of manuals |
Page 53 highlights
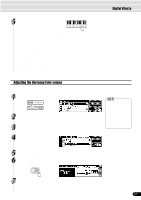
Digital Effects DSP (PSR-640) Applying the DSP effect Press the [DSP] button. The effect will be applied when you play the R1, R2 and L voices from the keyboard. In addition, when the [FAST/SLOW] button is pressed, the indicator lights up indicating that the variation of the DSP effect is selected. When the DSP effect type is Rotary Speaker or Tremolo, the speed of the modulation becomes fast. Selecting a DSP Type 1 3- Use the same operation as in "Reverb" (page 50). 4 Select "DSP." Use the data dial, the [+/YES] button or the [-/NO] button. 5 Press the [NEXT] button. BACK NEXT • When the Voice Set function is ON (page 136), the DSP effect and FAST/SLOW settings may change according to the selected R1 panel voice. 6 Select a DSP type. Use the data dial, the [+/YES] button or the [-/NO] button. Refer to the DSP Type List (page 154). 7 Play the keyboard. Try out some of the other DSP types as well. • When the selected DSP type is an Insertion Effect (pages 54, 152), the DSP effect applies only to the Voice R1. Adjust the depth of the DSP. The two parameters below affect the depth of the DSP effect. q DSP Depth (Send level page 91 Sets the DSP depth for the specified voice or track, and thus the amount of DSP effect applied to that voice or track. q DSP Return Level See below Sets the amount of DSP effect returned from the DSP effect stage, thus making it possible to adjust the degree of DSP effect applied to the overall sound. 8 Press the [NEXT] button. BACK NEXT • If DSP Insertion Effect is selected (page 54), you won't be able to set the DSP Return Level. 9 Adjust the DSP return level. Use the data dial, the [+/YES] button, the [-/NO] button or the number buttons [1]-[0]. 53 51
-
 1
1 -
2
-
3
-
4
-
5
-
6
-
7
-
8
-
9
-
10
-
11
-
12
-
13
-
14
-
15
-
16
-
17
-
18
-
19
-
20
-
21
-
22
-
23
-
24
-
25
-
26
-
27
-
28
-
29
-
30
-
31
-
32
-
33
-
34
-
35
-
36
-
37
-
38
-
39
-
40
-
41
-
42
-
43
-
44
-
45
-
46
-
47
-
 48
48 -
 49
49 -
 50
50 -
 51
51 -
 52
52 -
 53
53 -
 54
54 -
 55
55 -
 56
56 -
 57
57 -
 58
58 -
59
-
60
-
61
-
62
-
63
-
64
-
65
-
66
-
67
-
68
-
69
-
70
-
71
-
72
-
73
-
74
-
75
-
76
-
77
-
78
-
79
-
80
-
81
-
82
-
83
-
84
-
85
-
86
-
87
-
88
-
89
-
90
-
91
-
92
-
93
-
94
-
95
-
96
-
97
-
98
-
99
-
100
-
101
-
102
-
103
-
104
-
105
-
106
-
107
-
108
-
109
-
110
-
111
-
112
-
113
-
114
-
115
-
116
-
117
-
118
-
119
-
120
-
121
-
122
-
123
-
124
-
125
-
126
-
127
-
128
-
129
-
130
-
131
-
132
-
133
-
134
-
135
-
136
-
137
-
138
-
139
-
140
-
141
-
142
-
143
-
144
-
145
-
146
-
147
-
148
-
149
-
150
-
151
-
152
-
153
-
154
-
155
-
156
-
157
-
158
-
159
-
160
-
161
-
162
-
163
-
164
-
165
-
166
-
167
-
168
-
169
-
170
-
171
-
172
-
173
-
174
-
175
-
176
-
177
-
178
-
179
-
180
-
181
-
182
-
183
-
184
-
185
-
186
-
187
-
188
 |
 |
