Yamaha 640 Owner's Manual - Page 72
Song Copy, Disk Operations, Copying song data from one floppy disk to another
 |
View all Yamaha 640 manuals
Add to My Manuals
Save this manual to your list of manuals |
Page 72 highlights
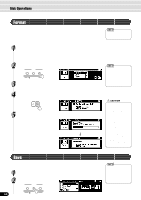
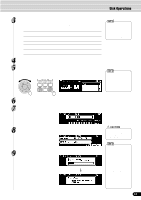
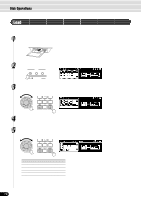
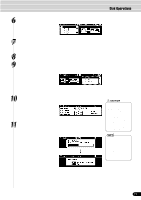
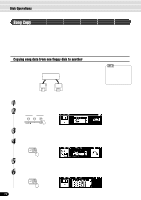
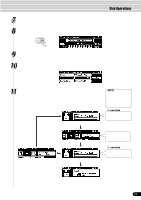
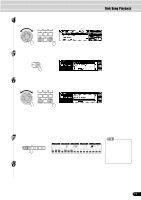
Disk Operations Song Copy This operation allows you to make backup copies of your important data. Primarily, this will come in handy when you are recording and editing song data. For example, if you are quantizing the track of a song (page 100) - which makes permanent changes to the track - making a backup copy of the song allows you to restore the original song data in case you're not satisfied with the results of the quantization. Having a dedicated backup disk for every song you work on is a good idea. In this way, you can save a new copy of the song each time you make an important edit to it. Copying song data from one floppy disk to another Prepare a backup disk by formatting it. One file can be copied at a time. As shown in the illustration below, first copy the desired file on the disk to internal memory, then copy it to the destination disk. PSR-740/640 Internal Memory copy copy • When the destination disk's write-protect tab is set to ON (see page 66) or the disk is a purposely "copy-protected" disk, an alert message appears indicating that the Copy function is not possible. Source Destination If the quantity of data is large, it may be necessary for the data to be copied in parts. 1 Insert the disk to be copied (source disk) into the disk drive. 2 Press the [UTILITY] button. LOAD DISK SAVE UTILITY DISK IN USE 3 Select "Copy." Use the data dial, the [+/YES] button or the [-/NO] button. 4 Press the [NEXT] button to display the Disk selection screen. BACK NEXT 5 Select "ANOTHER." Use the data dial, the [+/YES] button or the [-/NO] button. 6 Press the [NEXT] button to display the FILE selection screen. BACK NEXT 72 70
-
 1
1 -
2
-
3
-
4
-
5
-
6
-
7
-
8
-
9
-
10
-
11
-
12
-
13
-
14
-
15
-
16
-
17
-
18
-
19
-
20
-
21
-
22
-
23
-
24
-
25
-
26
-
27
-
28
-
29
-
30
-
31
-
32
-
33
-
34
-
35
-
36
-
37
-
38
-
39
-
40
-
41
-
42
-
43
-
44
-
45
-
46
-
47
-
48
-
49
-
50
-
51
-
52
-
53
-
54
-
55
-
56
-
57
-
58
-
59
-
60
-
61
-
62
-
63
-
64
-
65
-
66
-
 67
67 -
 68
68 -
 69
69 -
 70
70 -
 71
71 -
 72
72 -
 73
73 -
 74
74 -
 75
75 -
 76
76 -
 77
77 -
78
-
79
-
80
-
81
-
82
-
83
-
84
-
85
-
86
-
87
-
88
-
89
-
90
-
91
-
92
-
93
-
94
-
95
-
96
-
97
-
98
-
99
-
100
-
101
-
102
-
103
-
104
-
105
-
106
-
107
-
108
-
109
-
110
-
111
-
112
-
113
-
114
-
115
-
116
-
117
-
118
-
119
-
120
-
121
-
122
-
123
-
124
-
125
-
126
-
127
-
128
-
129
-
130
-
131
-
132
-
133
-
134
-
135
-
136
-
137
-
138
-
139
-
140
-
141
-
142
-
143
-
144
-
145
-
146
-
147
-
148
-
149
-
150
-
151
-
152
-
153
-
154
-
155
-
156
-
157
-
158
-
159
-
160
-
161
-
162
-
163
-
164
-
165
-
166
-
167
-
168
-
169
-
170
-
171
-
172
-
173
-
174
-
175
-
176
-
177
-
178
-
179
-
180
-
181
-
182
-
183
-
184
-
185
-
186
-
187
-
188
 |
 |
