Yamaha 640 Owner's Manual - Page 90
Mixer, Press the [MIXER] button., Adjust the volume from the corresponding display.
 |
View all Yamaha 640 manuals
Add to My Manuals
Save this manual to your list of manuals |
Page 90 highlights
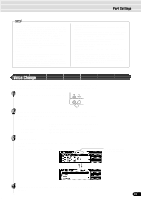
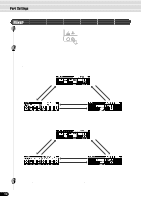
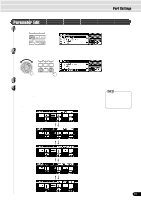
Part Settings Mixer 1 Press the [MIXER] button. The MIXER indicator flashes. 2 Adjust the volume from the corresponding display. There are three basic Mixer displays: one for the voices, one for the accompaniment or song tracks, and one for vocal harmony. The illustrations below show how to select the various displays. To adjust the desired volume setting, use the data dial, the [+/YES] button, the [-/NO] button or the number buttons [1]-[0]. q Style mode [TRACK9]-[TRACK16] buttons PART ON/OFF [VOICE R1] button [VOICE R2] button [VOICE L] button PART ON/OFF [VOICE R1] button [VOICE R2] button [VOICE L] button [TRACK9]-[TRACK16] buttons [TALK] button [VOCAL HARMONY ON/OFF] button [TALK] button [VOCAL HARMONY ON/OFF] button q Song mode [TRACK1]-[TRACK16] buttons PART ON/OFF [VOICE R1] button [VOICE R2] button [VOICE L] button PART ON/OFF [VOICE R1] button [VOICE R2] button [VOICE L] button [TRACK1]-[TRACK16] buttons [TALK] button [VOCAL HARMONY ON/OFF] button [TALK] button [VOCAL HARMONY ON/OFF] button 3 Press the [EXIT] button again to exit from the MIXER screen. 90 88
-
 1
1 -
2
-
3
-
4
-
5
-
6
-
7
-
8
-
9
-
10
-
11
-
12
-
13
-
14
-
15
-
16
-
17
-
18
-
19
-
20
-
21
-
22
-
23
-
24
-
25
-
26
-
27
-
28
-
29
-
30
-
31
-
32
-
33
-
34
-
35
-
36
-
37
-
38
-
39
-
40
-
41
-
42
-
43
-
44
-
45
-
46
-
47
-
48
-
49
-
50
-
51
-
52
-
53
-
54
-
55
-
56
-
57
-
58
-
59
-
60
-
61
-
62
-
63
-
64
-
65
-
66
-
67
-
68
-
69
-
70
-
71
-
72
-
73
-
74
-
75
-
76
-
77
-
78
-
79
-
80
-
81
-
82
-
83
-
84
-
 85
85 -
 86
86 -
 87
87 -
 88
88 -
 89
89 -
 90
90 -
 91
91 -
 92
92 -
 93
93 -
 94
94 -
 95
95 -
96
-
97
-
98
-
99
-
100
-
101
-
102
-
103
-
104
-
105
-
106
-
107
-
108
-
109
-
110
-
111
-
112
-
113
-
114
-
115
-
116
-
117
-
118
-
119
-
120
-
121
-
122
-
123
-
124
-
125
-
126
-
127
-
128
-
129
-
130
-
131
-
132
-
133
-
134
-
135
-
136
-
137
-
138
-
139
-
140
-
141
-
142
-
143
-
144
-
145
-
146
-
147
-
148
-
149
-
150
-
151
-
152
-
153
-
154
-
155
-
156
-
157
-
158
-
159
-
160
-
161
-
162
-
163
-
164
-
165
-
166
-
167
-
168
-
169
-
170
-
171
-
172
-
173
-
174
-
175
-
176
-
177
-
178
-
179
-
180
-
181
-
182
-
183
-
184
-
185
-
186
-
187
-
188
 |
 |
