Yamaha AW1600 Owner's Manual - Page 17
Parts of the AW1600 and what they do, Top panel - i
 |
View all Yamaha AW1600 manuals
Add to My Manuals
Save this manual to your list of manuals |
Page 17 highlights
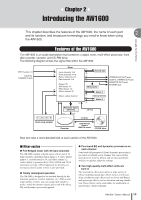
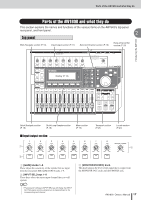
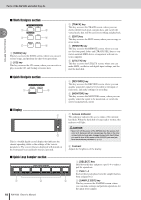
Parts of the AW1600 and what they do Parts of the AW1600 and what they do This section explains the names and functions of the various items on the AW1600's top panel, rear panel, and front panel. 2 Top panel Work Navigate section (P. 18) Input/output section (P. 17) Selected Channel section (P. 19) Data entry/control section (P. 20) Introducing the AW1600 Display (P. 18) Quick Navigate section (P. 18) Quick Loop Sampler section (P. 18) Mixer section (P. 19) ■ Input/output section Transport section (P. 21) Locate section (P. 20) 1 3 2 1 [GAIN] knobs 1-8 These adjust the sensitivity of the signals that are input from the rear panel MIC/LINE INPUT jacks 1-8. B [INPUT SEL] keys 1-8 These keys select the mixer input channel that you will operate. HINT • Pressing and holding an [INPUT SEL] key will display the INPUT SETTING popup window, allowing you to make settings for the corresponding input channel. C [MONITOR/PHONES] knob This knob adjusts the level of the signal that is output from the MONITOR OUT jacks and the PHONES jack. AW1600 Owner's Manual 17
-
 1
1 -
2
-
3
-
4
-
5
-
6
-
7
-
8
-
9
-
10
-
11
-
 12
12 -
 13
13 -
 14
14 -
 15
15 -
 16
16 -
 17
17 -
 18
18 -
 19
19 -
 20
20 -
 21
21 -
 22
22 -
23
-
24
-
25
-
26
-
27
-
28
-
29
-
30
-
31
-
32
-
33
-
34
-
35
-
36
-
37
-
38
-
39
-
40
-
41
-
42
-
43
-
44
-
45
-
46
-
47
-
48
-
49
-
50
-
51
-
52
-
53
-
54
-
55
-
56
-
57
-
58
-
59
-
60
-
61
-
62
-
63
-
64
-
65
-
66
-
67
-
68
-
69
-
70
-
71
-
72
-
73
-
74
-
75
-
76
-
77
-
78
-
79
-
80
-
81
-
82
-
83
-
84
-
85
-
86
-
87
-
88
-
89
-
90
-
91
-
92
-
93
-
94
-
95
-
96
-
97
-
98
-
99
-
100
-
101
-
102
-
103
-
104
-
105
-
106
-
107
-
108
-
109
-
110
-
111
-
112
-
113
-
114
-
115
-
116
-
117
-
118
-
119
-
120
-
121
-
122
-
123
-
124
-
125
-
126
-
127
-
128
-
129
-
130
-
131
-
132
-
133
-
134
-
135
-
136
-
137
-
138
-
139
-
140
-
141
-
142
-
143
-
144
-
145
-
146
-
147
-
148
-
149
-
150
-
151
-
152
-
153
-
154
-
155
-
156
-
157
-
158
-
159
-
160
-
161
-
162
-
163
-
164
-
165
-
166
-
167
-
168
-
169
-
170
-
171
-
172
-
173
-
174
-
175
-
176
-
177
-
178
-
179
-
180
-
181
-
182
-
183
-
184
-
185
-
186
-
187
-
188
-
189
-
190
-
191
-
192
-
193
-
194
-
195
-
196
-
197
-
198
-
199
-
200
-
201
-
202
-
203
-
204
-
205
-
206
-
207
-
208
-
209
-
210
-
211
-
212
-
213
-
214
-
215
-
216
-
217
-
218
-
219
-
220
-
221
-
222
-
223
-
224
-
225
-
226
-
227
-
228
-
229
-
230
-
231
-
232
 |
 |
