Yamaha AW1600 Owner's Manual - Page 211
Restoring the internal hard disk to the, factory-set condition, Installing a remote file - pros cons
 |
View all Yamaha AW1600 manuals
Add to My Manuals
Save this manual to your list of manuals |
Page 211 highlights
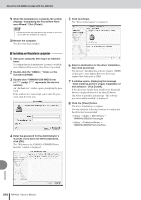
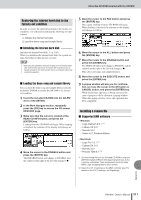
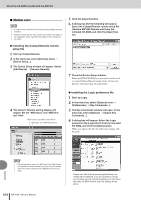
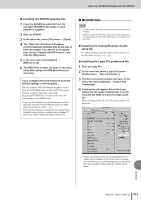
About the CD-ROM included with the AW1600 Restoring the internal hard disk to the factory-set condition In order to restore the internal hard disk to the factory-set condition, you will need to perform the following two procedures. A Initialize the internal hard disk B Load the demo song and sample library ■ Initializing the internal hard disk Initialize the internal hard disk. (→ p. 168) When you initialize the internal hard disk, the system settings will return to their factory-set state. NOTE • Executing this operation will erase all data from the internal hard disk, and the data cannot be recovered. We recommend you to backup all data on the internal hard disk to a computer before executing this operation. ■ Loading the demo song and sample library You can load the demo song and sample library from the included CD-ROM to restore the AW1600 to its factoryset condition. 1 Insert the included CD-ROM into the CD-RW drive of the AW1600. 2 In the Work Navigate section, repeatedly press the [CD] key to access the CD screen RESTORE page. 3 Make sure that the cursor is located at the READ CD INFO button, and press the [ENTER] key. Loading from the CD-ROM will begin. When loading is finished, the contents of the display will change as follows. 4 Move the cursor to the DISABLE button and press the [ENTER] key. The DISABLE button will change to ENABLE, and the symbol at the right of the list will change to ●. 5 Move the cursor to the PAD button and press the [ENTER] key. Once again, loading from the CD-ROM will begin. When loading is finished, the contents of the display will change as follows. 6 Move the cursor to the ALL button and press the [ENTER] key. 7 Move the cursor to the DISABLE button and press the [ENTER] key. The DISPLAY button will change to ENABLE, and all symbols at the right of the list will change to ●. This selects all songs and sample libraries. 8 Move the cursor to the EXECUTE button and press the [ENTER] key. 9 A popup window will ask you for confirmation, so move the cursor to the OK button or CANCEL button, and press the [ENTER] key. While the Restore operation is being executed, the state of progress will be shown in a popup window. When this popup window closes, the operation has been completed. Installing a remote file ■ Supported DAW software • Windows • Logic Platinum 5.5.1 (*1) • Cubase SX 3.0.1 • Nuendo 3.0.1 • Sonar 4.0.1 Producer Edition • Macintosh • Logic Pro 7.0.1 (*1) • Cubase SX 3.0.1 • Nuendo 3.0.1 • Protools TDM 6.7 (*2) *1 Use the setting file from the included CD-ROM to map the AW1600's faders/[TRACK SEL] keys/transport keys to the Logic key commands. Track assignments must be made within Logic as appropriate for your system. *2 Select the CS-10 settings as the MIDI controller type. For details on the CS-10 settings, ask Digidesign. Appendix AW1600 Owner's Manual 211
-
 1
1 -
2
-
3
-
4
-
5
-
6
-
7
-
8
-
9
-
10
-
11
-
12
-
13
-
14
-
15
-
16
-
17
-
18
-
19
-
20
-
21
-
22
-
23
-
24
-
25
-
26
-
27
-
28
-
29
-
30
-
31
-
32
-
33
-
34
-
35
-
36
-
37
-
38
-
39
-
40
-
41
-
42
-
43
-
44
-
45
-
46
-
47
-
48
-
49
-
50
-
51
-
52
-
53
-
54
-
55
-
56
-
57
-
58
-
59
-
60
-
61
-
62
-
63
-
64
-
65
-
66
-
67
-
68
-
69
-
70
-
71
-
72
-
73
-
74
-
75
-
76
-
77
-
78
-
79
-
80
-
81
-
82
-
83
-
84
-
85
-
86
-
87
-
88
-
89
-
90
-
91
-
92
-
93
-
94
-
95
-
96
-
97
-
98
-
99
-
100
-
101
-
102
-
103
-
104
-
105
-
106
-
107
-
108
-
109
-
110
-
111
-
112
-
113
-
114
-
115
-
116
-
117
-
118
-
119
-
120
-
121
-
122
-
123
-
124
-
125
-
126
-
127
-
128
-
129
-
130
-
131
-
132
-
133
-
134
-
135
-
136
-
137
-
138
-
139
-
140
-
141
-
142
-
143
-
144
-
145
-
146
-
147
-
148
-
149
-
150
-
151
-
152
-
153
-
154
-
155
-
156
-
157
-
158
-
159
-
160
-
161
-
162
-
163
-
164
-
165
-
166
-
167
-
168
-
169
-
170
-
171
-
172
-
173
-
174
-
175
-
176
-
177
-
178
-
179
-
180
-
181
-
182
-
183
-
184
-
185
-
186
-
187
-
188
-
189
-
190
-
191
-
192
-
193
-
194
-
195
-
196
-
197
-
198
-
199
-
200
-
201
-
202
-
203
-
204
-
205
-
 206
206 -
 207
207 -
 208
208 -
 209
209 -
 210
210 -
 211
211 -
 212
212 -
 213
213 -
 214
214 -
 215
215 -
 216
216 -
217
-
218
-
219
-
220
-
221
-
222
-
223
-
224
-
225
-
226
-
227
-
228
-
229
-
230
-
231
-
232
 |
 |
