Yamaha EAD10 EAD10 Reference Manual - Page 40
Press the SELECT button [F3] to select the Scene that you want to move.
 |
View all Yamaha EAD10 manuals
Add to My Manuals
Save this manual to your list of manuals |
Page 40 highlights
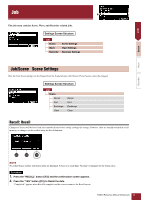
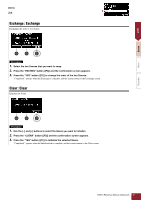
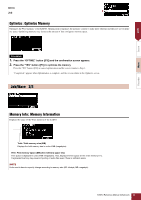
Job Scene Wave Recorder MENU Job Sort : Sort Changes the order of Scenes to call back when turning the [SCENE] knob. Procedure 1. Press the " " and " " buttons ([F1] and [F2]) to move the cursor. 2. Press the "SELECT" button ([F3]) to select the Scene that you want to move. 3. Press the " " and " " buttons ([F1] and [F2]), or the [-] and [+] buttons to move the selected Scene. 4. After moving the Scene to the position where you want it, press the "INSERT" button ([F3]). NOTE To cancel the order sort, press the [EXIT] button. Pressing the "INSERT" button ([F3]) sets the rearranged order and changes the Scene numbers accordingly. EAD10 Reference Manual (Advanced) 40
-
 1
1 -
2
-
3
-
4
-
5
-
6
-
7
-
8
-
9
-
10
-
11
-
12
-
13
-
14
-
15
-
16
-
17
-
18
-
19
-
20
-
21
-
22
-
23
-
24
-
25
-
26
-
27
-
28
-
29
-
30
-
31
-
32
-
33
-
34
-
 35
35 -
 36
36 -
 37
37 -
 38
38 -
 39
39 -
 40
40 -
 41
41 -
 42
42 -
 43
43 -
 44
44 -
 45
45 -
46
-
47
-
48
-
49
-
50
-
51
-
52
-
53
-
54
-
55
-
56
-
57
-
58
-
59
-
60
 |
 |

MENU
EAD10 Reference Manual (Advanced)
40
Job
Sort
:
Sort
Changes the order of Scenes to call back when turning the [SCENE] knob.
1.
Press the “
” and “
” buttons ([F1] and [F2]) to move the cursor.
2.
Press the “SELECT” button ([F3]) to select the Scene that you want to move.
3.
Press the “
” and “
” buttons ([F1] and [F2]), or the [–] and [+] buttons to move the selected Scene.
4.
After moving the Scene to the position where you want it, press the “INSERT” button ([F3]).
Pressing the “INSERT” button ([F3]) sets the rearranged order and changes the Scene numbers accordingly.
Procedure
To cancel the order sort, press the [EXIT] button.
NOTE
Job
Scene
Wave
Recorder