Yamaha MO8 Owner's Manual - Page 17
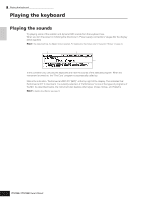
Group [A] - [H] buttons, DEC/NO] button - lcd parts
 |
UPC - 641018006938
View all Yamaha MO8 manuals
Add to My Manuals
Save this manual to your list of manuals |
Page 17 highlights
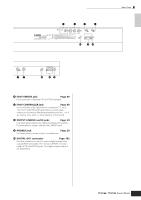
The Controls & Connectors Front Panel & [INFORMATION] button Page 37 For calling up a special "help" feature that shows information about the currently selected mode. You can go back to the previous display by pressing this button again or pressing any other button. Depending on the selected display, this button may be used to call up a window for inputting characters, for inputting numbers, for selecting note lengths, or for selecting keys or note names (page 35). * Data dial Page 35 For editing the currently selected parameter. To increase the value, turn the dial right (clockwise); to decrease the value, turn the dial left (counter-clockwise). If a parameter with a wide value range is selected, you can change the value in broader strokes by quickly turning the dial. ( [INC/YES] button Page 35 For increasing the value of the currently selected parameter. Also use it to actually execute a Job or a Store operation. º [DEC/NO] button Page 35 For decreasing the value of the currently selected parameter. Also use it to cancel a Job or a Store operation. n You can also use the [INC/YES] and [DEC/NO] buttons to quickly move through parameter values in 10-unit jumps, especially those with large ranges. Simply hold down one of the buttons (of the direction you want to jump), and simultaneously press the other. For example, to jump in the positive direction, hold down the [INC/YES] button and press [DEC/NO]. ¡ Cursor buttons Page 35 The cursor buttons move the "cursor" around the LCD display screen, highlighting and selecting the various parameters. ™ [EXIT] button Page 28 The menus and displays of this synthesizer are organized according to a hierarchical structure. Press this button to exit from the current display and return to the previous level in the hierarchy. £ [ENTER] button Use this button to execute a Job or a Store operation. Also use this button to actually enter a number when selecting a Memory or Bank for Voice or Performance. In the File mode, use this button to go to the next lowest level in the selected directory. ¢ Bank buttons Page 40 Each button selects a Voice or Performance Bank. When the [CATEGORY SEARCH] button is turned on, these buttons can be used to select the desired category (printed below each button). When the [SECTION] button is turned on in the Pattern mode, these buttons are used to select the desired section. ∞ Group [A] - [H] buttons Page 41 Each button selects a Voice or Performance Group. When the [CATEGORY SEARCH] button is turned on, these buttons can be used to select the desired category (printed below each button). When the [SECTION] button is turned on in the Pattern mode, these buttons are used to select the desired section. § Number [1] - [16] buttons Use of these buttons differs depending on the on/off status of the [TRACK SELECT] and [MUTE] buttons. Functions of the Number [1] - [16] buttons When [TRACK When [MUTE] SELECT] is on is on When both [TRACK SELECT] [MUTE] are off Keyboard Voice Play mode transmit channel - setting Voice Edit mode Element selection (1 - 4) and Element Mute setting (9 - 12) Voice selection, according to Groups A - H - Performance Play mode Performance Edit mode Keyboard transmit channel setting Performance part selection (1 - 4) Performance part Mute setting (1 - 4) Performance or Voice selection (if cursor is located at Voice name), according to Groups A - H Keyboard transmit channel setting (when memorizing the Voice mode or Performance Master Play mode mode to the current Master) or Song/Pattern track selection (when - Master selection, according to Groups A - H memorizing the Song mode or Pattern mode to the current Master) Master Edit mode Zone selection (1 - 4) - - Song/Pattern Play mode Song/Pattern Mixing mode Song/Pattern track selection Song/Pattern part selection Song/Pattern track Mute setting Song/Pattern part Mute setting Song/Pattern selection, according to Groups A - H Mixing Voice Edit mode Element selection (1 - 4) and Element Mute setting (9 - 12) - ¶ [CATEGORY SEARCH] button Page 42 When this button is turned on, the Bank buttons and the Group buttons can be used to select the Voice/ Performance category. • [SECTION] button Page 73 When this button is turned on in the Pattern mode, the Group [A] - [H] buttons can be used to select Pattern Sections A - H and the [PRE1] - [-] buttons of the Bank buttons can be used to select Pattern Sections I - P. ª [TRACK SELECT] button Page 76 Turning this button on in the Song/Pattern mode enables the Number [1] - [16] buttons for selecting corresponding Song/Pattern tracks. The on/off status of this button affects the Number [1] - [16] buttons in different ways, depending on the selected mode. (See § "Number [1] - [16] buttons" above.) , [MUTE] button Page 74 Turning this button on in the Song/Pattern mode enables the Number [1] - [16] buttons for muting corresponding Song/Pattern tracks. Press one of the Number [1] - [16] buttons while holding this button to solo the corresponding track of the current selected Song/Pattern. The on/off status of this button affects the Number [1] - [16] buttons in different ways, depending on the selected mode. (See § "Number [1] - [16] buttons" above.) Owner's Manual 17
-
 1
1 -
2
-
3
-
4
-
5
-
6
-
7
-
8
-
9
-
10
-
11
-
 12
12 -
 13
13 -
 14
14 -
 15
15 -
 16
16 -
 17
17 -
 18
18 -
 19
19 -
 20
20 -
 21
21 -
 22
22 -
23
-
24
-
25
-
26
-
27
-
28
-
29
-
30
-
31
-
32
-
33
-
34
-
35
-
36
-
37
-
38
-
39
-
40
-
41
-
42
-
43
-
44
-
45
-
46
-
47
-
48
-
49
-
50
-
51
-
52
-
53
-
54
-
55
-
56
-
57
-
58
-
59
-
60
-
61
-
62
-
63
-
64
-
65
-
66
-
67
-
68
-
69
-
70
-
71
-
72
-
73
-
74
-
75
-
76
-
77
-
78
-
79
-
80
-
81
-
82
-
83
-
84
-
85
-
86
-
87
-
88
-
89
-
90
-
91
-
92
-
93
-
94
-
95
-
96
-
97
-
98
-
99
-
100
-
101
-
102
-
103
-
104
-
105
-
106
-
107
-
108
-
109
-
110
-
111
-
112
-
113
-
114
-
115
-
116
-
117
-
118
-
119
-
120
-
121
-
122
-
123
-
124
-
125
-
126
-
127
-
128
-
129
-
130
-
131
-
132
-
133
-
134
-
135
-
136
-
137
-
138
-
139
-
140
-
141
-
142
-
143
-
144
-
145
-
146
-
147
-
148
-
149
-
150
-
151
-
152
-
153
-
154
-
155
-
156
-
157
-
158
-
159
-
160
-
161
-
162
-
163
-
164
-
165
-
166
-
167
-
168
-
169
-
170
-
171
-
172
-
173
-
174
-
175
-
176
-
177
-
178
-
179
-
180
-
181
-
182
-
183
-
184
-
185
-
186
-
187
-
188
-
189
-
190
-
191
-
192
-
193
-
194
-
195
-
196
-
197
-
198
-
199
-
200
-
201
-
202
-
203
-
204
-
205
-
206
-
207
-
208
-
209
-
210
-
211
-
212
-
213
-
214
-
215
-
216
-
217
-
218
-
219
-
220
-
221
-
222
-
223
-
224
-
225
-
226
-
227
-
228
-
229
-
230
-
231
-
232
-
233
-
234
-
235
-
236
-
237
-
238
-
239
-
240
 |
 |
