Yamaha MO8 Owner's Manual - Page 86
Editing a Pattern Chain, Converting a Pattern Chain to Song data
 |
UPC - 641018006938
View all Yamaha MO8 manuals
Add to My Manuals
Save this manual to your list of manuals |
Page 86 highlights
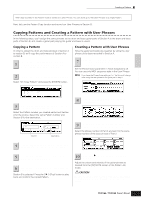
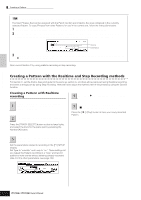
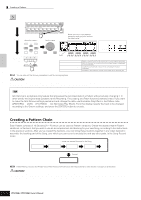
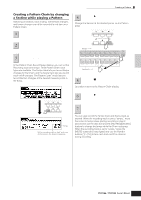
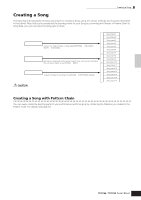
Quick Guide Creating a Song on the MO Creating a Pattern Editing a Pattern Chain The Pattern Chain Edit mode makes it possible to edit the order of the Sections in a chain, as well as insert tempo and scene/mute event data. 1 In the Pattern Play mode, select a Pattern for which data has already been created. Converting a Pattern Chain to Song data Once you've made a Pattern Chain, you can convert the data and create a Song with it. In the Pattern Play mode, select a Pattern for 1 which Pattern Chain data has already been created. 2 Press the [F6] CHAIN button to call up the Pattern Chain Play display. 2 Press the [F6] CHAIN button to call up the Pattern Chain Play display. Press the [EDIT] button to enter the Pattern 3 Chain Edit mode, then edit each track of the Pattern Chain. Press the [EXIT] button to return to the Pattern 4 Chain Play display, then press the [F] (Play) button to hear the edited Pattern Chain. 3 Press the [EDIT] button to enter the Pattern Chain Edit mode. Press the [F3] SONG button to call up the 4 "Convert to Song" display, then specify the destination Song. Save the created Pattern data to a USB 5 storage device (page 98) before turning the power off. EDIT Pattern Track Edit Enter the desired section (A - P) or the End mark by using the [INC/YES] and [DEC/NO] buttons. Scene Track Edit [F4] button Press the [F6] button to clear the event at the cursor location. [F4] button Tempo Track Edit When this box is checkmarked, program change messages in the MIDI sequence data are not copied. Destination Song number and the top measure number 5 Press the [ENTER] button to execute the Convert operation. The Pattern Chain data is converted to Song data and copied to the top measure of the destination Song. CAUTION This operation overwrites any data already existing at the destination Song. 6 Save the created Song data to a USB storage device (page 98) before turning the power off. CAUTION The created Song and Pattern data resides temporarily in DRAM (page 150). Because data contained in DRAM is lost when the power is turned off, you should always store any data residing in DRAM to a USB storage device before turning off the power. [F4] button Press the [F5] button to insert the event to the cursor location. Press the [F6] button to delete the event at the cursor location. 86 Owner's Manual
-
 1
1 -
2
-
3
-
4
-
5
-
6
-
7
-
8
-
9
-
10
-
11
-
12
-
13
-
14
-
15
-
16
-
17
-
18
-
19
-
20
-
21
-
22
-
23
-
24
-
25
-
26
-
27
-
28
-
29
-
30
-
31
-
32
-
33
-
34
-
35
-
36
-
37
-
38
-
39
-
40
-
41
-
42
-
43
-
44
-
45
-
46
-
47
-
48
-
49
-
50
-
51
-
52
-
53
-
54
-
55
-
56
-
57
-
58
-
59
-
60
-
61
-
62
-
63
-
64
-
65
-
66
-
67
-
68
-
69
-
70
-
71
-
72
-
73
-
74
-
75
-
76
-
77
-
78
-
79
-
80
-
 81
81 -
 82
82 -
 83
83 -
 84
84 -
 85
85 -
 86
86 -
 87
87 -
 88
88 -
 89
89 -
 90
90 -
 91
91 -
92
-
93
-
94
-
95
-
96
-
97
-
98
-
99
-
100
-
101
-
102
-
103
-
104
-
105
-
106
-
107
-
108
-
109
-
110
-
111
-
112
-
113
-
114
-
115
-
116
-
117
-
118
-
119
-
120
-
121
-
122
-
123
-
124
-
125
-
126
-
127
-
128
-
129
-
130
-
131
-
132
-
133
-
134
-
135
-
136
-
137
-
138
-
139
-
140
-
141
-
142
-
143
-
144
-
145
-
146
-
147
-
148
-
149
-
150
-
151
-
152
-
153
-
154
-
155
-
156
-
157
-
158
-
159
-
160
-
161
-
162
-
163
-
164
-
165
-
166
-
167
-
168
-
169
-
170
-
171
-
172
-
173
-
174
-
175
-
176
-
177
-
178
-
179
-
180
-
181
-
182
-
183
-
184
-
185
-
186
-
187
-
188
-
189
-
190
-
191
-
192
-
193
-
194
-
195
-
196
-
197
-
198
-
199
-
200
-
201
-
202
-
203
-
204
-
205
-
206
-
207
-
208
-
209
-
210
-
211
-
212
-
213
-
214
-
215
-
216
-
217
-
218
-
219
-
220
-
221
-
222
-
223
-
224
-
225
-
226
-
227
-
228
-
229
-
230
-
231
-
232
-
233
-
234
-
235
-
236
-
237
-
238
-
239
-
240
 |
 |
