Yamaha MO8 Owner's Manual - Page 89
Registering a Song Scene and Arpeggio type simultaneously to the [SF1] - [SF5], buttons
 |
UPC - 641018006938
View all Yamaha MO8 manuals
Add to My Manuals
Save this manual to your list of manuals |
Page 89 highlights
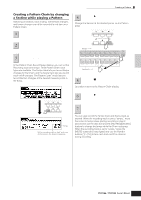
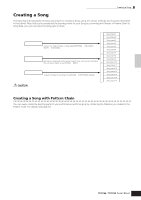
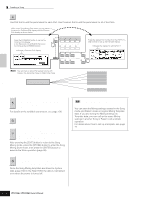
Creating a Song on the MO Quick Guide Creating a Song TIP Song Recording using a Performance If you have a favorite Performance or one that would fit the Song to be recorded, you can copy certain settings of up to four Parts of the Performance to the Song Mixing settings currently being edited. 1 Enter the Song Mixing Job mode ([SONG] ➞ [MIXING] ➞ [JOB]). 2 Press the [F5] PF COPY button to call up the Performance Copy display. 4 Press the [SONG] button to return to the Song Play mode, then select Track 1 and play the keyboard. Check whether the sound you hear is the same as that of the source Performance or not. 3 Set the parameters as necessary in the [F5] PF COPY display, then press the [ENTER] button to execute the Copy operation. Select a source Performance. Checkmark the boxes of the desired parameters. 5 Record your keyboard performance to Track 1. 6 Store the Song Mixing in the [SONG] ➞ [MIXING] ➞ [STORE] display. The settings copied from the Performance should be stored as Song Mixing data. 7 Save the Song data to a USB storage device in the File mode (page 98) before turning the power off. The destination Mixing Parts appear automatically. The displayed Part numbers differ depending on the source Performance. If the source Performance contains four Parts, "1, 2, 3, 4" appears here. n The explanations here also apply to the Pattern mode. CAUTION The destination Mixing Parts appear automatically. The displayed Part numbers differ depending on the source Performance. If the source Performance contains four Parts, "1, 2, 3, 4" appears here. The copy operation overwrites the Mixing settings previously existing in the destination. Registering a Song Scene and Arpeggio type simultaneously to the [SF1] - [SF5] buttons Song Scenes and Arpeggio types can both be registered to the [SF1] - [SF5] buttons (when the ARP1 - ARP5 menu items are shown at the bottom of the display). These settings are stored as Song data. Song Scene is a powerful function that allows you to store five different "snapshots" of important Song related parameters-including transpose, tempo, track mute status, and the basic sound/mixing controls (all parameter settings controllable from the Knobs with the [PAN/SEND] or [TONE] lamp turned on, and the Control sliders). You can call up both the Song Scene and Arpeggio type simultaneously by simply pressing one of the [SF1] - [SF5] buttons (when ARP1 - ARP5 are shown at the bottom of the display in the Song mode). ● Registering a Song Scene and Arpeggio type simultaneously to the [SF1] - [SF5] buttons ● Recalling a Song Scene and Arpeggio type simultaneously from the [SF1] - [SF5] buttons SCENE SCENE STORE + SF1 SF2 SF3 SF4 SF5 SF1 SF2 SF3 SF4 SF5 SCENE STORE SET LOCATE ARPEGGIO ON OFF Simultaneously hold the [STORE] button and press one of the [SF1] - [SF5] buttons. In the Song mode, you can register the Song Scene and Arpeggio type simultaneously to the [SF1] - [SF5] buttons only when the ARP1 - ARP5 menus appear at the bottom in the display. Owner's Manual 89
-
 1
1 -
2
-
3
-
4
-
5
-
6
-
7
-
8
-
9
-
10
-
11
-
12
-
13
-
14
-
15
-
16
-
17
-
18
-
19
-
20
-
21
-
22
-
23
-
24
-
25
-
26
-
27
-
28
-
29
-
30
-
31
-
32
-
33
-
34
-
35
-
36
-
37
-
38
-
39
-
40
-
41
-
42
-
43
-
44
-
45
-
46
-
47
-
48
-
49
-
50
-
51
-
52
-
53
-
54
-
55
-
56
-
57
-
58
-
59
-
60
-
61
-
62
-
63
-
64
-
65
-
66
-
67
-
68
-
69
-
70
-
71
-
72
-
73
-
74
-
75
-
76
-
77
-
78
-
79
-
80
-
81
-
82
-
83
-
 84
84 -
 85
85 -
 86
86 -
 87
87 -
 88
88 -
 89
89 -
 90
90 -
 91
91 -
 92
92 -
 93
93 -
 94
94 -
95
-
96
-
97
-
98
-
99
-
100
-
101
-
102
-
103
-
104
-
105
-
106
-
107
-
108
-
109
-
110
-
111
-
112
-
113
-
114
-
115
-
116
-
117
-
118
-
119
-
120
-
121
-
122
-
123
-
124
-
125
-
126
-
127
-
128
-
129
-
130
-
131
-
132
-
133
-
134
-
135
-
136
-
137
-
138
-
139
-
140
-
141
-
142
-
143
-
144
-
145
-
146
-
147
-
148
-
149
-
150
-
151
-
152
-
153
-
154
-
155
-
156
-
157
-
158
-
159
-
160
-
161
-
162
-
163
-
164
-
165
-
166
-
167
-
168
-
169
-
170
-
171
-
172
-
173
-
174
-
175
-
176
-
177
-
178
-
179
-
180
-
181
-
182
-
183
-
184
-
185
-
186
-
187
-
188
-
189
-
190
-
191
-
192
-
193
-
194
-
195
-
196
-
197
-
198
-
199
-
200
-
201
-
202
-
203
-
204
-
205
-
206
-
207
-
208
-
209
-
210
-
211
-
212
-
213
-
214
-
215
-
216
-
217
-
218
-
219
-
220
-
221
-
222
-
223
-
224
-
225
-
226
-
227
-
228
-
229
-
230
-
231
-
232
-
233
-
234
-
235
-
236
-
237
-
238
-
239
-
240
 |
 |
