Yamaha MO8 Owner's Manual - Page 93
Editing Mixing parameters to, complete a Song in the Mixing mode, Mixing Edit mode
 |
UPC - 641018006938
View all Yamaha MO8 manuals
Add to My Manuals
Save this manual to your list of manuals |
Page 93 highlights
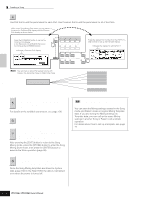
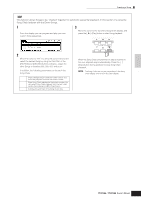
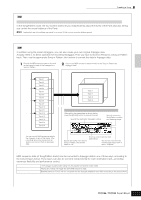
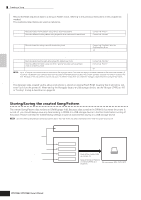
Creating a Song on the MO Quick Guide Creating a Song TIP Using the Undo/Redo functions If you're not satisfied with the results of a just-executed Job, or you want to hear the difference of the sound before and after using a Job, you can use the convenient Undo and Redo functions. After changing the data with a particular Job, repeat steps 1 - 4 as desired. 1 Press the [SONG] button to return to the Song Play mode, then press the [F] button to hear the Song as it was changed by the Job. This lets you check the results of the Job. 2 After stopping the Song, press the [JOB] button followed by the [F1] UNDO button to call up the Undo display. Press the [ENTER] button to execute Undo. The Song data is restored to its previous state. [ENTER] button Indicates the operation to be affected by Undo. Changes to "Redo." 3 Press the [SONG] button to return to the Song Play mode, then press the [F] (Play) button to play the Song. This lets you check the sound before actually making changes to it with the Job. 4 After stopping the Song, press the [JOB] button followed by the [F1] UNDO button to call up the Undo display. Press the [ENTER] button to execute the Redo. This lets you "redo" the Job, restoring the Song to the changes you made before using Undo in step 2 above. [ENTER] button Indicates the operation to be affected by Redo. Changes to "Undo." n Undo/Redo is applied to the most recent operation (Job, Edit, Record, etc.). n The Undo/Redo Job is available also in the Pattern Job mode. Editing Mixing parameters to complete a Song (in the Mixing mode/ Mixing Edit mode) In this final step (other than saving your precious work, which we'll cover next), you can mix down your tracks with the Song Mixing function-adjusting the volume balance and pan setting of all the parts and tweaking the effect levels. n The explanations here also apply to the Pattern mode. Press the [SONG] button to enter the Song 1 Play mode, then select a Song for which Mixing edits have been made. 2 Enter the Song Mixing mode by pressing the [MIXING] button (the lamp lights). Select the menu you wish to edit by pressing the [F1] - [F4] buttons, then edit the parameters in each display. If you alter any parameters, the [E] indicator will appear in the top left of the display. Press the [F5] VCE ED button to enter the Mixing Voice Edit mode (page 203). You can use the Song Mixing mode for the simple mixing functions. For information on the available parameters, see page 203. If you wish to edit more detailed Mixing parameters, enter the Song Mixing Edit mode. 3 Press the [EDIT] button to enter the Song Mixing Edit mode. EDIT JOB STORE COMPARE SCENE STORE SET LOCATE Owner's Manual 93
-
 1
1 -
2
-
3
-
4
-
5
-
6
-
7
-
8
-
9
-
10
-
11
-
12
-
13
-
14
-
15
-
16
-
17
-
18
-
19
-
20
-
21
-
22
-
23
-
24
-
25
-
26
-
27
-
28
-
29
-
30
-
31
-
32
-
33
-
34
-
35
-
36
-
37
-
38
-
39
-
40
-
41
-
42
-
43
-
44
-
45
-
46
-
47
-
48
-
49
-
50
-
51
-
52
-
53
-
54
-
55
-
56
-
57
-
58
-
59
-
60
-
61
-
62
-
63
-
64
-
65
-
66
-
67
-
68
-
69
-
70
-
71
-
72
-
73
-
74
-
75
-
76
-
77
-
78
-
79
-
80
-
81
-
82
-
83
-
84
-
85
-
86
-
87
-
 88
88 -
 89
89 -
 90
90 -
 91
91 -
 92
92 -
 93
93 -
 94
94 -
 95
95 -
 96
96 -
 97
97 -
 98
98 -
99
-
100
-
101
-
102
-
103
-
104
-
105
-
106
-
107
-
108
-
109
-
110
-
111
-
112
-
113
-
114
-
115
-
116
-
117
-
118
-
119
-
120
-
121
-
122
-
123
-
124
-
125
-
126
-
127
-
128
-
129
-
130
-
131
-
132
-
133
-
134
-
135
-
136
-
137
-
138
-
139
-
140
-
141
-
142
-
143
-
144
-
145
-
146
-
147
-
148
-
149
-
150
-
151
-
152
-
153
-
154
-
155
-
156
-
157
-
158
-
159
-
160
-
161
-
162
-
163
-
164
-
165
-
166
-
167
-
168
-
169
-
170
-
171
-
172
-
173
-
174
-
175
-
176
-
177
-
178
-
179
-
180
-
181
-
182
-
183
-
184
-
185
-
186
-
187
-
188
-
189
-
190
-
191
-
192
-
193
-
194
-
195
-
196
-
197
-
198
-
199
-
200
-
201
-
202
-
203
-
204
-
205
-
206
-
207
-
208
-
209
-
210
-
211
-
212
-
213
-
214
-
215
-
216
-
217
-
218
-
219
-
220
-
221
-
222
-
223
-
224
-
225
-
226
-
227
-
228
-
229
-
230
-
231
-
232
-
233
-
234
-
235
-
236
-
237
-
238
-
239
-
240
 |
 |
