Yamaha MO8 Owner's Manual - Page 90
Editing the recorded Song, Recording Song Scene changes to a Song - sound list
 |
UPC - 641018006938
View all Yamaha MO8 manuals
Add to My Manuals
Save this manual to your list of manuals |
Page 90 highlights
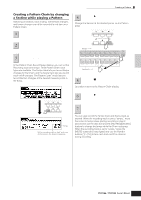
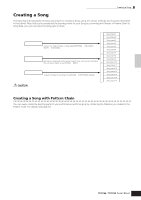
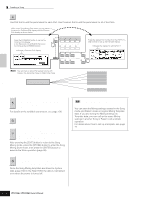
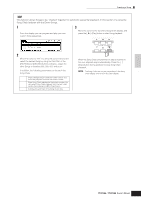
Quick Guide Creating a Song on the MO Creating a Song ■ Recalling a Song Scene and Arpeggio type during recording ARP1 - ARP5 menus appear also in the [F3] ARP display in the Song Record mode as well as the [F1] PLAY display in the Song Play mode. These indicate that you can change the Song Scene and Arpeggio type simultaneously during Song recording from the [F3] ARP display. ■ Recording Song Scene changes to a Song Each Song contains a Scene track to which you can record Scene changes. When the RecTrack is set to "scene" in step 4 described on page 88, you can record Scene changes from any display (even from those in which ARP1 - ARP5 are not shown) by pressing the [SF1] - [SF5] buttons during recording. n The explanations on Arpeggio here also apply to the Pattern mode. n As in the Voice mode and Performance mode, Arpeggio types can only be registered to the [SF1] - [SF5] buttons when the [ARPEGGIO ON/OFF] button is turned off. n For details on how to select an Arpeggio type in the Song mode/ Pattern mode, see page 80. Editing the recorded Song The Song Edit mode and Song Job mode can be used to edit or change the data of the already recorded Song. The Song Edit mode lets you change the recorded data and insert new data if needed. This includes note data as well as non-note data, such as program (Voice) changes and MIDI control change messages. The Song Job mode on the other hand provides a comprehensive variety of tools you can use to transform the recorded data-such as cleaning up the timing (Quantize), transposing, changing the velocity of notes, modifying the length of notes, and other useful operations for altering the sound. It also includes a variety of convenient operations, such as copying or erasing data. Most of these operations can be performed on either an entire track or a selected range of measures in the track. n The explanations here also apply to the Pattern mode. EDIT Song position MIDI events 007:2-000 Measure Clock (480 clocks number Beat per quarter-note) 3 Select a track to be edited. Select one of the three available track types by pressing the [F4] TR SEL (Track Select) button. Each press of the button alternates among the track types. To select one of the Pattern tracks (1 - 16), make sure the 1 - 16 track edit display is selected (see below), then turn the [TRACK SELECT] button on and press any of the [1] - [16] buttons. 1 2 3 4 5 6 7 8 ELEMENT PERF. PART ZONE 9 10 11 12 13 14 15 16 Select a track to be edited from 1 - 16. TRACK SELECT MUTE SOLO 1 - 16 track edit display ■ Editing the recorded Song data by MIDI event (in the Song Edit mode) 1 Press the [SONG] button to enter the Song Play mode, then select a Song to be edited. Enter the Song Edit mode by pressing the 2 [EDIT] button (the lamp lights), then press the [F1] CHANGE button to call up the MIDI event list display. Scene track edit display [F4] button Tempo track edit display [F4] button [F4] button 90 Owner's Manual
-
 1
1 -
2
-
3
-
4
-
5
-
6
-
7
-
8
-
9
-
10
-
11
-
12
-
13
-
14
-
15
-
16
-
17
-
18
-
19
-
20
-
21
-
22
-
23
-
24
-
25
-
26
-
27
-
28
-
29
-
30
-
31
-
32
-
33
-
34
-
35
-
36
-
37
-
38
-
39
-
40
-
41
-
42
-
43
-
44
-
45
-
46
-
47
-
48
-
49
-
50
-
51
-
52
-
53
-
54
-
55
-
56
-
57
-
58
-
59
-
60
-
61
-
62
-
63
-
64
-
65
-
66
-
67
-
68
-
69
-
70
-
71
-
72
-
73
-
74
-
75
-
76
-
77
-
78
-
79
-
80
-
81
-
82
-
83
-
84
-
 85
85 -
 86
86 -
 87
87 -
 88
88 -
 89
89 -
 90
90 -
 91
91 -
 92
92 -
 93
93 -
 94
94 -
 95
95 -
96
-
97
-
98
-
99
-
100
-
101
-
102
-
103
-
104
-
105
-
106
-
107
-
108
-
109
-
110
-
111
-
112
-
113
-
114
-
115
-
116
-
117
-
118
-
119
-
120
-
121
-
122
-
123
-
124
-
125
-
126
-
127
-
128
-
129
-
130
-
131
-
132
-
133
-
134
-
135
-
136
-
137
-
138
-
139
-
140
-
141
-
142
-
143
-
144
-
145
-
146
-
147
-
148
-
149
-
150
-
151
-
152
-
153
-
154
-
155
-
156
-
157
-
158
-
159
-
160
-
161
-
162
-
163
-
164
-
165
-
166
-
167
-
168
-
169
-
170
-
171
-
172
-
173
-
174
-
175
-
176
-
177
-
178
-
179
-
180
-
181
-
182
-
183
-
184
-
185
-
186
-
187
-
188
-
189
-
190
-
191
-
192
-
193
-
194
-
195
-
196
-
197
-
198
-
199
-
200
-
201
-
202
-
203
-
204
-
205
-
206
-
207
-
208
-
209
-
210
-
211
-
212
-
213
-
214
-
215
-
216
-
217
-
218
-
219
-
220
-
221
-
222
-
223
-
224
-
225
-
226
-
227
-
228
-
229
-
230
-
231
-
232
-
233
-
234
-
235
-
236
-
237
-
238
-
239
-
240
 |
 |
